Salta al contenuto principale
Unisciti alla Community delle riparazioni - Crea un account

Canon EOS 5D Mark II Front Panel Replacement

Cosa ti serve

  1. Canon EOS 5D Mark II Front Panel Replacement, Back Panel: passo 1, immagine 1 di 1
    • Peel back the rubber cover above the in/out ports to reveal two screw heads.

    Chiedi a FixBot

    Aggiungi Commento

  2. Canon EOS 5D Mark II Front Panel Replacement: passo 2, immagine 1 di 1
    • Remove both 5.4 mm screws using a Phillips #0.

    Chiedi a FixBot

    Aggiungi Commento

  3. Canon EOS 5D Mark II Front Panel Replacement: passo 3, immagine 1 di 1
    • Lift the in/out port plastic covering from the bottom where the backup battery used to be.

    Chiedi a FixBot

    Aggiungi Commento

  4. Canon EOS 5D Mark II Front Panel Replacement: passo 4, immagine 1 di 1
    • Remove each 6.3 mm screw on either side of the viewfinder using a Phillips #0 screwdriver.

    Chiedi a FixBot

    Aggiungi Commento

  5. Canon EOS 5D Mark II Front Panel Replacement: passo 5, immagine 1 di 1
    • Remove the three 4.8 mm screws on the bottom of the back plate using a Phillips #0.

    Chiedi a FixBot

    Aggiungi Commento

  6. Canon EOS 5D Mark II Front Panel Replacement: passo 6, immagine 1 di 1
    • Peel back the rubber covering next to the menu dial to access the screw.

    • Remove the single 3.4 mm screw using a Phillips #0.

    Chiedi a FixBot

    Aggiungi Commento

  7. Canon EOS 5D Mark II Front Panel Replacement: passo 7, immagine 1 di 1
    • The back panel can now fall off easily by turning the device upside down. Be sure to catch it so the data ribbons do not tear or tug.

    Chiedi a FixBot

    Aggiungi Commento

  8. Canon EOS 5D Mark II Front Panel Replacement: passo 8, immagine 1 di 1
    • Remove each data ribbon cable from the motherboard by applying pressure down towards the motherboard and gently sliding your thumb upwards on the slot where the cable meets the motherboard. This will raise a very small clip that locks the cable in place.

    • The back panel is now free from the rest of the device.

    Chiedi a FixBot

    Aggiungi Commento

  9. Canon EOS 5D Mark II Front Panel Replacement, Front Panel: passo 9, immagine 1 di 1
    Strumento utilizzato in questo passaggio:
    Tweezers
    $4.99
    • Using tweezers, pull out the wire attaching the front panel to the motherboard.

    Chiedi a FixBot

    Aggiungi Commento

  10. Canon EOS 5D Mark II Front Panel Replacement: passo 10, immagine 1 di 1
    • Peel off the rubber cover on the front panel in order to access the screws underneath.

    Chiedi a FixBot

    Aggiungi Commento

  11. Canon EOS 5D Mark II Front Panel Replacement: passo 11, immagine 1 di 1
    • Remove each of the 4.9 mm three screws using a Phillips #0.

    Chiedi a FixBot

    Aggiungi Commento

  12. Canon EOS 5D Mark II Front Panel Replacement: passo 12, immagine 1 di 1
    • Remove the two 4.8 mm screws above where the lens would be using a Phillips #0.

    Chiedi a FixBot

    Aggiungi Commento

  13. Canon EOS 5D Mark II Front Panel Replacement: passo 13, immagine 1 di 1
    • Remove the single screw underneath where the lens would be using a Phillips #0.

    Chiedi a FixBot

    Aggiungi Commento

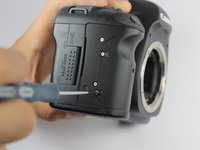
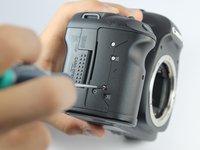
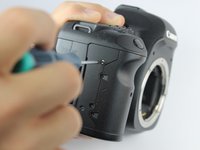
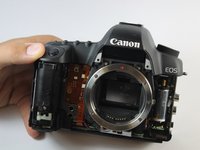
  14. Canon EOS 5D Mark II Front Panel Replacement: passo 14, immagine 1 di 3 Canon EOS 5D Mark II Front Panel Replacement: passo 14, immagine 2 di 3 Canon EOS 5D Mark II Front Panel Replacement: passo 14, immagine 3 di 3
    • Remove the four 3.0 mm screws next to the memory card reader using a Phillips #0.

    Chiedi a FixBot

    Aggiungi Commento

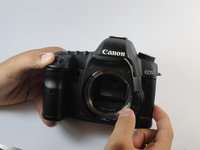
  15. Canon EOS 5D Mark II Front Panel Replacement: passo 15, immagine 1 di 2 Canon EOS 5D Mark II Front Panel Replacement: passo 15, immagine 2 di 2
    • Remove the front panel by lifting upwards from the right side where the in/out ports used to be.

    Chiedi a FixBot

    Aggiungi Commento

Conclusione

To reassemble your device, follow these instructions in reverse order.

Annulla: non ho completato questa guida.

Altre 14 persone hanno completato questa guida.

Mike Seed

Membro da: 09/22/14

3.166 Reputazione

8 guide realizzate

Team

USF Tampa, Team 1-6, Hickman Fall 2014 Membro di USF Tampa, Team 1-6, Hickman Fall 2014

USFT-HICKMAN-F14S1G6

3 Membri

17 guide realizzate

1Commento della guida

Good write-up. I just replaced my casing using these instructions.

sebastien - Rispondi Condividi

Aggiungi Commento

Visualizza statistiche:

Ultime 24 ore: 2

Ultimi 7 giorni: 17

Ultimi 30 giorni: 104

Tutti i Tempi: 12,597