Introduzione
Aggiorna il processore ad un iMac (metà 2010, 27"), da un Core i3 da 3.2GHz (Dual Core) ad un Core i7 2.93GHz (Quad Core).
Ho usato questa guida per lo smontaggio e il riassemblaggio.
http://www.btobey.com/learn/imac-ssd-ins...
Ho anche aggiunto un disco SATA da 3 TB e 32 GB di RAM, per potenziare al massimo questo sistema con OS X 10.7 Lion.
- Aggiornamento: sostituito il disco da 3 TB con un SSD da 512 GB, aggiornato a OS X 10.8 Mountain Lion
- Se cambi l'hard disk, dovrai comprare il programma"HDDFanControl" per controllare la velocità della ventola dell'hard disk ed evitare che giri sempre al massimo.
- Aprile 2013 - 1 anno dopo: il sistema è stabile come una roccia, non crasha, non ha kernel panics e non si blocca.
- Aprile 2014 - 2 anni dopo: gira senza problemi OS X 10.9 Mavericks. Il computer è sempre veloce, anche se mostra i segni dell'età rispetto alle nuove architetture Sandy Bridge, Ivy Bridge e Haswell. Le applicazioni più recenti iniziano a cigolare e ormai la "girandola" è sempre fissa.
- Aprile 2015 - 3 anni dopo. OS X 10.10.3 Yosemite. Continuity funziona ma Handoff un po' meno (manca il Bluetooth LE 4.0 integrato). Non è veloce come il mio Macbook Pro Haswell o il mio Mac Pro 2010 Xeon 12 core, ma resta valido. Con queste semplici modifiche, ho guadagnato altri anni di servizio da questa macchina "obsoleta"!
- Maggio 2016 - 4 anni dopo. Il sistema è OS X 10.11.5 El Capitan. Solo Handoff non va (vedi sopra) ma tutto il resto è perfetto. Il nuovo Blocco Note spacca, così come una versione (finalmente) stabile di Apple Mail; ora che quell'abominio di 'discoveryd' è morto ed è tornato il valido e ben collaudato 'mDNS-Responder', la rete funziona perfettamente. Continua a sorprendermi la longevità del sistema.
- Agosto 2016 - Oltre 4 anni dopo. Ora gira macOS 10.12 beta 2 Sierra senza troppi problemi eccetto i soliti bug delle versioni beta.
- Novembre 2017 - 5 anni dopo. Uso ancora questo PC ogni dannato giorno! Ora con un SSD OWC da 1TB e macOS 10.13 High Sierra con APFS. Continua ad andare senza alcun problema!
- Settembre 2018 - 6 anni dopo, si, 6 anni! e uso ancora rabbiosamente questo PC ogni giorno. Ora monta macOS 10.14 Mojave con APFS, con il Mojave Patcher di Dosdude. NB: la scheda video di questo iMac 2010 (11,3) NON è compatibile con Metal, quindi l'accelerazione video è disabilitata su Mojave, il che rende lento il refresh, Photo diventa nero e ci sono altre anomalie grafiche, ma tutto il resto funziona da Dio. Dark Mode vale l'aggiornamento.
- Non installare Mojave o Catalina, girerà a malapena e l'esperienza è terribile. Nelle parole di DosDude1: "Le schede video Radeon serie HD 5xxx e 6xxx non sono supportate, e probabilmente non lo saranno mai, da Mojave o successivi.
- Marzo 2019. Ho abbandonato Mojave 10.14. La GPU lenta lo rende del tutto inutilizzabile. Sono tornato alla configurazione High Sierra 10.13 con APFS, 1TB di SSD e 32 GB di RAM: sembra questa la configurazione ottimale per questa macchina.
Cosa ti serve
-
Attrezzo utilizzato in questo passaggio:Anti-Static Wrist Strap$7.16
-
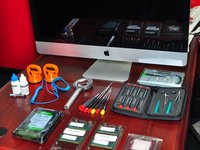
Comincia col mettere insieme tutte le parti, attrezzi, la banda anti-statica e i guanti (i guanti servono per il vetro e l'LCD).
-
Rimuovi il vetro.
-
Quindi rimuovi il display. iFixit ha delle ottime guide passo-passo su come fare.
-
-
-
Useremo un Intel Core i7 2.93GHz Quad Core, pasta termica tipo Arctic Silver e gli attrezzi di iFixit e OWC.
-
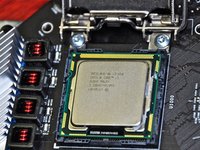
Il processore è un Core i7 Quad Core 870 2,93GHz 8MB LGA 1156 95W. Ho acquistato questa CPU usata su eBay, si trova a buon prezzo perché è un componente ormai di vecchia generazione.
-
Il processore è questo.
-
-
-
Rimuovi l'hard disk, il Superdrive e la scheda madre. Per farlo, segui le eccellenti guide di iFixit.
-
Rimuovere la scheda madre è un po' complicato, ma ho seguito questa guida (in inglese) http://www.btobey.com/learn/imac-ssd-ins...
-
Non c'è scritto in quella guida, ma per poter rimuovere la scheda madre devi togliere anche l'IR, che sta dietro al logo Apple, quello sotto al display.
-
-
-
-
Addio Core i3, benvenuto Core i7.
-
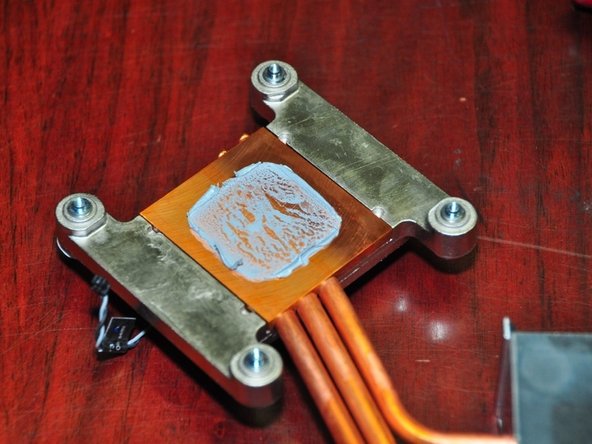
Applica la pasta termica tipo Arctic Silver usando un dito ricoperto da plastica. Spandila con uniformità solo sulla CPU. Vedi questa guida: Come applicare la pasta termica.
-
Esegui le operazioni in ordine inverso per il rimontaggio, poi entusiasmati con la tua macchina che va come una scheggia!
-
-
-
Più di 6 anni dopo, vale la pena aggiornare Mojava 10.14 per avere la Modalità Scura.
-
Questo scheda video integrata dell'iMac 2010 (11,3) *NON* è compatibile con Metal, quindi l'accelerazione video è DISABILITATA con Mojave. Questo fa si che il tuo schermo venga aggiornato lentamente, Photos diventa nero e altre anomalie grafiche, ma per il resto funziona perfettamente.
-
Tuttavia... Non insallare Mojave o Catalina su questo dispositivo. Girerà a malapena e l'esperienza è pessima. Questa affermazione è di DosDude1 stesso: "Radeon HD Serie 5xxx e 6xxx non sono, e non credo lo saranno mai, supportate da Mojave o sucessive ".
-
Dopo l'installazione di Mojave, i colori saranno invertiti. Per sistemare ciò, vai in System/Library/Extensions e metti questo file nel cestino: AMDRadeonX3000.kext e riavvia.
-


Per riassemblare il tuo dispositivo, segui queste istruzioni in ordine inverso.
Annulla: non ho completato questa guida.
Altre 107 persone hanno completato questa guida.
Un ringraziamento speciale a questi traduttori:
100%


Questi traduttori ci stanno aiutando ad aggiustare il mondo! Vuoi partecipare?
Inizia a tradurre ›

243Commenti sulla guida
Ok a word of caution about doing this. I installed an i7 in my 2010 27" i3 iMac and the system works, it reports the correct stats for the i7 but the cpu fan runs at high speed from boot. Annoying! I've researched a number of forums and found no way to resolve this, I also know there are a number of people with the same problem. So either I screwed up my logic board or it just doesn't like the i7 processor. It's the correct processor that people have used the i7 870. I'm at a loss and don't want to pull it out because it just runs so much faster for video editing but using the machine as an audio workstation is now impossible because of the noise from the fan. Also be extremely careful with the LCD screen. just having your shirt brush against it leaves marks and you can't clean it. If you think gloves will solve this you are wrong. DO NOT touch the lcd and be extremely careful with the connectors. If anyone has any ideas about the fan speed fix please let me know!
Also, I assume that you are using this processor?
Intel Core i7 870 2.93GHz 8MB LGA 1156 Quad Core Processor 95W
If you upgrade or change the Apple HD, you will need to buy HDDFanControl software to control the HDD fan which will run at full speed otherwise. I also use smcFanControl to monitor and control the other fans in the system.
As with any modification, your mileage may vary. This is a "Medium" difficulty mod and not recommended for novices to the hobby. I experienced none of the issues your have experienced.
I upgraded to Mountain Lion 10.8 when it was released to the Dev community with zero issues - currently at 10.8.2; I use this machine 'in anger' every day.
I did these mods 5 months ago, and this system has been absolutely ROCK SOLID with no crashes, no kernel panics and no freezes!
If you do the CPU replacement and afterwards the optical drive fan and cpu fan are running at max speed (very loud) then you more than likely didn't plug in the CPU temp sensor. The guide here doesn't talk about it so you can easily forget it! The connector is on the other side of the board, which is different from all the other temperature connectors and not on the same side as the heatsink screws either.
I did this and the computer ran with noisy fans. I used a fan control app to quiet it down, but it was still loud on startup until login. More importantly, the performance without the CPU temp sensor connected was terrible. It was slower than the original i5 CPU. HD videos would stutter and benchmarks gave very low scores.
Make sure you plug in the CPU temperature sensor after you put the heatsink on.
mikk -
download ssd fan control, this program let you adjust the fan speeds.