Salta al contenuto principale
Unisciti alla Community delle riparazioni - Crea un account

Brother PT-1010 Keyboard Replacement

Cosa ti serve

  1. Brother PT-1010 Keyboard Replacement, Remove Back Cover: passo 1, immagine 1 di 1
    • Flip the device over and press down on the indication arrows located at the top center of the back cover and pull it open.

    Chiedi a FixBot
  2. Brother PT-1010 Keyboard Replacement: passo 2, immagine 1 di 1
    • Remove batteries, cassette tape, and cutter blade.

    Chiedi a FixBot
  3. Brother PT-1010 Keyboard Replacement, Remove Screws: passo 3, immagine 1 di 1
    • Use a phillips size #00 screwdriver to unscrew the 5 corner screws circled in the picture.

    Chiedi a FixBot
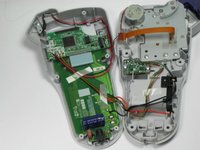
  4. Brother PT-1010 Keyboard Replacement, Separate Device: passo 4, immagine 1 di 1
    • Separate the top of the device from the bottom. Be very cautious when you separate the device, there is a ribbon attaching the top to the bottom.

    Chiedi a FixBot
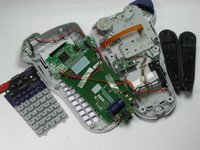
  5. Brother PT-1010 Keyboard Replacement, Remove side panels: passo 5, immagine 1 di 1
    • Remove the two black side panels. They will easily fall out so just move them to the side until you are putting your device back together.

    Chiedi a FixBot
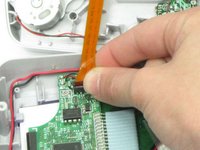
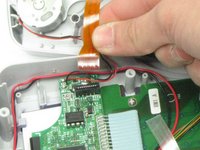
  6. Brother PT-1010 Keyboard Replacement, Pull Ribbon Out: passo 6, immagine 1 di 3 Brother PT-1010 Keyboard Replacement, Pull Ribbon Out: passo 6, immagine 2 di 3 Brother PT-1010 Keyboard Replacement, Pull Ribbon Out: passo 6, immagine 3 di 3
    • Using your index finger and thumb, pull out the golden ribbon from the green circuit board.

    Chiedi a FixBot
  7. Brother PT-1010 Keyboard Replacement, Remove Screws from Circuit Board: passo 7, immagine 1 di 1
    • Use a phillips size #00 screwdriver to remove the two screws, circled in red, from the green circuit board.

    Chiedi a FixBot
  8. Brother PT-1010 Keyboard Replacement, Remove Circuit Board: passo 8, immagine 1 di 1
    • Carefully remove the green circuit board by pulling it straight up. Be careful not to break the LCD cable ribbon that connects the circuit board to the device.

    • The ribbon is very fragile so be careful to break it when pulling up on the circuit board.

    Chiedi a FixBot
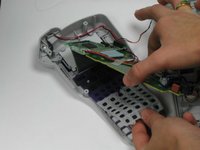
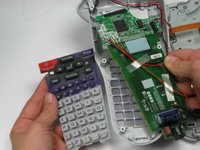
  9. Brother PT-1010 Keyboard Replacement, Peel Off Rubber Keyboard: passo 9, immagine 1 di 3 Brother PT-1010 Keyboard Replacement, Peel Off Rubber Keyboard: passo 9, immagine 2 di 3 Brother PT-1010 Keyboard Replacement, Peel Off Rubber Keyboard: passo 9, immagine 3 di 3
    • Underneath the circuit board you will find the rubber keyboard. Peel this off and remove it from the device.

    Chiedi a FixBot
Conclusione

To reassemble your device, follow these instructions in reverse order.

Haley Sweet

Membro da: 10/30/14

460 Reputazione

4 guide realizzate

Team

Baylor, Team 4-4, Williams Fall 2014 Membro di Baylor, Team 4-4, Williams Fall 2014

BU-WILLIAMS-F14S4G4

4 Membri

4 guide realizzate

3Commenti sulla guida

Hi!

Thanks for this very helpful and detailed set of instructions. One small suggestion - assuming that replacing the keyboard means you need a working one to replace the old one with, you might want to consider adding “Parts: replacement keyboard” instead of “No parts required.”

Cheers,

Maria B

Maria Bitterli - Rispondi Condividi

Please specify what is being replaced. Is the rubber keyboard the part that needs to be replaced?

Sincere Cavalier - Rispondi Condividi

Screen is dull, what to do

Judy Baranczyk - Rispondi Condividi

Aggiungi Commento

Visualizza statistiche:

Ultime 24 ore: 1

Ultimi 7 giorni: 9

Ultimi 30 giorni: 54

Tutti i Tempi: 3,564