Questa versione può contenere modifiche errate. Passa all'ultima istantanea verificata.
Cosa ti serve
-
Questo passaggio è privo di traduzione. Aiuta a tradurlo
-
Use a Phillips head screwdriver to unscrew 8 (3/4 in) Phillips screws from the housing set. Keep the screws all together.
-
Carefully remove the top housing
-
-
Questo passaggio è privo di traduzione. Aiuta a tradurlo
-
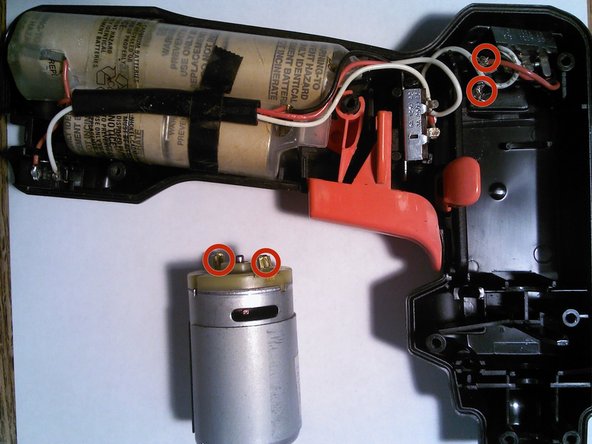
Make sure the wires previously connected to the battery are moved away from the battery terminals.
-
Make sure the drill trigger assembly stays in place or a new guide will be necessary.
-
-
Questo passaggio è privo di traduzione. Aiuta a tradurlo
-
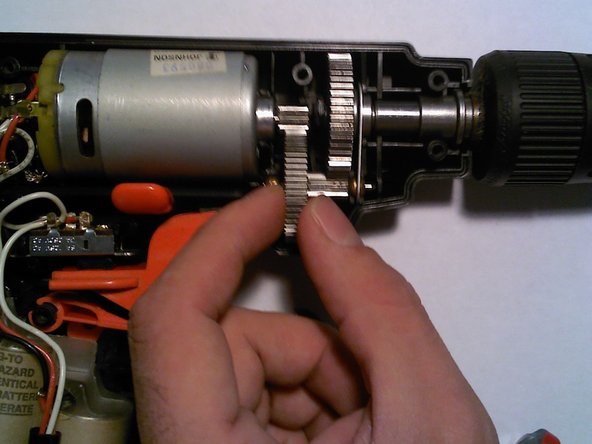
Grab the drill head with one hand and the gear with the other.
-
Pull away the second large gear from the motor gear and lift the drill head and gear up and out of the housing set.
-
-
Questo passaggio è privo di traduzione. Aiuta a tradurlo
-
Keep the drill head and gear assembly as one unit.
-
Make sure the gear assembly stays as one piece and the gold bearings do not fall off.
-
-
-
Questo passaggio è privo di traduzione. Aiuta a tradurlo
-
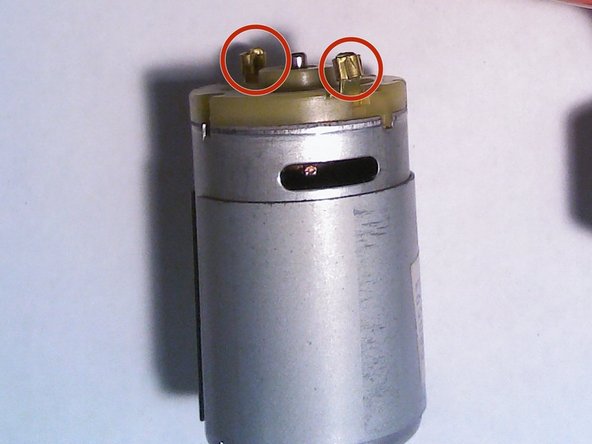
Pull out the motor and lay it next to the drill; keep in mind that the white and red wires will still be attached to the motor.
-
-
Questo passaggio è privo di traduzione. Aiuta a tradurlo
-
The needle nose pliers will be used to detach the wires.
-
WARNING: Take extra care when using the pliers to detach the wires as both wires and motor terminals are delicate.
-
Use the pliers to “slide” the narrow sides of the motor terminals where the wires are attached. Pinching terminals will make it difficult to remove the wire from the terminal.
-
-
Questo passaggio è privo di traduzione. Aiuta a tradurlo
-
Install new motor.
-
Attach wires to the new motor; make sure that the red wire is inserted back into the positive terminal on the new motor. The positive terminal is denoted by a (+) symbol.
-
The white wire will be inserted back into the negative terminal on the new motor. The negative terminal is denoted by the (-) symbol.
-
Make sure that the motor sits in the lower housing with the two terminals vertically in line, with the positive/red terminal on top.
-
The motor should fit snugly in the lower housing.
-
-
Questo passaggio è privo di traduzione. Aiuta a tradurlo
-
Use the pliers to "slide" the wide sides of the motor terminals to firmly secure the wires back to the terminals.
-
-
Questo passaggio è privo di traduzione. Aiuta a tradurlo
-
Replace the gear and drill head assembly.
-
Put the drill head back into where it originally was secured. Make sure it lines up with the molding of the plastic housing. Move the second large gear into where it locks into the motor gear.
-
Make sure that the gold bearings and other small parts lock into the designated slots in the molding of the housing.
-
-
Questo passaggio è privo di traduzione. Aiuta a tradurlo
-
Reconnect the battery wires to the battery terminals by fitting the wire terminals over the battery terminals where they were originally fitted.
-
-
Questo passaggio è privo di traduzione. Aiuta a tradurlo
-
Put the upper housing back on the drill. make sure that the upper housing lines up with the lower housing screw holes.
-
Put all eight screws back in the slots.
-
Tighten the screws back into place with the Phillips head screwdriver.
-
After the screws are back in place, make sure they are all snug.
-
-
Questo passaggio è privo di traduzione. Aiuta a tradurlo
-
Turn on and test out the drill to make sure the new motor works.
-
Congratulations on successfully installing your new motor!
-