Salta al contenuto principale
Unisciti alla Community delle riparazioni - Crea un account

Archos 101 G9 Flash Memory Replacement

Cosa ti serve

    1. Archos 101 G9 Flash Memory Replacement, Display Assembly: passo 1, immagine 1 di 1
      • Place an iFixit opening tool in the crease where the display assembly and back of the device meet.

      • Slide the tool firmly through the crease on one side of the device, twisting as you go to create separation.

      • When you reach the corner, carefully pry the two halves of the device apart.

      • There are small clips along the edges that need to stay intact in order to properly reassemble the device. Be very gentle when prying so as not to break the clips.

      • Repeat for the remaining three sides and corners.

      Chiedi a FixBot

      Aggiungi Commento

    2. Archos 101 G9 Flash Memory Replacement: passo 2, immagine 1 di 2 Archos 101 G9 Flash Memory Replacement: passo 2, immagine 2 di 2
      • Separate the halves of the device.

      • Ensure that you separate from the top and you keep the bottoms of both pieces near each other so as not to damage the ribbon cables that connect the halves.

      Chiedi a FixBot

      Aggiungi Commento

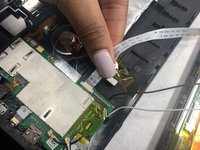
    3. Archos 101 G9 Flash Memory Replacement: passo 3, immagine 1 di 2 Archos 101 G9 Flash Memory Replacement: passo 3, immagine 2 di 2
      • Gently remove both ribbon cables from their sockets on the motherboard.

      Chiedi a FixBot

      Aggiungi Commento

    4. Archos 101 G9 Flash Memory Replacement: passo 4, immagine 1 di 1
      • Remove the white and black coaxial cables with gold tips from the motherboard.

      Chiedi a FixBot

      Aggiungi Commento

    5. Archos 101 G9 Flash Memory Replacement: passo 5, immagine 1 di 1
      • Remove the display assembly from the back panel.

      Chiedi a FixBot

      Aggiungi Commento

    1. Archos 101 G9 Flash Memory Replacement, Motherboard: passo 6, immagine 1 di 1
      • Remove the 2 mm screw that holds the motherboard in place using a Phillips #0 screwdriver.

      Chiedi a FixBot

      Aggiungi Commento

    2. Archos 101 G9 Flash Memory Replacement: passo 7, immagine 1 di 1
      • Carefully remove the ribbon cable from its socket on the motherboard.

      Chiedi a FixBot

      Aggiungi Commento

    3. Archos 101 G9 Flash Memory Replacement: passo 8, immagine 1 di 1
      • Remove the tape covering all of the solder connections on the motherboard.

      Chiedi a FixBot

      Aggiungi Commento

    4. Archos 101 G9 Flash Memory Replacement: passo 9, immagine 1 di 1
      • Desolder all six of the connections that were underneath the tape.

      Chiedi a FixBot

      Aggiungi Commento

    5. Archos 101 G9 Flash Memory Replacement: passo 10, immagine 1 di 1
      • Remove the motherboard from the tablet.

      Chiedi a FixBot

      Aggiungi Commento

    1. Archos 101 G9 Flash Memory Replacement, Flash Memory: passo 11, immagine 1 di 1
      • Flip the motherboard around to the backside and pry off the silver covering using a nylon spudger.

      Chiedi a FixBot

      Aggiungi Commento

    2. Archos 101 G9 Flash Memory Replacement: passo 12, immagine 1 di 1
      • Remove the largest black rectangle using the Hakko microsoldering kit.

      Chiedi a FixBot

      Aggiungi Commento

Conclusione

To reassemble your device, follow these instructions in reverse order.

Annulla: non ho completato questa guida.

Deneille Davids

Membro da: 10/28/21

181 Reputazione

2 guide realizzate

Team

UMass Dartmouth, Team 4-1, Gulbrandsen Fall 2021 Membro di UMass Dartmouth, Team 4-1, Gulbrandsen Fall 2021

UMASSD-GULBRANDSEN-F21S4G1

3 Membri

12 guide realizzate

0Commenti sulla guida

Aggiungi Commento

Visualizza statistiche:

Ultime 24 ore: 2

Ultimi 7 giorni: 3

Ultimi 30 giorni: 15

Tutti i Tempi: 592