Salta al contenuto principale
Unisciti alla Community delle riparazioni - Crea un account

Amazon Kindle DX LCD Replacement

Cosa ti serve

  1. Amazon Kindle DX LCD Replacement, Liquid Crystal Display (LCD): passo 1, immagine 1 di 1
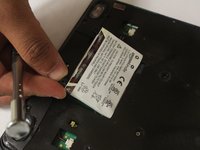
    • Take your Kindle and place it screen side down in order to open it from the back. Use the opening tool from the ifixit tool kit and insert it between the metal casing and plastic top piece.

    Chiedi a FixBot

    Aggiungi Commento

  2. Amazon Kindle DX LCD Replacement: passo 2, immagine 1 di 1
    • Once enough pressure is applied the small piece will pop open.

    Chiedi a FixBot

    Aggiungi Commento

  3. Amazon Kindle DX LCD Replacement: passo 3, immagine 1 di 1
    • Remove the plastic piece.

    Chiedi a FixBot

    Aggiungi Commento

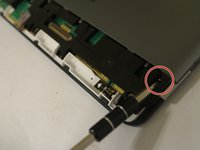
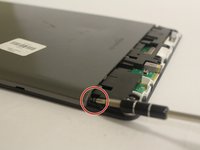
  4. Amazon Kindle DX LCD Replacement: passo 4, immagine 1 di 2 Amazon Kindle DX LCD Replacement: passo 4, immagine 2 di 2
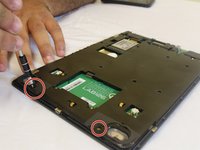
    • Once the small plastic piece is removed you will need to locate two 40mm screws on both corners of the remaining casing. Use the PH000 Philips Head Screwdriver from the tool kit to remove both screws.

    Chiedi a FixBot

    Aggiungi Commento

  5. Amazon Kindle DX LCD Replacement: passo 5, immagine 1 di 1
    • Use the opening tool again to take the off the bigger metal piece.

    Chiedi a FixBot

    Aggiungi Commento

  6. Amazon Kindle DX LCD Replacement: passo 6, immagine 1 di 1
    • Once the piece removed, locate the battery.

    Chiedi a FixBot

    Aggiungi Commento

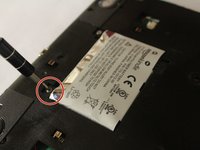
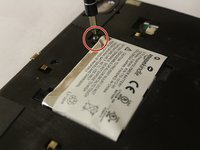
  7. Amazon Kindle DX LCD Replacement: passo 7, immagine 1 di 2 Amazon Kindle DX LCD Replacement: passo 7, immagine 2 di 2
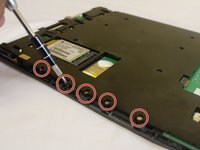
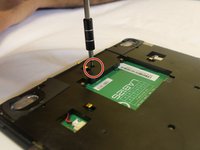
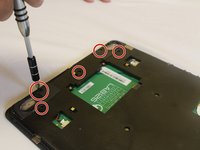
    • Locate the two 30mm screws securing the battery on the bottom of the Kindle DX. Use the PH00 Philips head screw driver from the tool kit to remove both screws.

    Chiedi a FixBot

    Aggiungi Commento

  8. Amazon Kindle DX LCD Replacement: passo 8, immagine 1 di 2 Amazon Kindle DX LCD Replacement: passo 8, immagine 2 di 2
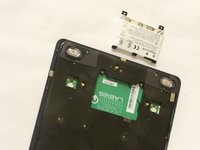
    • Take the battery off once the screws have been removed.

    Chiedi a FixBot

    Aggiungi Commento

  9. Amazon Kindle DX LCD Replacement: passo 9, immagine 1 di 2 Amazon Kindle DX LCD Replacement: passo 9, immagine 2 di 2
    • Unscrew the 30 mm screws using a Phillips #000 screwdriver as shown in the picture.

    Chiedi a FixBot

    Aggiungi Commento

  10. Amazon Kindle DX LCD Replacement: passo 10, immagine 1 di 2 Amazon Kindle DX LCD Replacement: passo 10, immagine 2 di 2
    • Unscrew the 30 mm screws using a Phillips #000 screwdriver as demonstrated in the picture.

    Chiedi a FixBot

    Aggiungi Commento

  11. Amazon Kindle DX LCD Replacement: passo 11, immagine 1 di 1
    • Remove the black case to reveal the mother board.

    Chiedi a FixBot

    Aggiungi Commento

  12. Amazon Kindle DX LCD Replacement: passo 12, immagine 1 di 1
    • Remove the motherboard from the display assembly.

    Chiedi a FixBot

    Aggiungi Commento

Conclusione

To reassemble your device, follow these instructions in reverse order.

Annulla: non ho completato questa guida.

Team

USF Tampa, Team 1-5, Cagle Fall 2016 Membro di USF Tampa, Team 1-5, Cagle Fall 2016

USFT-CAGLE-F16S1G5

3 Membri

10 guide realizzate

3Commenti sulla guida

Guide is incomplete :(

Robert Rogers - Rispondi Condividi

I can follow and understand up to step 11.

Steps 12 and 13 loose me, why would one need to remove the metal protection lid / shield? There does not seem to be any screws covered by the lids that need to be removed.

one would need to unclip the screen from the motherboard the lead off board from the wireless card to aerial and unscrew the remaining motherboard screws at least before you could remove the motherboard to access the screen to replace it.

Terry Mummery - Rispondi Condividi

Guide is useless and should be removed or replaced.

golan.benoni - Rispondi Condividi

Aggiungi Commento

Visualizza statistiche:

Ultime 24 ore: 2

Ultimi 7 giorni: 15

Ultimi 30 giorni: 73

Tutti i Tempi: 4,412