Introduzione
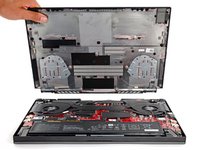
Use this guide to replace the lower case on your ASUS TUF Dash F15.
Before you perform this repair, be sure to completely power off and unplug your laptop. Make sure the laptop is not in standby, sleep, or hibernation mode.
Cosa ti serve
-
-
Remove the 14 Phillips screws securing the lower case:
-
Seven 8.8 mm screws
-
Seven 10.1 mm screws
-
Use a Phillips screwdriver to loosen the captive screw.
-
-
-
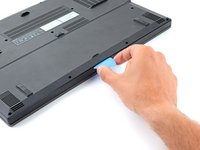
Insert an opening pick between the lower case and the chassis on the front right edge near the captive screw.
-
-
-
-
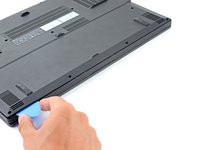
Slide the pick along the front edge to release the clips securing the lower case.
-
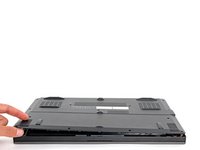
Repeat this process along the perimeter of the lower case to release the remaining clips.
-


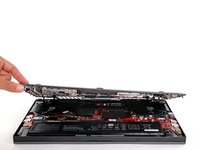
To reassemble your device, follow these instructions in reverse order.
Take your e-waste to an R2 or e-stewards certified recycler.
Repair didn't go as planned? Try some basic troubleshooting, or ask our ASUS TUF answers community for help.
To reassemble your device, follow these instructions in reverse order.
Take your e-waste to an R2 or e-stewards certified recycler.
Repair didn't go as planned? Try some basic troubleshooting, or ask our ASUS TUF answers community for help.
Annulla: non ho completato questa guida.
Altre 4 persone hanno completato questa guida.


4 Commenti
do you know how wide the screws are cuz i lost 2 of them and i have trouble buying them and i only found universal scews that are good for lenght but i dont know wide
I also lost some screws :S
I'm missing two of the bigger screws too. I don't think its a coincidence but a mistake 'cause I have opened my laptop twice and the two screws were missing on the first time I opened it.
Hi there, I hope you're doing well. I was just wondering if there is any possibility to buy a motherboard of a newer model of this laptop(one that has the same body) and replace it with mine. Because I have the 3050 ti i5 but I would like to upgrade it to i7 3070 version (it seems to have the same shape and size). Do you think this is possible?