31 2000771
Death or serious injury can result from failure to follow these instructions.
- Service by a qualified service technician only.
- Shut off gas supply and disconnect power before servicing.
- Reconnect all grounding devices after service.
- Replace all parts and panels before operating.
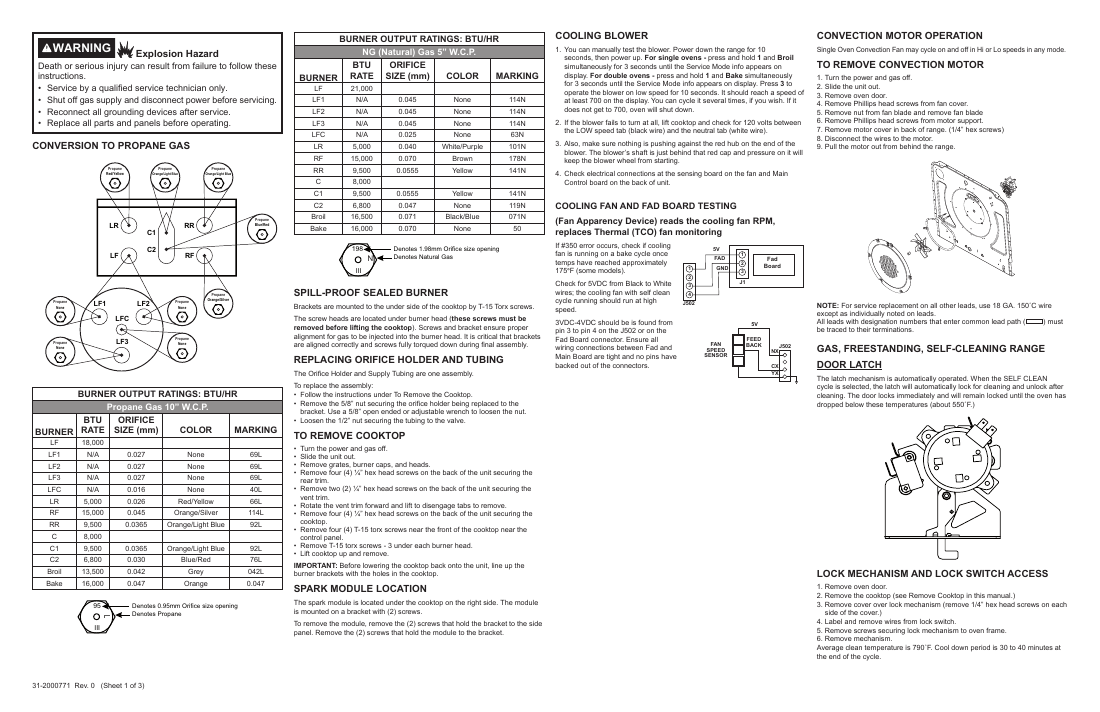
CONVERSION TO PROPANE GAS
BURNER OUTPUT RATINGS: BTU/HR
| Propane Gas 10' W.C.P. | ||||
|---|---|---|---|---|
| BURNER | BTU RATE | ORIFICE SIZE (mm) | COLOR | MARKING |
| LF | 18,000 | |||
| LF1 | N/A | 0.027 | None | 69L |
| LF2 | N/A | 0.027 | None | 69L |
| LF3 | N/A | 0.027 | None | 69L |
| LFC | N/A | 0.016 | None | 40L |
| LR | 5,000 | 0.026 | Red/Yellow | 66L |
| RF | 15,000 | 0.045 | Orange/Silver | 114L |
| RR | 9,500 | 0.0365 | Orange/Light Blue | 92L |
| C | 8,000 | |||
| C1 | 9,500 | 0.0365 | Orange/Light Blue | 92L |
| C2 | 6,800 | 0.030 | Blue/Red | 76L |
| Broil | 13,500 | 0.042 | Grey | 042L |
| Bake | 16,000 | 0.047 | Orange | 0.047 |
Table Caption: This table provides specifications for various propane gas burners operating at 10' W.C.P., including their BTU rate, orifice size in millimeters, color, and marking. It details information for different burner types such as LF, LR, RF, RR, C, and specific functions like Broil and Bake.
BURNER OUTPUT RATINGS: BTU/HR
| NG (Natural) Gas 5' W.C.P. | ||||
|---|---|---|---|---|
| BURNER | BTU RATE | ORIFICE SIZE (mm) | COLOR | MARKING |
| LF | 21,000 | |||
| LF1 | N/A | 0.045 | None | 114N |
| LF2 | N/A | 0.045 | None | 114N |
| LF3 | N/A | 0.045 | None | 114N |
| LFC | N/A | 0.025 | None | 63N |
| LR | 5,000 | 0.040 | White/Purple | 101N |
| RF | 15,000 | 0.070 | Brown | 178N |
| RR | 9,500 | 0.0555 | Yellow | 141N |
| C | 8,000 | |||
| C1 | 9,500 | 0.0555 | Yellow | 141N |
| C2 | 6,800 | 0.047 | None | 119N |
| Broil | 16,500 | 0.071 | Black/Blue | 071N |
| Bake | 16,000 | 0.070 | None | 50 |
Table Caption: This table provides specifications for various gas burners operating at 5' W.C.P. (water column pressure) for Natural Gas, detailing their BTU rate, orifice size in millimeters, color, and marking. It lists individual burner types such as LF, LFC, LR, RF, RR, C, C1, C2, Broil, and Bake.
SPILL-PROOF SEALED BURNER
Brackets are mounted to the under side of the cooktop by T-15 Torx screws.
The screw heads are located under burner head ( these screws must be removed before lifting the cooktop ). Screws and bracket ensure proper alignment for gas to be injected into the burner head. It is critical that brackets are aligned correctly and screws fully torqued down during final assembly.
REPLACING ORIFICE HOLDER AND TUBING
The Orifice Holder and Supply Tubing are one assembly.
To replace the assembly:
- Follow the instructions under To Remove the Cooktop.
- Remove the 5/8' nut securing the orifice holder being replaced to the bracket. Use a 5/8' open ended or adjustable wrench to loosen the nut.
- Loosen the 1/2' nut securing the tubing to the valve.
TO REMOVE COOKTOP
- Turn the power and gas off.
- Slide the unit out.
- Remove grates, burner caps, and heads.
- Remove four (4) ¼' hex head screws on the back of the unit securing the rear trim.
- Remove two (2) ¼' hex head screws on the back of the unit securing the vent trim.
- Rotate the vent trim forward and lift to disengage tabs to remove.
- Remove four (4) ¼' hex head screws on the back of the unit securing the cooktop.
- Remove four (4) T-15 torx screws near the front of the cooktop near the control panel.
- Remove T-15 torx screws - 3 under each burner head.
- Lift cooktop up and remove.
IMPORTANT: Before lowering the cooktop back onto the unit, line up the burner brackets with the holes in the cooktop.
SPARK MODULE LOCATION
The spark module is located under the cooktop on the right side. The module is mounted on a bracket with (2) screws.
To remove the module, remove the (2) screws that hold the bracket to the side panel. Remove the (2) screws that hold the module to the bracket.
COOLING BLOWER
- Y ou can manually test the blower. Power down the range for 10 seconds, then power up. For single ovens press and hold 1 and Broil simultaneously for 3 seconds until the Service Mode info appears on display. For double ovens press and hold 1 and Bake simultaneously for 3 seconds until the Service Mode info appears on display. Press 3 to operate the blower on low speed for 10 seconds. It should reach a speed of at least 700 on the display. You can cycle it several times, if you wish. If it does not get to 700, oven will shut down.
- If the blower fails to turn at all, lift cooktop and check for 120 volts between the LOW speed tab (black wire) and the neutral tab (white wire).
- Also, make sure nothing is pushing against the red hub on the end of the blower. The blower's shaft is just behind that red cap and pressure on it will keep the blower wheel from starting.
- Check electrical connections at the sensing board on the fan and Main Control board on the back of unit.
COOLING FAN AND FAD BOARD TESTING
(Fan Apparency Device) reads the cooling fan RPM, replaces Thermal (TCO) fan monitoring
If #350 error occurs, check if cooling fan is running on a bake cycle once temps have reached approximately 175 ° F (some models).
Check for 5VDC from Black to White wires; the cooling fan with self clean cycle running should run at high speed.
3VDC-4VDC should be is found from pin 3 to pin 4 on the J502 or on the Fad Board connector. Ensure all wiring connections between Fad and Main Board are tight and no pins have backed out of the connectors.
CONVECTION MOTOR OPERATION
Single Oven Convection Fan may cycle on and off in Hi or Lo speeds in any mode.
TO REMOVE CONVECTION MOTOR
- Turn the power and gas off.
- Slide the unit out.
- Remove oven door.
- Remove Phillips head screws from fan cover.
- Remove nut from fan blade and remove fan blade
- Remove Phillips head screws from motor support.
- Remove motor cover in back of range. (1/4' hex screws)
- Disconnect the wires to the motor.
- Pull the motor out from behind the range.
NOTE: For service replacement on all other leads, use 18 GA. 150˚C wire except as individually noted on leads.
All leads with designation numbers that enter common lead path ( ) must be traced to their terminations.
GAS, FREESTANDING, SELF-CLEANING RANGE DOOR LATCH
The latch mechanism is automatically operated. When the SELF CLEAN cycle is selected, the latch will automatically lock for
