Salta al contenuto principale

Cosa ti serve

Questo smontaggio non è una guida di riparazione. Per riparare il tuo American Era Electric Rice Cooker, usa il nostro manuale di assistenza.

  1. American Era Electric Rice Cooker Teardown, Rice Cooker Teardown: passo 1, immagine 1 di 1
    • Start with the rice cooker unplugged, on a flat surface.

  2. American Era Electric Rice Cooker Teardown, Remove Pot and Lid: passo 2, immagine 1 di 3 American Era Electric Rice Cooker Teardown, Remove Pot and Lid: passo 2, immagine 2 di 3 American Era Electric Rice Cooker Teardown, Remove Pot and Lid: passo 2, immagine 3 di 3
    • Remove the lit and pot and turn upside down.

  3. American Era Electric Rice Cooker Teardown, Remove Bottom Plate: passo 3, immagine 1 di 3 American Era Electric Rice Cooker Teardown, Remove Bottom Plate: passo 3, immagine 2 di 3 American Era Electric Rice Cooker Teardown, Remove Bottom Plate: passo 3, immagine 3 di 3
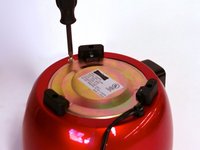
    • Use a Phillips #1 screwdriver to remove the two screws.

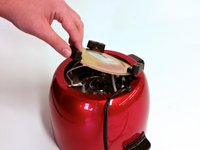
    • Remove the bottom plate by lifting one of the rubber feet.

  4. American Era Electric Rice Cooker Teardown, Remove Internal Screws: passo 4, immagine 1 di 2 American Era Electric Rice Cooker Teardown, Remove Internal Screws: passo 4, immagine 2 di 2
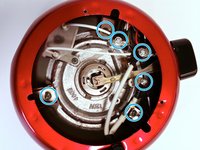
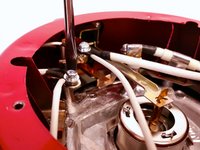
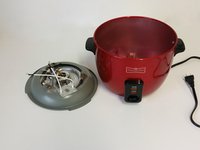
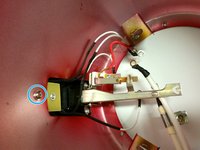
    • We're inside! Here's our first look at the circuitry. Let's take it apart.

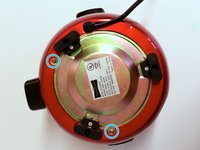
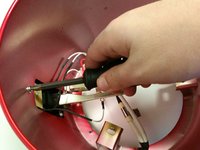
    • Use a 3/8" or 8 mm flathead screwdriver to remove these six screws.

  5. American Era Electric Rice Cooker Teardown, Bend Tab: passo 5, immagine 1 di 2 American Era Electric Rice Cooker Teardown, Bend Tab: passo 5, immagine 2 di 2
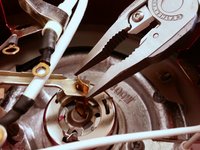
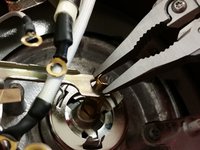
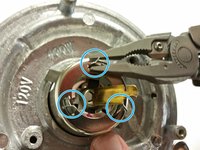
    • Find the metal tab that connects the center button to the switch lever.

    • Use pliers to bend the metal tab into a U shape.

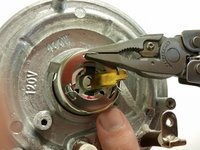
    • Align the tab with the slot so that it falls through.

  6. American Era Electric Rice Cooker Teardown, Remove Heating Element: passo 6, immagine 1 di 2 American Era Electric Rice Cooker Teardown, Remove Heating Element: passo 6, immagine 2 di 2
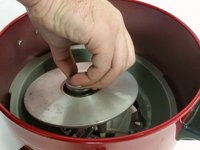
    • Turn the rice cooker right-side up.

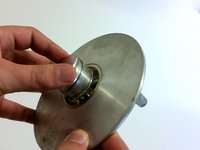
    • Grab the center button and pull the heating plate upward. The gray metal ring should come out with it.

  7. American Era Electric Rice Cooker Teardown, Remove Temp. Sensor: passo 7, immagine 1 di 1
    • Use a Phillips #1 screwdriver to remove the screw connecting the temperature sensor to the heating element.

    • Remove the temperature sensor.

  8. American Era Electric Rice Cooker Teardown, Remove Center Button: passo 8, immagine 1 di 3 American Era Electric Rice Cooker Teardown, Remove Center Button: passo 8, immagine 2 di 3 American Era Electric Rice Cooker Teardown, Remove Center Button: passo 8, immagine 3 di 3
    • Three bent metal tabs connect the center button to the heating element. Use pliers to flatten these three tabs.

    • Remove the center button from the heating element.

  9. American Era Electric Rice Cooker Teardown, Remove Control Panel: passo 9, immagine 1 di 2 American Era Electric Rice Cooker Teardown, Remove Control Panel: passo 9, immagine 2 di 2
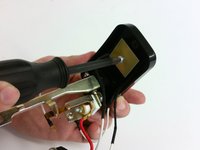
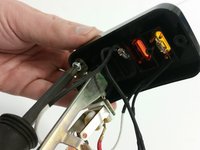
    • Use a Phillips #1 screwdriver to remove the screw that secures the control panel.

    • Remove the control panel from the outside of the rice cooker.

  10. American Era Electric Rice Cooker Teardown, Disassemble Control Panel: passo 10, immagine 1 di 3 American Era Electric Rice Cooker Teardown, Disassemble Control Panel: passo 10, immagine 2 di 3 American Era Electric Rice Cooker Teardown, Disassemble Control Panel: passo 10, immagine 3 di 3
    • Use a Phillips #1 screwdriver to remove the screw securing the rectangular fiberglass plate. This should free the two light bulbs.

    • Use a Phillips #1 screwdriver to remove two screws securing the switch lever to the control panel plate. Remove the switch lever.

  11. American Era Electric Rice Cooker Teardown, Disassemble Switch: passo 11, immagine 1 di 2 American Era Electric Rice Cooker Teardown, Disassemble Switch: passo 11, immagine 2 di 2
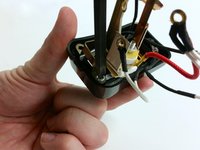
    • Use pliers or hex wrench to hold the nut while using a Phillips #1 screwdriver to remove the screw holding the switch assembly together.

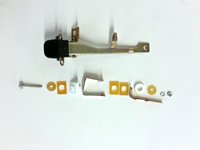
    • Pull the switch assembly apart into its parts. Careful not to lose any of these small parts!

  12. American Era Electric Rice Cooker Teardown, All Done!: passo 12, immagine 1 di 1
    • And here we have it: a fully disassembled rice cooker.

Travis Taylor

Membro da: 04/12/13

464 Reputazione

5 Guide realizzate

Team

Cal Poly, Team 10-40, Amido Spring 2013 Membro di Cal Poly, Team 10-40, Amido Spring 2013

CPSU-AMIDO-S13S10G40

4 Membri

37 Guide realizzate

0 Commenti

Aggiungi Commento

Visualizza Statistiche:

Ultime 24 Ore: 1

Ultimi 7 Giorni: 10

Ultimi 30 Giorni: 43

Tutti i Tempi: 3,959