Salta al contenuto principale

Lanciato nel giugno 2009 / processore Core 2 Duo da 2,53 GHz

170 Domande Visualizza tutte

How to remove PH000 keyboard stripped screws?

Hello,

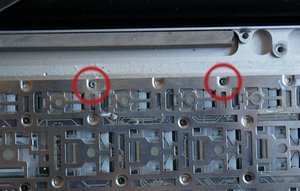
I want to replace my keyboard, but I have an issue with two of the tiny screws of the old keyboard.

Block Image

I tried with no success :

- using PH00 and PH000 screwdrivers with a rubber band

- using glue with a PH000 bit (i waited for 30 minutes fo the glue to dry)

- using various other bit to get a grip

I think i only have two options now :

- use a rotary tool to make a mark horizontal mark in the head of the screw, and hope to unscrew with another screwdriver

- use soldering iron to attach the screw with a metalic part or a screwdriver bit, and unscrew it this way.

I don't know what's best, or what could work... those screw are so tiny it make the work harder. Plus, the two solutions above may damage the old keyboard (but this is not the most important I guess, since I'm replacing it).

What do you think, any other ideas, or advice ?

Thanks !

Risposto! Visualizza la risposta Anch'io ho questo problema

Questa è una buona domanda?

Punteggio 4
2 Commenti

Hi there I don't know if you're still active here but I really need help I have the same problem and have been trying for over a month now.

I've tried the same things you had tried with no success and just had some questions.

Which rotary tool did you use?

How did you go about removing the screws?

How did the stuck screws affect the keyboard when typing?

Probably talking to myself as this post was 4 years ago but heyho I'm desperate so.

da

@Ian Baah

Hi, i don’t remember exactly what kind of rotary tool was used to drill the head of the screws. I think it was some kind of dremel.

All the other screws were removed with a PH000 screwdriver.

The stuck screws are not a problem with my laptop, everything works fine. Only the mute key is a little hard to get but definitively not a problem to me. I guess i was lucky thoses stucked screws were not in the middle of the keyboard.

da

Aggiungi un commento

3 Risposte

Soluzione Prescelta

Jp,

I would most definitely be careful in what you chose to do next. The more that you work at trying to remove the screw, the more likely you are to continue to chip away at bits of the head of the screw which would make them easier to remove.

Unless you have some precision using a rotary tool, I would not advise it being your first option in cutting into the remaining part of the head of the screws. You might find it more difficult than you had before to get a grip with a driver onto the head.

Soldering to the screw could also make for an even messier problem. However, it would probably the safer of the two options you were considering. Unless you are able to solder a strong connection onto the screw heads, you won't find it to be much more use if the solder doesn't provide any more grip or strength in turning the screw to remove it.

You said that you are replacing the keyboard anyways. So how important is it to you cost wise and time wise that these screws be removed from the old keyboard? You may find that spending time on this may be more work than its worth.

Questa risposta è stata utile?

Punteggio 2

5 Commenti:

Jared, thanks for your answer.

Well, I have no experience of these tools (the rotary tool or the soldering iron). So I guess there are big chances that I damage the old keyboard anyway. But it's not a real problem because I already get a new one for replacement.

Yet, to place the new keyboard I have to get rid of the two damaged screws that keep the old keyboard fixed to the case.

If i follow you, you recommend to let the damaged screws in place in the case, and just remove the heads, right ?

But how can I do this ? Someone recommended me to use a screwdriver and a hammer to do this, but i'm not confident with this technique.

da

Thanks for the advice jmw130.

I don't think the Pliers could help in this situation, the way the keyboard is designed don't let me enough space to grab the edges of the screw head. But i will give a try to the Precision Screw Extractor Set.

If this fails too.... in a desperation move I will try the rotary tool to get rid of the screws heads, even if the body of the screws remain in the topcase.

I will post there to keep you guys updated :)

da

Best wishes on your repair, Jp!

da

Okay so... it fixed it :)

The Precision Screw Extractor Set was not helpful... either the PH000 screws of the keyboard are too tiny, or too damaged, but it didn't helped in my case.

I had to drill the head of the two damaged screws with a rotary tool. The body of those screws still remain in the case... but i had no other choice at this stage.

After this I managed to replace the keyboard, and now i'm typing this message from my repaired laptop :)

The only issue is that the two damaged screws were very close one to another (you can check this on the pictures). Hence, the mute key key, juste above the missing screws, doesn't not respond very well. But this is not a big deal...

Thanks for your help :)

da

JMW130, your answer is ill-informed and unhelpful.

You say "So how important is it to you cost wise and time wise that these screws be removed from the old keyboard?"

Your answer is unhelpful because the screws are not screwed into the old keyboard. Therefore they do not need to be removed from the old keyboard.

The screws are screwed into, and need to be removed from, the underside of the top-case of the Macbook, NOT the keyboard.

Your answer shows that you are inexperienced and unaware of this very important fact, and it nullifies the value of what you are recommending.

da

Aggiungi un commento

Okay with no experience with these tools, I would definitely not recommend attempting a cut into or soldering onto such small screws...

If it is necessary for you to remove the screws in order to complete your keyboard replacement, I would look into using some Screw Extracting Pliers (Screw Extracting Pliers) or Precision Screw Extractor Set (Precision Screw Extractor Set) both run for about $20-$25 USD. One of those may be a better tool to use rather than a rotary tool or soldering iron.

You'll want to remove the entire screws which are striped and replace them with ones that are not in case you'll need to remove them again in the future and to better be able to install them again to finish your repair.

With the pliers or extraction tools, you should have the best grip on the head of the screws to remove them.

Immagine Precision Screw Extractor Set

Prodotto

Precision Screw Extractor Set

$24.99

Immagine Screw Extracting Pliers

Prodotto

Screw Extracting Pliers

$19.99

Questa risposta è stata utile?

Punteggio 0
Aggiungi un commento

I have had experience with this and I succeeded but I had to destroy the old keyboard to do it. But it wasn’t working properly so it was destined for the trash anyway.

I used a pair of cutters (tin-snips or wire cutters) and cut the metal of the old keyboard in a circle around the stuck screw. That allowed me to remove what was left of the old keyboard.

I was left with the stuck screw and a circle of mangled metal (from the old keyboard), about 3/4 inch in diameter, around it. I could then grab the mangled metal and slowly unscrew it which dragged the stuck screw along with it. A little super glue here might help but I didn’t need it.

It also seems possible that I could have lifted up the mangled metal and folded it upwards on each side of the screw to hold it, then unscrew the whole thing by holding the mangled metal, tightly folded up, with a pair of pliers.

If the mangled metal won’t hold the screw enough to unscrew it you can cut into the mangled metal as close to the screw as you can get. Then lift up one side of the mangled metal and bend it backwards and forwards, up and down, multiple times until it breaks away from around the screw. You should then have enough of the screw sticking out to be able to grab it with a small pair of pliers and unscrew it by hand with the pliers.

When I replaced a keyboard I had three screws that were stuck and needed this “treatment”. I got them all out, but the old keyboard was not fit for anything by the time I’d finished with it.

Be careful of cuts though. That metal is very sharp when you cut into it and it will slice into your fingers if you’re not careful.

Questa risposta è stata utile?

Punteggio 0
Aggiungi un commento

Aggiungi la tua risposta

Jp sarà eternamente grato.
Visualizza Statistiche:

Ultime 24 Ore: 5

Ultimi 7 Giorni: 23

Ultimi 30 Giorni: 91

Tutti i Tempi: 8,350