Questa versione può contenere modifiche errate. Passa all'ultima istantanea verificata.
Cosa ti serve
-
-
Nei seguenti passaggi, rimuoverai la grata superiore, assicurata al pannello dai tredici fermi di plastica mostrati nella foto.
-
-
-
Orienta la console in modo che le parole "XBOX 360" sui lati siano rivolte verso l'alto e il frontalino sia rivolto verso sinistra.
-
Inserire lo spudger di metallo tra lo sfiato superiore e la mascherina superiore vicino al retro della Xbox.
-
Ruota lo spudger verso l´esterno dalla console, facendo leva sul bordo dello sfiato della ventola fino a liberare i due fermagli di plastica.
-
-
-
Inserisci lo spudger tra la grata di sfogo e la cornice superiore, lungo il lato sinistro della console.
-
Nello stesso modo descritto sopra, inizia a far leva sul lato sinistro dello sfiato superiore per staccarlo dalla cornice.
-
Continua a fare leva lungo tutto il lato sinistro per sganciare tutte le clip su questo lato.
-
-
Questo passaggio è privo di traduzione. Aiuta a tradurlo
-
Lift the fan vent up from the freed left side to disengage the clips along the right side.
-
Remove the entire fan vent.
-
-
Questo passaggio è privo di traduzione. Aiuta a tradurlo
-
In the following steps, you will be releasing the six clips highlighted in red.
-
-
Questo passaggio è privo di traduzione. Aiuta a tradurlo
-
Insert a metal spudger through the front-most slit on the left edge of the top bezel and between the bottom edge of the clip and the left case, as described above.
-
Simultaneously rotate the spudger away from the console and pull up on the top bezel to free the clip.
-
-
Questo passaggio è privo di traduzione. Aiuta a tradurlo
-
Using the same method described above, free the two remaining clips along the left edge of the top bezel.
-
-
Questo passaggio è privo di traduzione. Aiuta a tradurlo
-
Grab the entire top panel with your hands, lift up the entire left edge high enough to rest the separated clips on top of the left case.
-
-
Questo passaggio è privo di traduzione. Aiuta a tradurlo
-
Rotate the console so that the rear of the Xbox 360 S is facing to the right, and the right case is facing you.
-
Insert a metal spudger through the rear-most slit on the right edge of the top bezel and between the bottom edge of the clip and the right case.
-
While lifting up on the top bezel with your fingers, rotate the spudger away from the console to free the clip.
-
-
Questo passaggio è privo di traduzione. Aiuta a tradurlo
-
In the same manner as described in the previous steps, release the middle and front clips along the right edge of the top panel.
-
-
Questo passaggio è privo di traduzione. Aiuta a tradurlo
-
Push the latch holding down the hard drive cover to the left.
-
Pull the hard drive cover away from the console.
-
-
Questo passaggio è privo di traduzione. Aiuta a tradurlo
-
Firmly grasp the fabric tab labeled with the size of the hard drive (e.g. "250 GB") attached to the hard drive.
-
Pull the hard drive straight out of the console.
-
-
Questo passaggio è privo di traduzione. Aiuta a tradurlo
-
It is attached to the bottom panel by the seven clips shown.
-
-
Questo passaggio è privo di traduzione. Aiuta a tradurlo
-
Insert a metal spudger between the black bottom vent and the silver rim of the bottom bezel, in the rear right corner of the vent.
-
Rotate the spudger away from the console, prying the vent up from the bottom bezel.
-
-
Questo passaggio è privo di traduzione. Aiuta a tradurlo
-
In the same manner as described above, pry the two remaining clips on the bottom right edge.
-
-
Questo passaggio è privo di traduzione. Aiuta a tradurlo
-
Remove the bottom vent by lifting it away from the bottom bezel.
-
-
Questo passaggio è privo di traduzione. Aiuta a tradurlo
-
The clips shown in red can be detached by inserting a metal spudger underneath the bottom edge of the clip. Once underneath the bottom edge, simply prying away from the console will free the clip.
-
-
Questo passaggio è privo di traduzione. Aiuta a tradurlo
-
Insert a metal spudger through the slit near the rear left corner of the bottom bezel.
-
Rotate the spudger away from the device while lifting the rear bezel up with the other hand.
-
-
Questo passaggio è privo di traduzione. Aiuta a tradurlo
-
Insert a metal spudger through the left middle slit of the bottom bezel, and between the bottom edge of the clip and the left case.
-
Simultaneously pull the bottom bezel up and rotate the spudger away from the console to free the clip.
-
In a similar fashion, free the clip at the front of the bottom bezel's left edge.
-
-
-
Questo passaggio è privo di traduzione. Aiuta a tradurlo
-
Insert the spudger into the rear-most slit on the right edge of the bottom bezel, and wedge it behind the clip by pushing the spudger down while pushing the tip of the spudger against the right case.
-
Simultaneously release the clip and pull the bottom bezel up.
-
-
Questo passaggio è privo di traduzione. Aiuta a tradurlo
-
Insert a spudger between the silver rim and bottom bezel directly above the clip shown.
-
Release the clip while pulling up on the bottom bezel.
-
-
Questo passaggio è privo di traduzione. Aiuta a tradurlo
-
Lift the left edge of the bottom bezel up enough to gain clearance.
-
Insert a metal spudger behind the left edge of the last clip, and push the clip away from the right case.
-
-
Questo passaggio è privo di traduzione. Aiuta a tradurlo
-
Locate the two clips connecting the right and left case along the top edge of the console, behind the Wi-Fi card.
-
While pushing the left and right case away from each other with one hand, pry the clips away from the case with a metal spudger.
-
-
Questo passaggio è privo di traduzione. Aiuta a tradurlo
-
Insert a spudger between the right and left cases to hold them separate while you work elsewhere.
-
-
Questo passaggio è privo di traduzione. Aiuta a tradurlo
-
While pushing the left and right cases apart with one hand, free one clip located beside the hard drive slot.
-
-
Questo passaggio è privo di traduzione. Aiuta a tradurlo
-
Place another spudger between the left and right cases directly below the clip.
-
-
Questo passaggio è privo di traduzione. Aiuta a tradurlo
-
Insert the flat edge of a metal spudger between the left and right cases where the warranty sticker used to be.
-
Pry the left case upwards to form a gap between the two cases, and slide the spudger in toward the left case.
-
Rotate the spudger upward to release the last clip.
-
-
Questo passaggio è privo di traduzione. Aiuta a tradurlo
-
Release one clip in the front left corner of the top edge securing the left case to the faceplate.
-
-
Questo passaggio è privo di traduzione. Aiuta a tradurlo
-
Flip the console over so the bottom is facing upward.
-
Release one clip in the front left corner of the bottom edge securing the left case to the faceplate.
-
Rotate the left case away from the device to release the last two inner clips.
-
Remove the left case.
-
-
Questo passaggio è privo di traduzione. Aiuta a tradurlo
-
Release the clip near the front right corner of the top edge securing the right case to the faceplate.
-
-
Questo passaggio è privo di traduzione. Aiuta a tradurlo
-
Release the clip in the bottom right corner of the top edge securing the right case to the front case.
-
-
Questo passaggio è privo di traduzione. Aiuta a tradurlo
-
Lift the left edge of the faceplate upward to release the last two clips securing the faceplate to the right case.
-
Detach the faceplate from the rest of the device.
-
-
Questo passaggio è privo di traduzione. Aiuta a tradurlo
-
Using a spudger or fingernail, lift the clear blue tab away from the connector.
-
Slide the locking tab on the power switch board cable connector toward the top of the console.
-
Pull the power switch cable straight out of the connector.
-
The faceplate is now free of the rest of the console.
-
-
Questo passaggio è privo di traduzione. Aiuta a tradurlo
-
Remove the two 5.6 mm T8 Torx screws securing the RF module to the metal case.
-
-
Questo passaggio è privo di traduzione. Aiuta a tradurlo
-
Pull the board directly away from the Xbox to remove it.
-
-
Questo passaggio è privo di traduzione. Aiuta a tradurlo
-
Remove the single T10 Torx screw holding in the wireless card.
-
Pull the Wi-Fi Board out of the console.
-
-
Questo passaggio è privo di traduzione. Aiuta a tradurlo
-
Remove the large white warranty sticker from the metal frame to expose a screw.
-
-
Questo passaggio è privo di traduzione. Aiuta a tradurlo
-
Remove the five 55.5 mm T10 Torx screws securing the right case to the metal frame.
-
-
Questo passaggio è privo di traduzione. Aiuta a tradurlo
-
Lift the right case off by its metal framework.
-
-
Questo passaggio è privo di traduzione. Aiuta a tradurlo
-
Disconnect the optical drive data cable from the back of the optical drive.
-
Disconnect the power cable from the back of the optical drive.
-
-
Questo passaggio è privo di traduzione. Aiuta a tradurlo
-
Remove the single 11.3 mm gold T10 Torx screw from the hole marked "G."
-
-
Questo passaggio è privo di traduzione. Aiuta a tradurlo
-
Remove the single 9.2 mm T10 Torx screw securing the hard drive cable connector to the plastic bracket.
-
Lift the hard drive cable connector off the hard drive bracket.
-
-
Questo passaggio è privo di traduzione. Aiuta a tradurlo
-
Remove the 11.3 mm T10 Torx screw holding the hard drive bracket to the metal frame, near the DC-In port.
-
-
Questo passaggio è privo di traduzione. Aiuta a tradurlo
-
Lift the hard drive bracket out of the metal frame.
-
-
Questo passaggio è privo di traduzione. Aiuta a tradurlo
-
Disconnect the fan cable by pulling its connector off the logic board.
-
-
Questo passaggio è privo di traduzione. Aiuta a tradurlo
-
Unscrew the two 11.7 mm Phillips screws securing the fan to the heat sink in the bottom right and top left corners of the fan.
-
Remove the fan from the logic board assembly.
-
-
Questo passaggio è privo di traduzione. Aiuta a tradurlo
-
There are a total of 10 screws holding the logic board assembly to the metal case:
-
Five 11.3 mm silver T10 Torx screws, in the holes marked "M", "N", "P", "R", and "T".
-
Four 5.6 mm black T9 Torx screws in the holes marked "D", "E", "J", and "K".
-
A single 11.3 mm gold T10 Torx screw in the hole marked "A".
-
-
Questo passaggio è privo di traduzione. Aiuta a tradurlo
-
Lift the optical drive retaining bracket off the logic board.
-
-
Questo passaggio è privo di traduzione. Aiuta a tradurlo
-
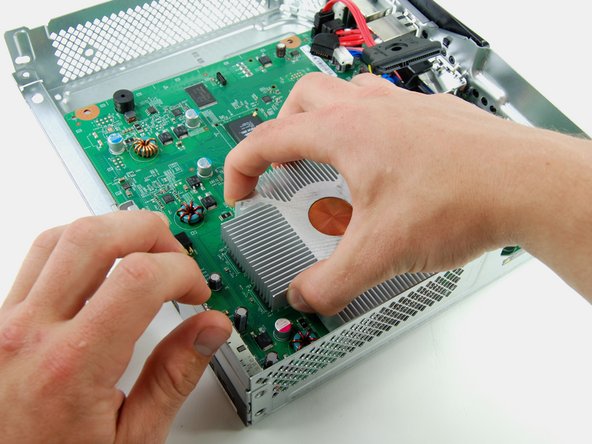
Grab the heat sink with one hand, and hold the metal frame with the other.
-
Lift the logic board assembly out of the metal frame.
-
-
Questo passaggio è privo di traduzione. Aiuta a tradurlo
-
Starting at the front left corner of the x-clamp, insert a 1.5 mm flathead screwdriver between the heat sink's peg and the x-clamp's hook.
-
-
Questo passaggio è privo di traduzione. Aiuta a tradurlo
-
In the same manner described above, release the rear right hook of the x-clamp.
-
-
Questo passaggio è privo di traduzione. Aiuta a tradurlo
-
In the same manner described above, release the rear left hook of the x-clamp.
-
-
Questo passaggio è privo di traduzione. Aiuta a tradurlo
-
Lift the x-clamp off the back of the logic board.
-


Annulla: non ho completato questa guida.
Altre 68 persone hanno completato questa guida.

16 Commenti
This is a great guide. Thank you for taking the time to make it.
Intercooler guys, purchase an intercooler and save yourself from this hassle
I had problems getting the x-bracket off the back (step 54-57).
I found this video using a pair of needle nose pliers that helped me immensely with this step:
I think we all ended up finding that video...
Thank you for taking the time to make this very instructional guide