Salta al contenuto principale

Dell XPS 15 9560 Touchpad Replacement

Cosa ti serve

  1. Dell XPS 15 9560 Touchpad Replacement, Back Panel: passo 1, immagine 1 di 1
    • Before beginning, unplug the charger and any peripheries. If possible, discharge your battery below 25%.

    • Shut the laptop down.

  2. Dell XPS 15 9560 Touchpad Replacement: passo 2, immagine 1 di 1
    • Remove the ten 4.0 mm screws from the back panel of the laptop using a T5 Torx screwdriver.

  3. Dell XPS 15 9560 Touchpad Replacement: passo 3, immagine 1 di 1
    • Remove the two 5 mm screws underneath the XPS badge door using a Phillips screwdriver

  4. Dell XPS 15 9560 Touchpad Replacement: passo 4, immagine 1 di 1
    • Use a scribe to remove the bottom base cover from the backplate.

  5. Dell XPS 15 9560 Touchpad Replacement, Battery: passo 5, immagine 1 di 1
    • Using a T5 Torx screwdriver, remove the six 4.0 mm screws.

  6. Dell XPS 15 9560 Touchpad Replacement: passo 6, immagine 1 di 1
    • Use your fingernails to gently "walk" the battery connector directly out of its socket.

  7. Dell XPS 15 9560 Touchpad Replacement: passo 7, immagine 1 di 1
    • Remove the battery.

  8. Dell XPS 15 9560 Touchpad Replacement, Hard Drive: passo 8, immagine 1 di 1
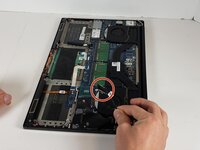
    • Using a Phillips #0 screwdriver, remove four 4.0 mm screws of the hard drive bracket.

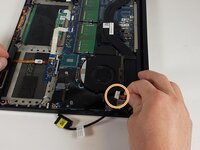
    • Unplug the hard drive cable.

  9. Dell XPS 15 9560 Touchpad Replacement: passo 9, immagine 1 di 1
    • Remove the hard drive bracket. Then, unplug and remove the hard drive.

  10. Dell XPS 15 9560 Touchpad Replacement, Trackpad: passo 10, immagine 1 di 1
    • Remove the two 5 mm mounting screws.

  11. Dell XPS 15 9560 Touchpad Replacement: passo 11, immagine 1 di 1
    • Use a screwdriver to remove the single 5 mm screw securing the silver plate.

  12. Dell XPS 15 9560 Touchpad Replacement: passo 12, immagine 1 di 1
    • Use a spudger, pushing on alternating sides of the connector, to get it out of the socket.

    • It may take a lot of alternating before the connector comes out. Be patient, and don't pull on the cables.

    • To reconnect the cable, align the connector and use a spudger.

    • Don't push on the cables themselves, or you may damage the connector.

  13. Dell XPS 15 9560 Touchpad Replacement: passo 13, immagine 1 di 2 Dell XPS 15 9560 Touchpad Replacement: passo 13, immagine 2 di 2
    • Unplug the black cord.

    • Unplug the cord with a white plug.

  14. Dell XPS 15 9560 Touchpad Replacement: passo 14, immagine 1 di 2 Dell XPS 15 9560 Touchpad Replacement: passo 14, immagine 2 di 2
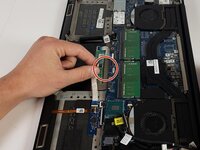
    • Disconnect the white ribbon cables, and use a spudger or your fingernail to gently lift the looped tab away from the connector. It should pop up easily.

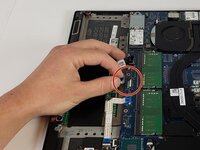
    • Next, use the spudger or your fingernail to push the plastic tab away from the socket. It should move slightly.

    • Now, pull the white ribbon cables out.

  15. Dell XPS 15 9560 Touchpad Replacement: passo 15, immagine 1 di 1
    • Lift the laptop as shown.

    • Separate the touchpad from the keyboard.

Conclusione

To reassemble your device, follow these instructions in reverse order. Take your e-waste to an R2 or e-Stewards certified recycler.

0Commenti sulla guida

Aggiungi Commento

Visualizza Statistiche:

Ultime 24 Ore: 1

Ultimi 7 Giorni: 4

Ultimi 30 Giorni: 28

Tutti i Tempi: 4,968