Salta al contenuto principale

iPad mini 4 LTE バッテリー交換

Avviso: Stai modificando una guida prerequisita. Tutte le modifiche avranno effetto sulla guida che include questo passo.

Inglese
Giapponese

Traduzione in corso passo 2

Passo 2
iPad mini 4 LTE Battery Replacement: passo 0, immagine 1 di 1
  • In the following steps you will be cutting the adhesive under the battery, and prying it off of the rear case.

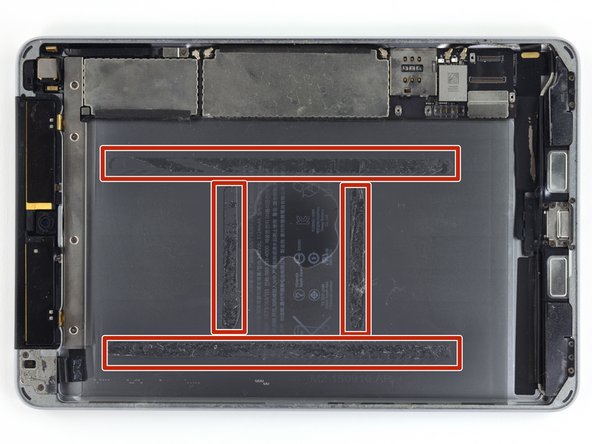
  • The adhesive is laid out as shown in this image: two strips along the long edges, and two shorter strips perpendicular in the center.

  • To avoid damaging the battery, use plastic tools, heat, and patience. Do not puncture, bend, or overheat the battery.

  • Do not pry near the logic board, you could damage your iPad.

  • If you are performing this procedure on the Wi-Fi version, it is safe to insert pry tools from the upper, lower, and left edges of the battery. For the LTE version, only pry from the lower and left edges to avoid damaging other components.

次の手順では、バッテリーの下の接着テープを剥がし、リアケースをこじ上げて外します。

接着テープはこの写真のように、2本が2つの長辺に沿って貼り付けられており、またこれらに対して垂直で、より短い2本が中心部に貼り付けられています。

バッテリーの損傷を防止するには、プラスチック製の工具、熱、そして辛抱強さが必要です。バッテリーを針などで刺したり、曲げたり、あるいは加熱しないでください。

ロジックボードの付近をこじ開けないでください。iPadが損傷するおそれがあります。

Wi-Fiバージョンでこの手順を実行する場合は、こじ開け用工具をバッテリーの上端、下端、左端から差し込むのが安全です。LTEバージョンでは、他の部品が損傷しないように、下端と左端からのみこじ上げます。

I tuoi contributi sono usati su licenza in base alla licenza open source Creative Commons.