Salta al contenuto principale

MacBook Pro 13" Retina-scherm eind 2013 Vervanging van de batterij

Avviso: Stai modificando una guida prerequisita. Tutte le modifiche avranno effetto su tutte le guide che includono questo passo.

Inglese
Olandese

Traduzione in corso passo 9

Passo 9
MacBook Pro 13" Retina Display Late 2013 Battery Replacement: passo 0, immagine 1 di 3 MacBook Pro 13" Retina Display Late 2013 Battery Replacement: passo 0, immagine 2 di 3 MacBook Pro 13" Retina Display Late 2013 Battery Replacement: passo 0, immagine 3 di 3
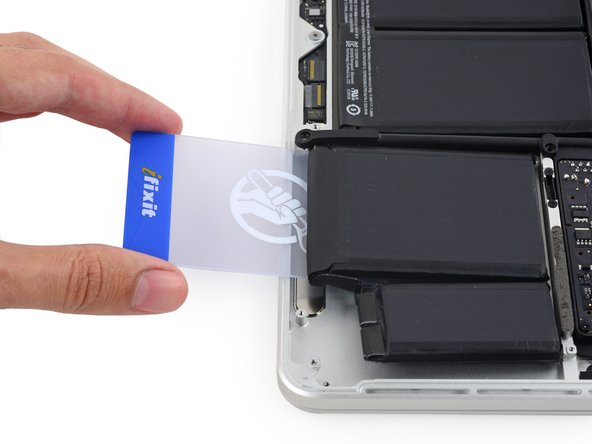
  • Repeat this procedure with the adjacent battery cell:

  • Apply a small amount of liquid adhesive remover under the battery cell, and wait 2-3 minutes for it to penetrate and soften the adhesive.

  • Alternatively, re-heat this section with your iOpener if needed.

  • Push a plastic card about an inch between the battery cell and the upper case, and slowly pry the cell up to separate all of the adhesive.

Herhaal deze procedure met de naastgelegen batterijcel:

Dien een kleine hoeveelheid vloeibare lijmverwijderaar toe onder de batterijcel en wacht gedurende 2-3 minuten om dit te laten intrekken en de lijm te verzachten.

Als alternatieve methode, kun je dit gebied met je iOpener verwarmen.

Duw een plastic kaart voor ongeveer twee centimeter tussen de batterijcel en de bovenste behuizing en wrik de cel voorzichtig omhoog om deze los te krijgen van de lijm.

I tuoi contributi sono usati su licenza in base alla licenza open source Creative Commons.