Salta al contenuto principale

Sostituzione gruppo schermo Motorola Moto Z Play

Avviso: Stai modificando una guida prerequisita. Tutte le modifiche avranno effetto su tutte le guide che includono questo passo.

Inglese
Italiano

Traduzione in corso passo 3

Passo 3
Motorola Moto Z Play Display Assembly Replacement: passo 0, immagine 1 di 3 Motorola Moto Z Play Display Assembly Replacement: passo 0, immagine 2 di 3 Motorola Moto Z Play Display Assembly Replacement: passo 0, immagine 3 di 3
  • In the following steps, you will separate the display assembly from the Moto Z Play's chassis.

  • For reference, refer to the first image, showing the back of the display assembly (right) after it has been removed from the phone (left).

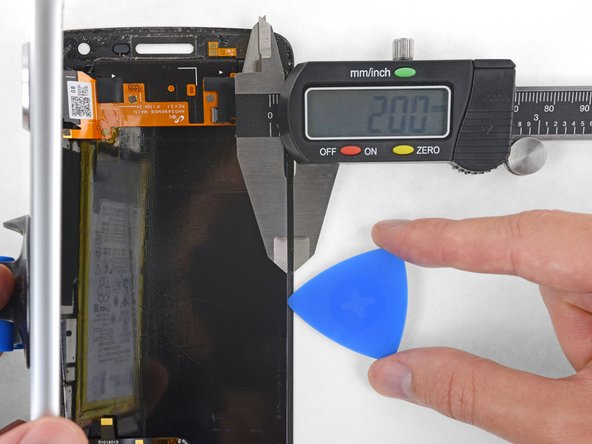
  • If you plan to re-use the display assembly, pay particular attention to the side edges. When slicing through the glue in this area, you must be careful to insert your tool less than 2 mm, or your tool will come in contact with the display panel and damage it.

  • Playing cards are a safer, but much slower, prying tool. The soft paper cards are less likely to damage the display panel, which is good news if you plan to reuse it.

Nei passi successivi staccherai il gruppo schermo dalla scocca del Moto Z Play.

Prendi come riferimento la prima immagine, che mostra il retro del gruppo display (a destra) dopo che è stato rimosso dal telefono (a sinistra).

Se prevedi di riutilizzare il gruppo schermo, fai molta attenzione ai bordi laterali. Quando tagli la colla in queste zone, devi stare attento a inserire il tuo attrezzo meno di 2 mm, altrimenti lo strumento potrebbe entrare in contatto con il pannello e danneggiarlo.

Le carte da gioco sono uno strumento di apertura più sicuro, ma molto più lento. È più difficile che danneggino il pannello del display, il che è una buona cosa se intendi riutilizzarlo.

I tuoi contributi sono usati su licenza in base alla licenza open source Creative Commons.