Salta al contenuto principale

ionvac SmartClean V2 Side Brush Motors Replacement

Cosa ti serve

  1. ionvac SmartClean V2 Side Brush Motors Replacement, Shell (Top & Bottom): passo 1, immagine 1 di 2 ionvac SmartClean V2 Side Brush Motors Replacement, Shell (Top & Bottom): passo 1, immagine 2 di 2
    • Caution: Before beginning, turn off the ionvac and place it on a level surface.

    • Keep in mind that your ionvac has many small screws that can be easily lost. Using a magnetic project mat is best to prevent misplacing any parts.

    • Flip your ionvac right-side up, turning it so that the front filter vents are facing forward and the power button is furthest from you.

  2. ionvac SmartClean V2 Side Brush Motors Replacement: passo 2, immagine 1 di 3 ionvac SmartClean V2 Side Brush Motors Replacement: passo 2, immagine 2 di 3 ionvac SmartClean V2 Side Brush Motors Replacement: passo 2, immagine 3 di 3
    • Use a Phillips screwdriver to remove the 8 screws indicated in red holding the base together.

    • Use the same screwdriver to remove the 8 screws indicated in orange which hold the rims (bumper arms).

    • Remove the rims from your ionvac and set them aside.

  3. ionvac SmartClean V2 Side Brush Motors Replacement: passo 3, immagine 1 di 1
    • Flip your ionvac right-side up and tilt it upwards at a 45 degree angle.

    • Use a Jimmy or prying tool to wedge the sharp end through the bottom crevice (below the sensors).

    • Continue prying the outside rim of your ionvac open. You will feel the top shell (frame or cover) loosen.

    • Caution: Resist the urge to tear the top shell open until the entire rim has been loosened.

  4. ionvac SmartClean V2 Side Brush Motors Replacement: passo 4, immagine 1 di 2 ionvac SmartClean V2 Side Brush Motors Replacement: passo 4, immagine 2 di 2
    • Lift the top shell off carefully.

  5. ionvac SmartClean V2 Side Brush Motors Replacement, Side Brush Motors: passo 5, immagine 1 di 1
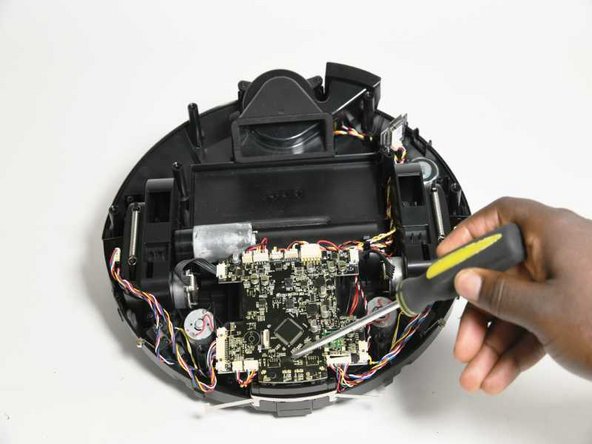
    • Identify the 2 side brush motors that look like cylinders on the bottom shelf of your ionvac.

  6. ionvac SmartClean V2 Side Brush Motors Replacement: passo 6, immagine 1 di 2 ionvac SmartClean V2 Side Brush Motors Replacement: passo 6, immagine 2 di 2
    • Remove the 3 screws that attach the motor to the bottom shelf.

    • Lift the motor out of its slot.

  7. ionvac SmartClean V2 Side Brush Motors Replacement: passo 7, immagine 1 di 1
Conclusione

To reassemble your device, follow these instructions in reverse order.

0 Commenti

Aggiungi Commento

Visualizza Statistiche:

Ultime 24 Ore: 0

Ultimi 7 Giorni: 4

Ultimi 30 Giorni: 24

Tutti i Tempi: 155