Salta al contenuto principale

iPod Touch 6th Generation Display Assembly Replacement

Guida Archiviata
Questa guida è mantenuta solo per scopi storici. Usa la versione aggiornata della guida per eseguire la riparazione.

Cosa ti serve

  1. iPod Touch 6th Generation Display Assembly Replacement, Power Off device: passo 1, immagine 1 di 2 iPod Touch 6th Generation Display Assembly Replacement, Power Off device: passo 1, immagine 2 di 2
    • Make sure you iPod is powered off before starting the repair

    • Hold the Sleep/Wake Button (Power Button) for about 3-5 seconds.

  2. iPod Touch 6th Generation Display Assembly Replacement, Front Pannel: passo 2, immagine 1 di 1
    • If your display is cracked to prevent you from cutting your self we recommend you place clear duck tape over the screen until all the cracks are fully covered.

    • Wear Safety glasses to prevent glass from from going into your eyes

  3. iPod Touch 6th Generation Display Assembly Replacement: passo 3, immagine 1 di 1
    • The bottom of the screen is held in place with adhesive.

    • Use the iOpener or Heat gun to soften the adhesive

    • Alternatively you can use an Hair dyer

    • As you start to prying the screen off, you may need to apply more heat

  4. iPod Touch 6th Generation Display Assembly Replacement, Opening the iPod: passo 4, immagine 1 di 2 iPod Touch 6th Generation Display Assembly Replacement, Opening the iPod: passo 4, immagine 2 di 2
    • Place a suction cup just above the home button, towards the lower section of the glass.

    • Press it firmly to ensure the cup has a strong seal.

    • Hold iPod firmly on a hard surface

    • To prevent you from breaking the ribbon cables connected to the LCD, Place your thumb and index finger over the lower corners of the display to stop the display from opening too far.

    • Start to Lift the suction cup, and start to firmly pull constantly until the adhesive breaks, and the display comes up from the rear case.

    • When lifting the screen apart if adhesive is still sticking to the display you may get a razor blade to cut the adhesive.

    • Be careful not to lift more than about an inch—a fragile plastic frame still connects the display assembly to the rear case.

  5. iPod Touch 6th Generation Display Assembly Replacement: passo 5, immagine 1 di 2 iPod Touch 6th Generation Display Assembly Replacement: passo 5, immagine 2 di 2
    • In this part we will be losing and freeing the Bezel (The plastic Frame) that surround the screen.

    • Start at the top of the Bezel, Using a plastic opening tool, insert it into the gap between the plastic frame and the rear case.

    • Slid to tool down the Bezel to loosen it from the case.

  6. iPod Touch 6th Generation Display Assembly Replacement: passo 6, immagine 1 di 2 iPod Touch 6th Generation Display Assembly Replacement: passo 6, immagine 2 di 2
    • Insert the plastic opening tool between the frame and the rear case behind the first clip.

    • Rock the tool sideways, to spread the gap behind the clip and separate it from the rear case.

    • Initially this may not free the clip , but by repeating the procedure for each clip, it will begin to loosen the piece.

    • Repeat the procedure with the next two clips on that side

    • You may have to go back and forth between the clips to free all of them. Be patient, as the plastic frame is quite fragile.

  7. iPod Touch 6th Generation Display Assembly Replacement: passo 7, immagine 1 di 3 iPod Touch 6th Generation Display Assembly Replacement: passo 7, immagine 2 di 3 iPod Touch 6th Generation Display Assembly Replacement: passo 7, immagine 3 di 3
    • Moving onto the left side of the bezel, insert the plastic opening tool into the gap between the frame and the rear case near the top.

    • Now slide the tool down, loosening the frame from the case.

  8. iPod Touch 6th Generation Display Assembly Replacement: passo 8, immagine 1 di 2 iPod Touch 6th Generation Display Assembly Replacement: passo 8, immagine 2 di 2
    • Insert the plastic opening tool between the frame and the rear case behind the first clip.

    • Rock the tool sideways, to spread the gap behind the clip and separate it from the rear case.

    • Initially this may not free the clip , but by repeating the procedure for each clip, it will begin to loosen the piece.

    • Repeat the procedure with the next two clips on that side

    • You may have to go back and forth between the clips to free all of them. Be patient, as the plastic frame is quite fragile.

  9. iPod Touch 6th Generation Display Assembly Replacement: passo 9, immagine 1 di 3 iPod Touch 6th Generation Display Assembly Replacement: passo 9, immagine 2 di 3 iPod Touch 6th Generation Display Assembly Replacement: passo 9, immagine 3 di 3
    • Insert the plastic opening tool between the display assembly and the rear case near the top of the iPod.

    • Barley twist the opening tool to lift the front panel up from the rear case.

    • Separate the display assembly from the iPod.

    • Don't try to remove the Front panel, because there are still many cables connected to it.

  10. iPod Touch 6th Generation Display Assembly Replacement, LCD Shield Plate: passo 10, immagine 1 di 2 iPod Touch 6th Generation Display Assembly Replacement, LCD Shield Plate: passo 10, immagine 2 di 2
    • Carefully fold the display over away from the rest of the iPod, watching out not to disconnect or break any of the ribbon cables. Set the two halves flat on a flat surface

    • Use a plastic opening tool to pry the home button switch up from the LCD Plate

    • You may need to use a heat gun or hair dryer to soften the adhesive on the back of the home button. (Use a low heat setting)

    • Do not try to remove the home button switch, because it is connected to components below the LCD plate.

  11. iPod Touch 6th Generation Display Assembly Replacement: passo 11, immagine 1 di 1
    • Remove the following screws securing the LCD plate to the rear case:

    • Two 1.2 mm #00 Phillips screws

    • Nine 1.6 mm #00 Phillips screws

    • One 2.3 mm #00 Phillips screw

  12. iPod Touch 6th Generation Display Assembly Replacement: passo 12, immagine 1 di 2 iPod Touch 6th Generation Display Assembly Replacement: passo 12, immagine 2 di 2
    • Lift up the LCD plate to remove it

  13. iPod Touch 6th Generation Display Assembly Replacement, Battery: passo 13, immagine 1 di 1
    • Remove three 1.6 mm #00 Phillips screws that are securing the logic board onto the rear case.

  14. iPod Touch 6th Generation Display Assembly Replacement, Heat the back of the iPod: passo 14, immagine 1 di 1
    • There are two strips of adhesive holding the battery onto the rear case.

    • Do not heat the battery!!

    • Turn the iPod to the back were you can see the Apple logo and apply heat there to soften adhesive

    • The rear case does not have to be hot, you should be able to touch it without felling discomfort

  15. iPod Touch 6th Generation Display Assembly Replacement: passo 15, immagine 1 di 2 iPod Touch 6th Generation Display Assembly Replacement: passo 15, immagine 2 di 2
    • There are three notches on either side of the battery. In the next steps, you will be using these notches to gradually pry the battery up from the rear case.

    • The battery is secured with a lot of adhesive, so you'll need to go slowly and carefully to avoid puncturing or creasing the battery.

    • Insert a plastic opening tool into the top right notch and gently pry up on the battery.

    • Don't try to attempt to pry up the entire battery at this point, just slowly start to loosen the adhesive at each point.

    • Continue with the lower right notch. Insert a plastic opening tool into the notch, and gently lift up on the side of the battery.

  16. iPod Touch 6th Generation Display Assembly Replacement: passo 16, immagine 1 di 1
    • Continue prying up the battery from the bottom.

    • When prying along the bottom, be careful not to press down too hard against the speaker or headphone jack.

  17. iPod Touch 6th Generation Display Assembly Replacement: passo 17, immagine 1 di 2 iPod Touch 6th Generation Display Assembly Replacement: passo 17, immagine 2 di 2
    • Pry along the left side as well.

  18. iPod Touch 6th Generation Display Assembly Replacement: passo 18, immagine 1 di 3 iPod Touch 6th Generation Display Assembly Replacement: passo 18, immagine 2 di 3 iPod Touch 6th Generation Display Assembly Replacement: passo 18, immagine 3 di 3
    • Once all of the adhesive is loose, lift the battery up from the bottom and sway it out over the left side of the rear case.

    • Make sure not to pull it out because it is soldered onto the logic board.

    • Once battery is out of case turn the battery over to straighten its cable and set it down.

  19. iPod Touch 6th Generation Display Assembly Replacement, Front facing camera: passo 19, immagine 1 di 2 iPod Touch 6th Generation Display Assembly Replacement, Front facing camera: passo 19, immagine 2 di 2
    • Get a spudger and use the flat end of it to take out facing camera out of its socket in the display assembly.

  20. iPod Touch 6th Generation Display Assembly Replacement, Lighting connector assembly: passo 20, immagine 1 di 1
    • Use the tip of a spudger to peel back a piece of tape covering a screw on the side of the headphone jack.

  21. iPod Touch 6th Generation Display Assembly Replacement: passo 21, immagine 1 di 1
    • Remove the following screws securing the headphone jack, Lightning connector, and speaker.

    • Three 2.6 mm #00 Phillips screws

    • Two 2.0 mm #00 Phillips screws

  22. iPod Touch 6th Generation Display Assembly Replacement: passo 22, immagine 1 di 1
    • Use the flat end of a spudger to lift the speaker up from the rear case.

    • Do not try to remove the speaker, because it is soldered to the Lightning connector assembly.

  23. iPod Touch 6th Generation Display Assembly Replacement: passo 23, immagine 1 di 1
    • Gripping the large ribbon cable, gently pull the Lightning connector assembly out of the bottom of the case.

  24. iPod Touch 6th Generation Display Assembly Replacement, Display Assembly: passo 24, immagine 1 di 2 iPod Touch 6th Generation Display Assembly Replacement, Display Assembly: passo 24, immagine 2 di 2
    • Flip the entire assembly over, showing the back of the logic board.

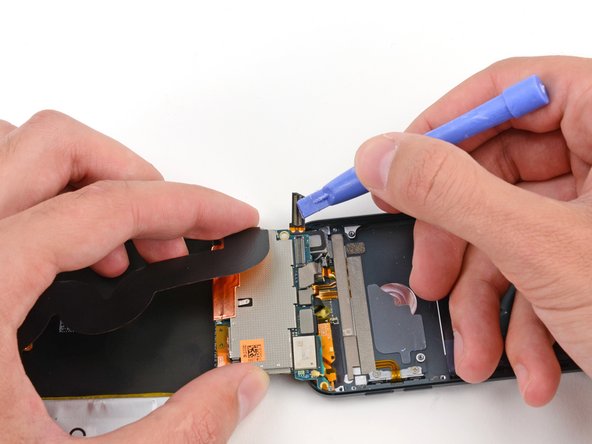
    • Use a plastic opening tool to disconnect the digitizer cable from the logic board.

  25. iPod Touch 6th Generation Display Assembly Replacement: passo 25, immagine 1 di 2 iPod Touch 6th Generation Display Assembly Replacement: passo 25, immagine 2 di 2
    • Use a plastic opening tool to disconnect the display cable from its socket.

  26. iPod Touch 6th Generation Display Assembly Replacement: passo 26, immagine 1 di 3 iPod Touch 6th Generation Display Assembly Replacement: passo 26, immagine 2 di 3 iPod Touch 6th Generation Display Assembly Replacement: passo 26, immagine 3 di 3
    • Flip the Lightning connector/logic board assembly back over to expose the top of the logic board.

    • The display cable is lightly adhered to the top of the logic board.

    • Use the flat end of a spudger to peel the display cable up from the logic board.

  27. iPod Touch 6th Generation Display Assembly Replacement: passo 27, immagine 1 di 2 iPod Touch 6th Generation Display Assembly Replacement: passo 27, immagine 2 di 2
    • Finally remove the display assembly from the iPod

    • You can use an iPod touch 5 LCD on the iPod touch 6 the're exactly the same.

Conclusione

To reassemble your device, follow these instructions in reverse order.

Altre 15 persone hanno completato questa guida.

Aiden

Membro da: 08/08/16

1.482 Reputazione

2 Guide realizzate

Team

Aiden's Tech Repairs Membro di Aiden's Tech Repairs

Business

1 Membro

3 Guide realizzate

Un commento

This is a very comprehensive guide, but it is way beyond me.

I’d rather live with erratic behaviour in my current iPod, or ditch it and rely on my Android cell-phone for the same functions.

Paul Terni - Replica

Aggiungi Commento

Visualizza Statistiche:

Ultime 24 Ore: 1

Ultimi 7 Giorni: 28

Ultimi 30 Giorni: 44

Tutti i Tempi: 11,298