Cosa ti serve
-
-
Se lo schermo del tuo display è crepato, contieni ulteriori rotture e previeni danni fisici durante la riparazione coprendo lo schermo con del nastro adesivo.
-
Posiziona delle strisce sovrapposte di nastro adesivo da imballaggio sopra al display dell'iPod finché tutto il vetro non sia coperto.
-
-
-
Utilizza un asciugacapelli oppure prepara un iOpener e applicalo al bordo inferiore dell'iPod per circa un minuto al fine di ammorbidire l'adesivo sottostante.
-
La base dello schermo (vicino al pulsante home) è tenuta in posizione con un adesivo potente.
-
Mentre inizi a fare leva per rimuovere lo schermo nei prossimi passi, potresti aver bisogno di applicare più calore per mantenere la colla calda e flessibile.
-
-
-
Centra la ventosa nella sezione inferiore del vetro, con il suo bordo centrato sopra al pulsante home.
-
Premi con fermezza e assicurati che la ventosa abbia una presa forte.
Be very careful. I have bought the ifixit kit. Tried with the suction cup and it didn’t work. None of the tools actually helped. Follower the instructions carefully and still ended up with a cracked screen. I wish I could go back in time and not doing any of this. I literally just cried and have no money for a new screen.
-
-
-
Tieni con fermezza l'iPod contro un tavolo o una panca.
-
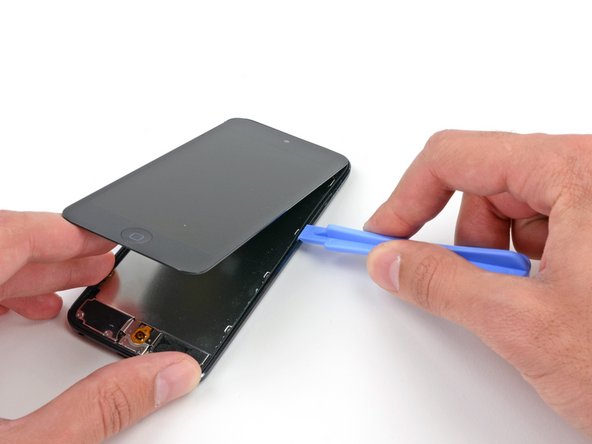
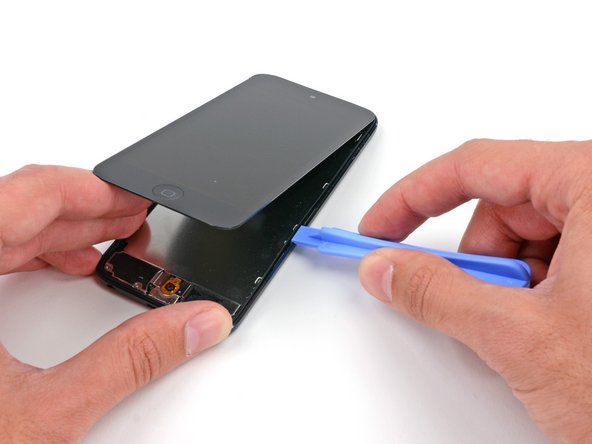
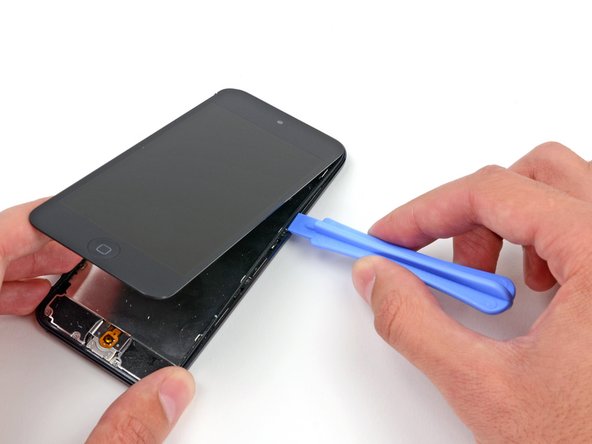
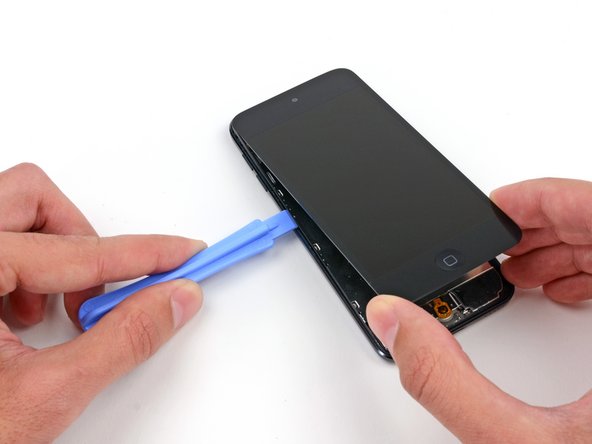
Solleva la ventosa verso l'alto e indietro verso la parte superiore dell'iPod. Sii paziente, e tira con forza costante finché l'adesivo si rompe e il display viene via dal case posteriore.
-
Potrebbe essere necessario utilizzare una pistola termica per ammorbidire l'adesivo (specialmente nei climi più freschi). Se riesci a fare leva e a sollevare lo schermo, ma l'adesivo rimane ancora attaccato e si stacca come il formaggio su una pizza, puoi far scorrere una lametta sottile dentro e tagliare delicatamente l'adesivo.
Step 2.5: Recover iPod from far side of the room due to suction assisted throwing.
thanks, Apple
Did as shown, button switch works fine, when I reinstall button, it's like it won't touch the switch to engage.
What next?
I've got the same problem, managed to get the screen off, transferred the little steel plate to the new home button and put it in. The switch works fine when I press it with my finger, but it won't work with the home button??? - Did you manage to solve this problem?
Tom -
I've got the same problem. Been trying to find a solution for a few days now. Lots of people ask this question, but no one ever answers it. How did you solve it?
tirgang -
It sounds like you need to replace the home button dome switch rather than the actual home button. I'm currently searching for one myself. My customer jammed the home button and now it doesn't click. The dome switch is located on the home button ribbon cable and not on the home button.
The "home button" repair shows the physical button, but it's not actually the repair for the switch, which is what should be shown as the home button repair. The switch has a little black plastic tab that breaks off with excessive presses, and that's why the button plate cannot engage the switch when the screen is reinstalled. You will need to replace the switch, or modify it with something small enough to press the switch when the LCD is lowered.
Rene -
I also ran in to the Home button not working issue. I have not idea what changed with the button, but it would not work (from the outside) after the battery replacement & re-assembling. If you opened the iPod up, you could press the switch directly and it clicked & worked, but it seemed finicky. I ended up putting the tiniest dot of hot melt on the center of the switch (smaller than the switch 'dome', and thin too, maybe 0.6-0.7mm thick), re-assembled, and it works fine now.
Use the hair dryer or a heat gun to loosen the adhesive. This did not work with just a suction cup for me.
I also had to use a heat gun and the opening tool instead of just a suction cup to open the assembly. The rest of the guide worked really well!
When putting back together, make sure the display connector is in firm or you might get lines. And also, perform a hard reset - my power wasn't working, I took it apart and checked the power flex cable, but all it needed was a hard reset when put back together.
Suction cup and hair dryer method never worked for me. Even tried my heat gun. Finger went numb before I gave up. Used thin prying + suction cup and eventually opened it but screen cracked in the process when I was too aggressive opening it.
In hind-sight, it would have been very helpful to know that the adhesive is just in the 2 areas to either side of the home button, nothing along the edges.
Biggest complaint is the time wasted, should have just bought a replacement iPod, better return on my money/time.
The adhesive strips are only located to the left and right of the home button. Imagine two small squares of tape in each corner. Be careful heating. I used a heat gun on the lowest heat, but I think I may have overheated the area and damaged the digitizer on the bottom of the screen. I now have small green lines on that section of the screen. I too had to use a thin metal spudger to release the adhesive.
-
-
-
-
Iniziando nella parte superiore destra del dispositivo, inserisci uno strumento di apertura in plastica nello spazio che si trova tra il telaio in plastica e il case posteriore in alluminio.
-
Fai scorrere lo strumento giù per questa fessura, allentando il telaio dal case.
Careful! This piece is super fragile. It really helps to understand the way the clips work. I struggled for 10 min with not a single un-clip, snapped the plastic frame in 2 places because I didn't understand the clips, and as soon as I figured out how they work the piece was off like a prom dress.
The clips are metal n shapes around the outside of the frame. They need to be pushed away from the center of the device to release the frame. You need to get something in between the plastic and clip to release, a guitar pick is probably too thick. A thin opening device would probably work but I used a razor blade. I'm not sure if these clips are on all of the newer Apple devices, but I've never encountered one before (usually work on android devices.)
I hope this helps prevent someone from having to replace the frame.
I wish I had read this comment before I broke my frame, hah! It made sense once I had the clips out, but while they were still in it was mystifying. Thankfully it won't be too big of a problem since all of the frame will still clip in, it just won't be connected.
-
-
-
Inserisci uno strumento di apertura in plastica tra il telaio e il case posteriore dietro la prima clip.
-
Muovi lo strumento lateralmente, per allargare lo spazio dietro la clip e separarlo dal case posteriore.
-
Questo potrebbe anche non liberare la clip inizialmente, ma ripetendo la procedura per ciascuna clip questo inizierà a far allentare il pezzo.
-
-
-
Ripeti la procedura con le prossime due clip su questo lato.
-
Inserisci lo strumento di apertura in plastica tra il telaio in plastica e il case posteriore in alluminio dietro la seconda clip.
-
Muovi lo strumento lateralmente, allentando la clip dal case.
Hello how are you? I don't know what happens when I go back and put everything I close and the home button doesn't work, I disarm it and check the flex and it works when I press it but with the home button it doesn't.
-
-
-
Utilizzando la stessa procedura, allenta l'ultima clip che fissa il telaio in plastica al case posteriore.
They have the exact same dimensions.
do you think if i use reolacement scren of itouch 5th gen to my itou h 6th gen this would work? i cant find screen for itouch 6th gen so im thnking to use the screen of 5th gen pls help me
-


Per riassemblare il tuo dispositivo, segui queste istruzioni in ordine inverso.
Per riassemblare il tuo dispositivo, segui queste istruzioni in ordine inverso.
Annulla: non ho completato questa guida.
Un'altra persona ha completato questa guida.
Un ringraziamento speciale a questi traduttori:
100%

Questi traduttori ci stanno aiutando ad aggiustare il mondo! Vuoi partecipare?
Inizia a tradurre ›

Any repair guides for front camera?
ipod touch 5th generation front camera freezes then returns to rear camera. This happened after replacing battery. Any ideas? Tried hard reset & restoring. Nothing worked.
Libby - Replica