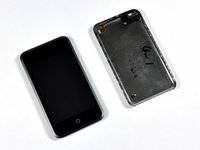
Introduzione
Battery not lasting long? Swap it out (requires soldering).
Cosa ti serve
-
-
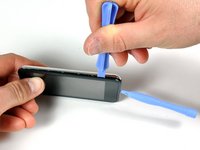
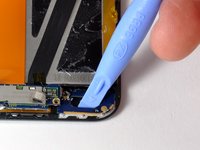
Insert the small plastic opening tool into the seam in between plastic display panel and the metal back panel. The angled edge should point towards the metal back panel.
-
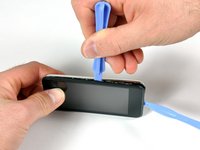
Hold the tool in place once it is wedged inside and the two panels are separated.
-
-
-
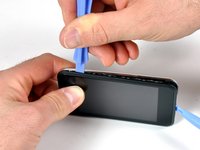
Flip the iPod 180 degrees so it matches the orientation in the picture.
-
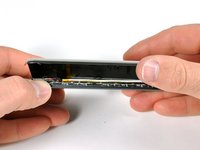
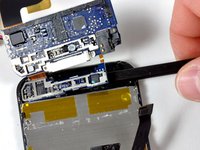
Carefully insert the spudger in between the battery and the display. There are routing cables underneath, so make sure you slowly pry the battery loose.
In step five I was very careful with the spudger at getting the battery loose from the LCD screen but now after reassembly I have white bleed through all around three sides of the LCD screen. It shows up easily on light colored screen backgrounds like the Set up screen. It looks like the spudger some how damaged the back side of the LCD screen during disassembly. Is this glue heat sensitive or is there an alternative to using the spudger that a user can suggest?
Citazione da DUSTmurph:
Could I possibly just cut the battery cables in this step and solder them to the wires on the new battery??
I am thinking about trying this myself - It seems a lot less labor intensive than desoldering in that very tight location. I guess the big concern is if there is room for insulation on the spliced wires when the unit gets closed up.
Citazione da barlowdo:
I am thinking about trying this myself - It seems a lot less labor intensive than desoldering in that very tight location. I guess the big concern is if there is room for insulation on the spliced wires when the unit gets closed up.
I will add that there is really not a lot of wire length to do a splice on and it may be as difficult to do as soldering to the circuit board.
Yes, even without de-soldering/soldering, one can simply cut the two wires then put a jumper wire on re-installation.
I agree with DUSTmurph's, comment.
Is there any jumper little enough to fit in it?
You could cut the cables and solder the new batt's to these, but I'd make sure the total length of the splice is the same to the original. Also use the smallest-diameter heat-shrink tube to insulate so as not to make a bump that prevents the trinket to close properly.
-
-
-
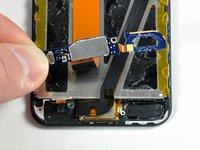
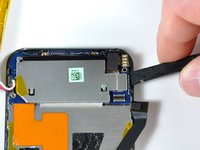
Use a spudger (or your fingernails) to remove the gold antenna. The antenna bends easily, so make sure not to apply too much pressure. When re-assembling, put the gold antenna in place before inserting the antenna circuit boards.
-
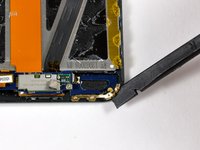
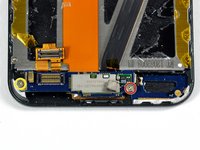
Use the spudger to remove the connector on the left side.
-
Remove the 2.4 mm Phillips screw.
-
Remove the 1.6 mm Philips screw.
There is a gold spring coil on the side of the board near the left side. BE VERY CAREFUL! It extremely brittle metal and if smashed down, won't connect with the power switch. Once smashed down, attempting to stretch it back out will break it. I found out the hard way and the only way to fix it is to replace the logic board.
Are these really Phillips 00 screws? My supposedly 00 screwdriver is way too big. Maybe they are really Phillips 000. The screws in my device were set with blue locktight (grr). I was able to unscrew three of the six with very small straight edge screwdriver but had to sand off the heads of three more with a Dremel tool. This is dangerous. During the process I barely nicked a component near where the antenna cable connects to the logic board. Now I have a new battery and no WiFi.
-
-
-
-
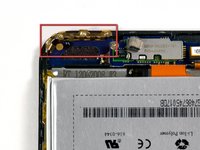
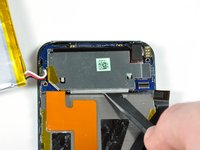
The antenna loop board needs to be pried up (it is glued down). Gently use a plastic opening tool or spudger, to dislodge the antenna loop board. The board is connected to the antenna electronics by a small ribbon cable. This two-board assembly is very frail.
-
The two small antenna circuit boards can now be lifted up together, and their orange cable can be peeled from the display.
-
-
-
Use the spudger to remove the black masking tape. This will reveal the top two screws in the picture.
-
Unscrew the three 2.4 mm Phillips screws.
-
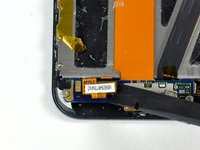
Unscrew the 3.8 mm Philips screw.
-
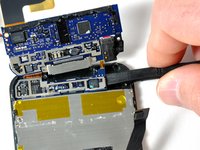
Use a spudger to disconnect the black connector.
-
Use a spudger to disconnect the black connector.
Actually you can skip all this taking apart sequence - just remove older battery, clean the soldering holes and solder wires back from top. just put some thin plastic film under logic board where the soldering points are while soldering wires in. I replaced god knows how many batteries like this and they all are fine. that way you can replace battery in 5minutes!
Right, this is what I did. Although it took me more than 5 minutes just to get the case open.
-
-
-
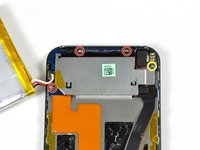
Use the spudger to loosen the logic board from multiple sides. It is held in place by glue and the four screws that were removed in the previous step.
-
-
-
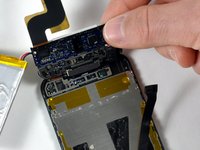
Gently lift the logic board (and attached components) upward.
-
Slide the spudger under the small portion of the logic board. The board should come loose once the spudger has slid almost all the way to the other side.
I've managed to strip a screw. Be careful of that!
When I did this, the headphone jack cable sheared completely. The headphone jack was still down and the board flipped up. There was almost no resistance to indicate something was tearing. Luckily, installing a new headphone jack is pretty easy if you have a fine tip soldering iron. But it was a big delay as I had to order the part.
Citazione da jonathan:
When I did this, the headphone jack cable sheared completely. The headphone jack was still down and the board flipped up. There was almost no resistance to indicate something was tearing. Luckily, installing a new headphone jack is pretty easy if you have a fine tip soldering iron. But it was a big delay as I had to order the part.
Citazione da Ryan:
Do you have any specific info or guide on how to replace the headphone jack? I agreed to help a friend with their iPod and it turns out a new headphone jack is in order. I have never done a repair on an iPod requiring soldering. I think myself and many others would be grateful for a tutorial.
Citazione da Ryan Lacy:
Do you have any specific info or guide on how to replace the headphone jack? I agreed to help a friend with their iPod and it turns out a new headphone jack is in order. I have never done a repair on an iPod requiring soldering. I think myself and many others would be grateful for a tutorial.
Well what worked for me was keeping the old connector on the soldered part. The new ribbon has two holes on each solder connecting point. If the ribbon isn't already ripped, go ahead and rip/cut it. Then simply place the new ribbon on top of the existing end with the solder blobs on it. Press down with the heated tip from on top of the solder pads and the heat should be enough to melt the solder beneath. It should flow right up through the holes with the pressure and voila.
Jonathan did you post any photos or a video of your soldering the new headphone jack to the logic board? I did as you did and broke the small ribbon or cable connecting the headphone jack to the logic board. This is my first attempt at repairing an electronic device, and it ended very badly.
I do it without removing the smaller card : it is more safety !!
-
-
-
Use the tip of a spudger to remove the cloudy white glue covering the battery contacts.
-
-
-
Place the desoldering wick on top of the existing solder ball.
-
Place the soldering iron on top of wick above the existing solder ball.
-
Hold the soldering iron in place until the solder melts into the wick.
-
Repeat the same procedure on the remaining two connectors.
-
Lift the old battery out of the iPod. Be sure that all the solder has been removed before pulling the wires away from the board. The wires should come free with little to no resistance.
-
-
-
Melt a small solder bead directly onto the metal connector on the board by placing the soldering iron onto the metal connector and then pressing solder against the tip and the board.
-
Once a small amount of solder has melted onto the board, lift the solder away first and then the soldering iron.
I would remove all the solder and use a pin to clear the holes before inserting the cables and resoldering.
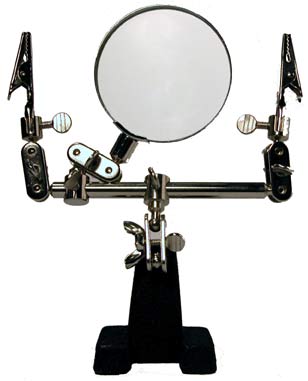
Also get a 'helping hand' - they are a few quid on eBay - similar to this: http://www.laventure.net/tourist/cables3...
I removed all the solder as Neil suggests. But to pull the solder out with the wick you may need to add some a little solder to the top of the hole first so that you get good thermal conductivity between the wick and the solder you are trying to remove from the small hole.
-
-
-
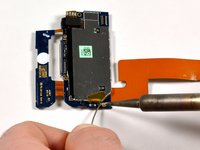
Place the wire from the new battery onto the new solder bead.
-
Press the tip of the soldering iron onto the solder bead until it melts.
-
Slide the wire lead into the liquid solder until the wire goes through the center of the bead, then remove the soldering iron.
-
Continue with the other two connections the same way, taking special care not to solder two of the connectors together.
-
-
-
The wires should look very similar to this picture once you have finished soldering.
Hey guys, I have a question, I have an Ipod touch 1st gen but it needs a battery and the replacements are too expensive so I think to just use brand new nokia 3 contact battery but I don't know what pins are on the ipod and I can't find chematic anywere, do anyone know.
-


To reassemble your device, follow these instructions in reverse order.
To reassemble your device, follow these instructions in reverse order.
Annulla: non ho completato questa guida.
Altre 134 persone hanno completato questa guida.

8 Commenti
When i did this i found the desoldiering wick un necessary. A helper is mutch advised, she held it, i heated and pulled out the old wires, then reused the soldier already there
If you don't want to go to all the trouble and risk of breaking something. Don't take everything apart. Just cut the battery wires as close as possible to the old battery terminals and splice the wires from the new battery on them. A little solder and a bit of electrical tape and your done! It's miller time!
while this might be an easy way to get the job done, it is for lack of a better word half-assed. It opens the door for shorts and part malfunction in the future. While i can see where you are coming from, it is not the corect way. Do it right the first time.
I stopped at step 5, cut the battery wires and spliced them to those on the new battery and then scotch taped them. It worked, although to official method is doubtless better.
I recommend examining the metal case fastening carefully to see that prongs are flattened before reassembly. Several of mine were bent out and up.
I took it apart and stopped before step 6. Took it to an experienced radio repairs man. I think he did a good work soldering three point for £5 but I forgot to check the headphone jack before taking it back home and 'of course' the jack is not working any more. I've did everything I could find on internet to make the jack work again but no.
I doubt it could have broken in the repair but who knows...
Anyway I've ordered a spare jack from Amazon for £5 and I'm thinking of changing it myself.
Unfortunately though the ipod has given up totally on me now. I can't even make it wake/start up connected to iTunes. Oh, dear! my good old friend, won't you please come back to me?!
Bonjour,
le liens propose une batterie chez Amazon est 1600 mAh, est-ce que l’appareil peut supporté cette intensité ?
I found the little plastic tools to be useless. I finally got the case apart using jeweler's screwdrivers, guitar picks, and believe it or not, a wood chisel to split the sides of the case open. And believe it or not, I got back together again - not quite as good as new, but good enough.
I'd REALLY love to know how Apple technicians get this little beast apart without damaging or nicking the case.
phinegan - Replica
Who's betting the actually replace the back with a brand-spanker - if they repair them at all!
marc draco - Replica
They do replace it with a new back, thats why they said that if you have words on the back (engraved) by someone other then apple, your going to lose those but if there done by apple then they'll do it again (when replaceing the battery they say that)
shadowfox00101 - Replica
I replaced my battery in my 1st gen iPod and it still doesn't hold a charge for more then 5 min. Any ideas?
ae86keidori - Replica
mine has the same problem. My 1st gen iPod touch dropped in water. after that It still works but can't hold a charge for more than 5 mins. I changed the battery and still the same.
One of my friend give me some advices, I simply clean the whole logic board with some non water alcohol, and it works. It works perfect now. You can have a try.
Liku - Replica
I found a method that worked for me in opening the case. I started at the top, and used a sewing needle. I'm sure a straight pin world work also. Using some padding between the back of the needle and my hand, I worked the point of the needle between the casing and the metal back. Don't push straight into the gap, push on the edge of the gap down toward the back of the iPod. Once you feel the needle slip in, use it as a guide to get your prying tool in there.
Paul Jones - Replica
Hey, I made it, it's open! My opener tool was useless. A swiss army knife and lots of brute force is your friend. My tool broke apart not resisting such force that is necessary.
http - Replica
lol i dropped my iPod this fixedit because it had no back
elais - Replica
Count get past step 1 :( began seperating the back but the metal back sooner bent than the clips letting loose. I heard something chip then the ipod started getting very hot so I think I punctured the battery :( its going to live outside for a while before I throw it out.
Mike - Replica