Questa versione può contenere modifiche errate. Passa all'ultima istantanea verificata.
Cosa ti serve
-
-
Riempi una pentola o una padella con abbastanza acqua per immergerci un iOpener.
-
Scalda l'acqua finché non bolle. Spegni il fuoco.
-
Posiziona l'iOpener nell'acqua calda per 2-3 minuti. Assicurati che l'iOpener sia completamente immerso nell'acqua.
-
Usa delle pinze per estrarre l'iOpener scaldato dall'acqua calda.
-
Asciuga accuratamente l'iOpener con un asciugamano.
-
Il tuo iOpener è pronto all'uso! Se devi scaldare di nuovo l'iOpener, scalda l'acqua fino all'ebollizione, spegni il fuoco e immergi l'iOpener in acqua per 2-3 minuti.
-
-
-
Se il tuo vetro è rotto, evita di romperlo ulteriormente e di tagliarti con le schegge coprendolo con del nastro adesivo.
-
Applica delle strisce di nastro adesivo trasparente da pacchi sul vetro, una sopra l'altra, finché non è completamente coperto.
-
Fai del tuo meglio per seguire il resto della guida come descritto. Comunque, una volta rotto il vetro, continuerà a rompersi mentre ci lavori e potresti dover usare uno strumento di apertura in metallo per rimuovere il vetro.
-
-
-
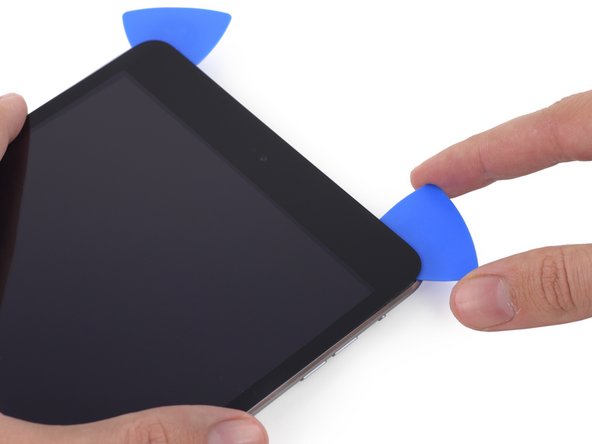
Prendi il primo plettro che hai inserito e fallo scorrere sotto il vetro verso l'angolo superiore dell'iPad.
-
Se vedi la punta del plettro sotto il vetro, niente panico: semplicemente tira un po' indietro il plettro. Probabilmente tutto funzionerà ancora, ma cerca di evitare che succeda per evitare di depositare sul pannello LCD dell'adesivo, che sarà poi difficile da rimuovere.
-
-
-
Lascia il plettro infilato nell'iPad appena oltre la fotocamera frontale.
-
Prendi un altro plettro e infilalo a sinistra della fotocamera, dove sei già passato con il primo plettro. Fai scorrere questo plettro tornando indietro verso l'angolo in alto a sinistra per tagliare l'adesivo rimasto.
-
Lascia il secondo plettro infilato sotto l'angolo per evitare che l'adesivo si reincolli.
-
-
-
Fai scorrere il plettro sotto l'angolo in basso a sinistra attorno all'angolo per tagliare l'adesivo.
-
Lascia il plettro sotto l'angolo. Non andare oltre e non rimuovere il plettro dall'iPad.
-
Antenne
-
Alloggio tasto Home
-
Cavo digitizer
-
I prossimi passaggi ti mostreranno dove fare leva per evitare queste componenti. Scalda e fai leva solo dove indicato.
-
-
-
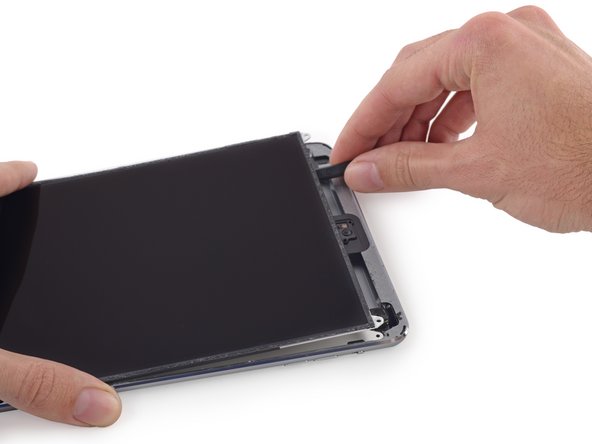
Una volta separato tutto l'adesivo, apri il vetro come la pagina di un libro e appoggialo sulla superficie di lavoro.
-
Se vuoi riusare il gruppo dello schermo, durante il rimontaggio dovrai sostituire l'adesivo. Segui la nostra guida per l'applicazione dell'adesivo dello schermo per farlo e sigillare di nuovo il dispositivo.
-
-
-
Infila la parte piatta di uno spudger tra il pannello LCD e la schermatura e solleva delicatamente il pannello.
-
Fai scorrere un sottile filo (come filo interdentale o lenza) sotto lo schermo, iniziando dal bordo superiore e tirandolo verso quello inferiore.
-
Usa una sottile e flessibile scheda o una banconota in polimeri per tagliare l'adesivo iniziando dal bordo superiore.
-
-
-
-
Svita le seguenti viti a croce Phillips #00 dalla copertura dei cavi dello schermo:
-
Una vite da 2,7 mm
-
Due viti da 1,4 mm
-
-
-
Usa la parte piatta di uno spudger per sollevare il connettore del cavo del digitizer dalla sua presa.
-
-
Questo passaggio è privo di traduzione. Aiuta a tradurlo
-
Remove the following Phillips #00 screws from the left antenna:
-
One 2.6 mm screw
-
Two 1.5 mm screws
-
-
Questo passaggio è privo di traduzione. Aiuta a tradurlo
-
Use the flat end of a spudger to loosen the foam adhesive securing the Wi-Fi antenna to the left speaker.
-
-
Questo passaggio è privo di traduzione. Aiuta a tradurlo
-
Use the flat end of a spudger to fold the wide left-hand piece of tape away from the left speaker.
-
-
Questo passaggio è privo di traduzione. Aiuta a tradurlo
-
Use the tip of a spudger to pry the antenna cable tape up from the rear case of the iPad.
-
Gently pull the antenna cable out of the way as you work along the piece of tape to free it and keep it from resealing.
-
-
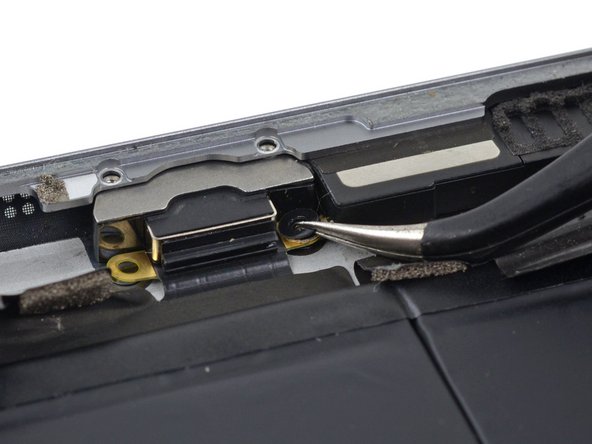
Questo passaggio è privo di traduzione. Aiuta a tradurlo
-
Pull the antenna cable from the clip behind the Lightning connector.
-
-
Questo passaggio è privo di traduzione. Aiuta a tradurlo
-
Pull the wide tape toward the battery, applying constant force to peel it from the antenna cable lodged between it and the speaker.
-
Insert a plastic opening tool into the gap between the wide tape and the antenna cable, to break the adhesive connecting the two.
-
Slide the plastic opening tool along the length of the antenna cable to completely separate it from the piece of tape.
-
-
Questo passaggio è privo di traduzione. Aiuta a tradurlo
-
Lift the antenna cable tape up from behind the right speaker.
-
-
Questo passaggio è privo di traduzione. Aiuta a tradurlo
-
Pull the antenna cable out from under the corner of the right speaker.
-
-
Questo passaggio è privo di traduzione. Aiuta a tradurlo
-
Remove the following Phillips #00 screws from the right antenna:
-
Three 1.5 mm screws
-
One 2.6 mm screw
-
-
Questo passaggio è privo di traduzione. Aiuta a tradurlo
-
Use the flat end of a spudger to cut the foam adhesive securing the antenna to the right speaker.
-
-
Questo passaggio è privo di traduzione. Aiuta a tradurlo
-
Pull the bend of the antenna cable out of the corner of the case.
-
Fold the antenna out of the way of the right speaker.
-
-
Questo passaggio è privo di traduzione. Aiuta a tradurlo
-
Remove the following Phillips #00 screws securing the right speaker to the rear case:
-
One 1.9 mm screw
-
One 1.7 mm screw with a large head
-
-
Questo passaggio è privo di traduzione. Aiuta a tradurlo
-
Remove the speaker contact washer from the iPad.
-
-
Questo passaggio è privo di traduzione. Aiuta a tradurlo
-
Push the speaker with the flat end of a spudger to begin sliding it out of its recess in the rear case.
-
-
Questo passaggio è privo di traduzione. Aiuta a tradurlo
-
Insert the tip of a spudger into the gap between the left speaker and the bottom left side of the rear case.
-
-
Questo passaggio è privo di traduzione. Aiuta a tradurlo
-
Use a set of tweezers to remove any tape covering the front-facing camera cable clips.
-
-
Questo passaggio è privo di traduzione. Aiuta a tradurlo
-
Use a plastic opening tool to fold the front-facing camera cable clips outward, away from the cable, freeing the cable connector.
-
-
Questo passaggio è privo di traduzione. Aiuta a tradurlo
-
Use a plastic opening tool to lift the front-facing camera cable connector straight up off of its socket on the logic board.
-
-
Questo passaggio è privo di traduzione. Aiuta a tradurlo
-
Use a plastic opening tool to gently fold the front-facing camera cable upwards (roughly at a 90-degree angle), exposing the bottom side of it.
-
-
Questo passaggio è privo di traduzione. Aiuta a tradurlo
-
Use a set of tweezers to peel up the small piece of tape covering the microphone cable connector.
-
-
Questo passaggio è privo di traduzione. Aiuta a tradurlo
-
Use the tip of a spudger to gently lift the tab on the microphone ribbon cable's ZIF connector.
-
-
Questo passaggio è privo di traduzione. Aiuta a tradurlo
-
Slide the tip of a tweezer under the microphone cable to separate it from the adhesive holding it to the headphone jack cable.
-
-
Questo passaggio è privo di traduzione. Aiuta a tradurlo
-
Use tweezers to pull the microphone cable straight out from its ZIF socket.
-
Gently bend the microphone cable up and out of the way of the headphone jack cable.
-
-
Questo passaggio è privo di traduzione. Aiuta a tradurlo
-
Remove any tape covering the headphone jack cable connector.
-
-
Questo passaggio è privo di traduzione. Aiuta a tradurlo
-
Use a plastic opening tool to fold the headphone jack cable clips outward, away from the cable, freeing the cable connector.
-
-
Questo passaggio è privo di traduzione. Aiuta a tradurlo
-
Use a plastic opening tool to pry the headphone jack cable's connector up from its socket on the logic board.
-
-
Questo passaggio è privo di traduzione. Aiuta a tradurlo
-
Lift the headphone jack cable up out of the way of the logic board.
-
-
Questo passaggio è privo di traduzione. Aiuta a tradurlo
-
Remove the 1.4 mm Phillips #00 screw securing the rear-facing camera cable bracket.
-
-
Questo passaggio è privo di traduzione. Aiuta a tradurlo
-
Use a set of tweezers to grip the rear-facing camera cable bracket and push it toward the rear-facing camera.
-
Lift the rear-facing camera cable bracket up off of the logic board.
-
-
Questo passaggio è privo di traduzione. Aiuta a tradurlo
-
Use the flat end of a spudger to lift the rear-facing camera connector up off of its socket on the logic board.
-
Gently push the rear-facing camera cable away from the logic board.
-
-
Questo passaggio è privo di traduzione. Aiuta a tradurlo
-
Remove the 1.8 mm Phillips #00 screw securing the case button cable bracket.
-
-
Questo passaggio è privo di traduzione. Aiuta a tradurlo
-
Remove the case button cable bracket from the iPad.
-
-
Questo passaggio è privo di traduzione. Aiuta a tradurlo
-
Use the point of a spudger to lift the case button cable connector straight up out of its socket on the logic board.
-
Fold the cable out of the way of the logic board.
-
-
Questo passaggio è privo di traduzione. Aiuta a tradurlo
-
Use the point of a spudger to lift the two antenna cable connectors straight up off of their sockets on the logic board.
-
-
Questo passaggio è privo di traduzione. Aiuta a tradurlo
-
Use the point of a spudger to pull the antenna cable clip toward the battery to allow access to the cables.
-
-
Questo passaggio è privo di traduzione. Aiuta a tradurlo
-
Deroute and remove both antennas from the iPad.
-
-
Questo passaggio è privo di traduzione. Aiuta a tradurlo
-
Remove the following Phillips #00 screws securing the left speaker to the rear case:
-
One 1.9 mm screw
-
One 1.7 mm screw
-
-
Questo passaggio è privo di traduzione. Aiuta a tradurlo
-
Remove the speaker contact washer from the iPad.
-
-
Questo passaggio è privo di traduzione. Aiuta a tradurlo
-
Insert the tip of a spudger into the gap between the left speaker and the bottom left side of the rear case.
-
Push the spudger in to slide the speaker out from its recess in the rear case.
-
-
Questo passaggio è privo di traduzione. Aiuta a tradurlo
-
Push from the Lightning connector end with the flat end of a spudger to free the speaker from the lip of the rear case.
-
-
Questo passaggio è privo di traduzione. Aiuta a tradurlo
-
Heat an iOpener and place it in the center of the back of the iPad case.
-
After a minute, reheat the iOpener and place it on the right side of the iPad, the side farthest from the camera.
-
-
Questo passaggio è privo di traduzione. Aiuta a tradurlo
-
Flip the iPad back over and insert a plastic card between the logic board side, speaker end of the battery and the rear case.
-
-
Questo passaggio è privo di traduzione. Aiuta a tradurlo
-
Remove the plastic card and insert it under the cell nearest the edge of the case.
-
-
Questo passaggio è privo di traduzione. Aiuta a tradurlo
-
Insert a second plastic card beneath the battery on the logic board side near the front-facing camera.
-
-
Questo passaggio è privo di traduzione. Aiuta a tradurlo
-
Insert the second card under the battery near the headphone jack.
-
-
Questo passaggio è privo di traduzione. Aiuta a tradurlo
-
Grasp both cards and slowly pull the case-side cell of the battery up about two inches from the rear case.
-
Peel slowly and try not to bend the battery cell.
-
-
Questo passaggio è privo di traduzione. Aiuta a tradurlo
-
Move the right-hand card up under the other battery cell.
-
-
Questo passaggio è privo di traduzione. Aiuta a tradurlo
-
Press the left-hand card up toward the logic board.
-
-
Questo passaggio è privo di traduzione. Aiuta a tradurlo
-
Grip both cards and use them to lift the battery up off the rear case.
-
Remove the battery from the iPad.
-
-
Questo passaggio è privo di traduzione. Aiuta a tradurlo
-
Peel up the tape covering the Lightning connector cable.
-
-
Questo passaggio è privo di traduzione. Aiuta a tradurlo
-
Use a set of tweezers to remove the small plastic covers on the screws in the Lightning connector housing.
-
-
Questo passaggio è privo di traduzione. Aiuta a tradurlo
-
Remove the two 2.8 mm Phillips #00 screws from the Lightning connector housing.
-
-
Questo passaggio è privo di traduzione. Aiuta a tradurlo
-
Remove the single 1.3 mm Phillips #00 screw from the logic board.
-
-
Questo passaggio è privo di traduzione. Aiuta a tradurlo
-
One under the upper component tab, and one under the Lightning connector ribbon cable.
-
In the following steps only pry where directed so as to avoid damaging your logic board.
-
-
Questo passaggio è privo di traduzione. Aiuta a tradurlo
-
Place a heated iOpener on the bottom of the rear case for one minute.
-
-
Questo passaggio è privo di traduzione. Aiuta a tradurlo
-
Carefully insert an opening pick under the ribbon cable near the Lighting connector housing.
-
Slide the opening pick toward the logic board, but stop half an inch from the bend in the cable.
-
-
Questo passaggio è privo di traduzione. Aiuta a tradurlo
-
Reinsert the opening pick under the Lightning connector ribbon cable from the case-side edge.
-
Slide the pick along the Lightning connector ribbon cable and under the logic board.
-
-
Questo passaggio è privo di traduzione. Aiuta a tradurlo
-
Reheat the iOpener and place it at the top of the rear case of the iPad for one minute.
-
-
Questo passaggio è privo di traduzione. Aiuta a tradurlo
-
Carefully insert an opening pick under the logic board to the right of the front-facing camera.
-
-
Questo passaggio è privo di traduzione. Aiuta a tradurlo
-
Place a plastic opening tool in the hole in the logic board near the rear-facing camera connector.
-
Pry the logic board up from the last of the adhesive.
-
-
Questo passaggio è privo di traduzione. Aiuta a tradurlo
-
Lift the logic board by the camera end and gently pull the Lightning connector housing out of the rear case.
-
Remove the logic board from the iPad mini.
-


Annulla: non ho completato questa guida.
Altre 27 persone hanno completato questa guida.


4 Commenti
This guide uses an iPad mini 3 not a 2.
This guide is overkill, you really don't need to remove EVERY SINGLE PART From the IPad to replace a logic board. Just unplug everything and you can just unscrew it and replace.
Well, there was a part of the logic board under the battery, so they need to remove that. Sure, they likely could have removed it without taking everything out, but it would probably be a lot harder if things were in the way.
Kyan -
You dont need to remove battery!