Questa versione può contenere modifiche errate. Passa all'ultima istantanea verificata.
Cosa ti serve
-
-
Riempi una pentola o una padella con abbastanza acqua per immergerci un iOpener.
-
Scalda l'acqua finché non bolle. Spegni il fuoco.
-
Posiziona l'iOpener nell'acqua calda per 2-3 minuti. Assicurati che l'iOpener sia completamente immerso nell'acqua.
-
Usa delle pinze per estrarre l'iOpener scaldato dall'acqua calda.
-
Asciuga accuratamente l'iOpener con un asciugamano.
-
Il tuo iOpener è pronto all'uso! Se devi scaldare di nuovo l'iOpener, scalda l'acqua fino all'ebollizione, spegni il fuoco e immergi l'iOpener in acqua per 2-3 minuti.
-
-
-
Se il vetro dello schermo è crepato, previeni ulteriori rotture e danni fisici durante la riparazione coprendo lo schermo con del nastro adesivo trasparente.
-
Sovrapponi strisce di nastro adesivo trasparente per coprire tutta la superficie dello schermo dell´iPad.
-
Fai del tuo meglio per seguire il resto della guida, come descritta. In ogni caso, uno schermo crepato continuerà probabilmente a danneggiarsi durante la riparazione e, perciò potrebbe essere necessario utilizzare uno strumento metallico per estrarre il vetro.
-
-
-
C'è una piccola fessura nell'anello adesivo dell'iPad nell'angolo in alto a destra, a circa 5 cm dal bordo superiore. Dovrai sfruttare questa debolezza.
-
Allinea lo strumento con il tasto del muto. Infila la punta di uno uno strumento di apertura in plastica nella fessura tra il vetro anteriore e il bordo in plastica. Infila solo la punta dello strumento, solo abbastanza per allargarla.
-
-
-
-
Una volta superata l'antenna WiFi (a circa da 75 mm dal bordo destro, o accanto al tasto Home), reinfila il plettro completamente.
-
Fai scorrere il plettro verso destra, rilasciando l'adesivo che fissa l'antenna WiFi al vetro anteriore.
-
L'antenna del WiFi è attaccata al bordo inferiore dell'iPad tramite delle viti e un cavo. Questo passaggio separa l'antenna dal pannello anteriore, assicurando che quando lo rimuoverai l'antenna non verrà danneggiata.
-
-
-
Fai scorrere il plettro sotto il bordo superiore dell'iPad, sfilandolo leggermente per aggirare la staffa della fotocamera anteriore.
-
L'adesivo in questa zona è molto spesso e può essere richiesta abbastanza forza. Lavora attentamente e lentamente, assicurandoti di non scivolare e danneggiare te stesso o l'iPad.
-
-
Questo passaggio è privo di traduzione. Aiuta a tradurlo
-
Remove the four 2.0 mm Phillips screws securing the LCD to the rear case.
-
-
Questo passaggio è privo di traduzione. Aiuta a tradurlo
-
Lift the LCD from its long edge closest to the volume buttons and rotate it out of the rear case.
-
Lay the LCD on the front panel as seen in the second picture.
-
-
Questo passaggio è privo di traduzione. Aiuta a tradurlo
-
Use the edge of a plastic opening tool to flip up the metal retaining clip securing the display data cable to its socket on the logic board.
-
-
Questo passaggio è privo di traduzione. Aiuta a tradurlo
-
Pull the display data cable out of its socket on the logic board.
-
-
Questo passaggio è privo di traduzione. Aiuta a tradurlo
-
Carefully peel the rubber cover off the metal camera retainer and remove it from the iPad 2.
-
-
Questo passaggio è privo di traduzione. Aiuta a tradurlo
-
Remove the following two screws:
-
One 3.3 mm Phillips screw
-
One 2.1 mm Phillips screw
-
Lift the metal retainer clip straight up from its recess in the rear panel.
-
-
Questo passaggio è privo di traduzione. Aiuta a tradurlo
-
Use a plastic opening tool to pry the rear camera connector up from its socket on the control board.
-
Remove the rear facing camera.
-
-
Questo passaggio è privo di traduzione. Aiuta a tradurlo
-
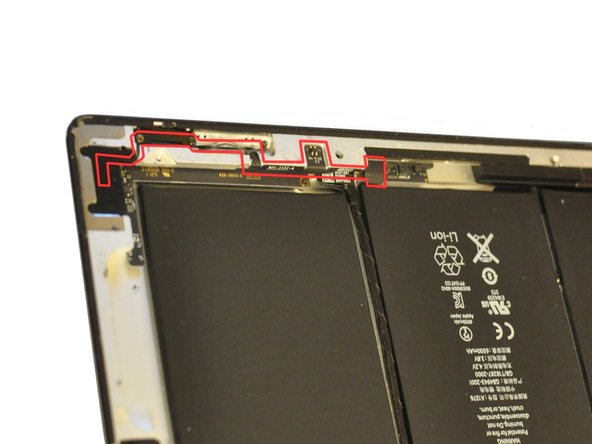
Once the LCD panel and rear camera are removed, you can begin removing the Power, Mute, Volume cable (hereafter called the PMV cable for short).
-
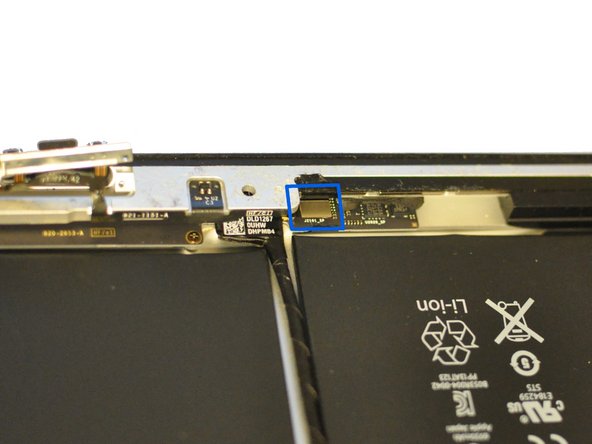
The PMV cable starts near the end of the control board cable that runs between two of the battery units, and runs in a complicated path along the side and corner of the iPad. (see photos 1 and 2)
-
The end of the PMV cable is wrapped in tape. Begin by removing this tape to expose the silver rectangular connector on the end of the cable. (see photo 3)
-
Use a plastic opening tool or small screwdriver to lift free the rectangular connector.
-
-
Questo passaggio è privo di traduzione. Aiuta a tradurlo
-
Now you must disassemble the side switches.
-
Remove the 2.1 mm Phillips screw from the volume switch mechanism.
-
Remove the two 5.0 mm Phillips screws from the mute slider mechanism.
-
If you have not already removed the rear camera, do so now.
-
-
Questo passaggio è privo di traduzione. Aiuta a tradurlo
-
Remove the two 2.5 mm Phillips screws from the back of the power switch mechanism.
-
You can then push in on the power switch (on the exterior of the iPad) to push the mechanism's internal metal plate loose.
-
You can then peel the PMV cable free from the iPad's case, working backwards from the power switch towards the mute switch.
-
Lift free the small metal frame piece supporting the mute and volume switches.
-
Note: The photo shows the mute and volume switch frame being removed before the rear camera and power switch; this is possible but it's probably best to start with the power switch first.
-
-
Questo passaggio è privo di traduzione. Aiuta a tradurlo
-
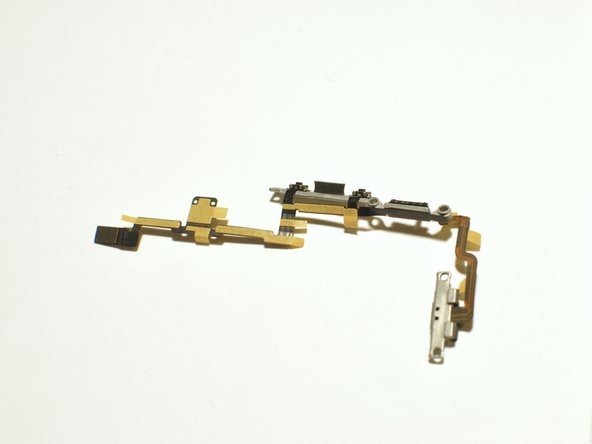
The PMV cable itself is a complicated piece with three integrated buttons and a switch slider.
-
You will need to carefully peel off the old cable free from the ipad frame and the two metal supports (one for the power switch, one for the mute and volume switches).
-
Note that each button is held in place with a tiny bit of adhesive. Use a plastic opening tool or small screwdriver to lift them free.
-
-
Questo passaggio è privo di traduzione. Aiuta a tradurlo
-
Now assemble the replacement PMV cable to the two metal brackets.
-
Each button has on its underside two tiny black plastic pegs which fit into holes in the metal frames, to ensure the proper fit. Make sure to line these up properly when attaching the cable to the metal frames. The reassembled cable should look as shown in the figures.
-
Install the new cable working from the power switch back towards the mute and volume switches and then to the cable connector, snaking the PMV cable along its complicated path.
-
The replacement part should have adhesive patches to hold the cable in place.
-
Attaching the rectangular cable connector is tricky as there is little clearance from the edge of the iPad case. It may be helpful to use a plastic opening tool to push it gently until it snaps into place.
-


Annulla: non ho completato questa guida.
Altre 114 persone hanno completato questa guida.
6 Commenti
Hi, we have an iPad 2 in for repair and needs a new power button assembly. Thing is the ribbon is different from a standard iPad 2. There are subtle differences in the inside too. It is definitely a genuine iPad, and has same model numbers. Anyone come across this before?
Chris, I have the same problem with power ribbon cable it's not the one everyone is selling, did you manage to find a source who sold the correct part?
David -
Completed this guide thank you. Just want to point out that there are two cables for the iPad 2, making sure that you have the right one is very important. Be very careful around the camera area of the iPad too this is very tricky and there are no pictures of this part, wish I had done some now to upload for others, but I'm sure that I'll have another to do before to long and I will then. One main tip... Don't stick anything down till you've got everything secure as removing the the tape is very tricky once stuck and you don't want to be replacing this again...
Beware of fake versions of this cable 821-1151-A from many suppliers. The Hall Effect magnetic switch will then not work because the printed circuit traces on the cable are incorrect. The fake cable can be identified by an ohmmeter showing the two contacts for the Hall chip farthest from the cable edge to be shorted together.