Introduzione
Quando la memoria grafica del mio iMac da 24" di inizio 2009 si è rovinata, ho creduto di dover buttare il computer. Alcune fonti riportavano che la scheda grafica era saldata alla scheda madre, ma potrebbe essere vero solo per il modello base dell'iMac. Quelli con scheda NVIDIA o ATI sono riparabili/aggiornabili come mostrato in questa guida.
Questa guida mostra lo scollegamento di tutti i cavi dalla scheda madre, la rimozione di tutte le viti di bloccaggio e della scheda madre e la sostituzione della scheda grafica.
Cosa ti serve
-
-
Inizia seguendo la fantastica guida sull'apertura di questo modello di iMac di Brittany.
-
-
-
Una volta rimosso lo schermo dal dispositivo, puoi vedere quello che ti aspetta.
-
La scheda madre è evidenziata in rosso. Dovremo rimuoverla del tutto, in quanto la scheda grafica è installata sul suo retro. Prima di farlo, dobbiamo scollegare attentamente 17 connettori.
-
Puoi vedere delle parti della scheda grafica evidenziate in arancione. La scheda grafica è sulla destra e il dissipatore dedicato è a sinistra, "controvento" rispetto a quello della CPU.
-
DOPO aver scollegato i cavi, dovrai anche rimuovere la copertura dello speaker destro. in quanto copre l'angolo della scheda madre. è tenuto fermo da una vite evidente.
Traducción al Español:
Una vez que haya retirado la pantalla LCD del dispositivo, podrá ver en qué está.
La placa lógica se describe aquí en rojo. Tenemos que eliminarlo completamente ya que la tarjeta de video está instalada en la parte posterior. Antes de hacer eso, tenemos que separar cuidadosamente 17 conectores.
Puedes ver partes de la tarjeta gráfica resaltadas en naranja. La GPU está a la derecha y los disipadores de calor dedicadas están a la izquierda, ubicadas justo a "encima" del ventilador de la CPU.
DESPUÉS DE QUE desconectemos todos los cables, también debe quitar la carcasa del altavoz derecho ya que cubre la esquina de la placa lógica. Este se retiene con un tornillo.
-
-
-
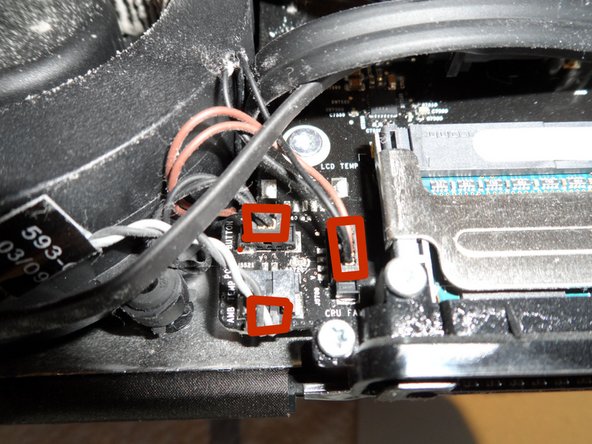
Questa zona della scheda madre ha tre connettori vicini tra loro per il tasto di accensione, il sensore della temperatura ambientale e la ventola della CPU. Scollegali.
-
Scollega questi cavi per il sensore della temperatura del disco rigido, il sensore della temperatura del lettore CD e la ventola del disco rigido.
-
Ognuno di questi tre connettori ha un diverso numero di contatti, quindi non scambiarli tra loro quando li ricolleghi. Grazie Apple!
I followed your indications with great success to revive my old iMac 24" (early 2008) by baking its burned-out Nvidia 8800GS !
This is a great step-by-step guide. Thank you very much for publishing it ! I'd like to add some commentaries : the 3 connectors (red point) are rather hard to unplug. Don't loose patience ! You have to pull them slowly with your nails and tweezers to avoid damaging the tiny wires. Don't be afraid, just take your time, because as indicated perfectly by Jeff, each connector has a different size.
Traducción al Español:
Esta posición en la placa lógica tiene tres conectores muy próximos entre sí para el botón de encendido, el sensor de temperatura ambiente y el ventilador de la CPU. Desenchúfelos.
Desconecte estos tres conectores para el sensor de temperatura HD, el sensor de temperatura de la unidad óptica y el ventilador del disco duro.
Cada uno de estos tres conectores tiene una cantidad diferente de pines, por lo que no puede mezclarlos cuando se vuelva a conectar. Gracias, Apple!
-
-
-
Scollega la presa della ventola del lettore CD.
-
Dovrebbero esserci quattro prese da scollegare in questa zona: il bus SATA, il microfono e gli speaker destro e sinistro.
RED: On my iMac 24" (early 2008), the plug for the optical drive fan is located just on the right side of the SATA bus plug. I'd like to publish a picture of it but I don't know if it's possible here.
ORANGE: On my iMac 24" (early 2008), the SATA plug is tighten by two little screws of the same size than those of the screen data plug. They are easy to remove. All the connectors are different so that it's impossible to mix them up. As said before, some of them could be a bit hard to remove but take your time, they will loosen.
Traducción al Español:
Desconecte el enchufe del ventilador de la unidad óptica.
Tiene cuatro enchufes para desconectar en esta ubicación: bus SATA, micrófono y los cables de altavoz izquierdo y derecho.
ROJO: en mi iMac 24 "(principios de 2008), el conector del ventilador de la unidad óptica se encuentra justo en el lado derecho del conector del bus SATA. Me gustaría publicar una imagen del mismo, pero no sé si es posible aquí
NARANJA: en mi iMac 24 "(principios de 2008), el tapón SATA se aprieta con dos tornillos pequeños del mismo tamaño que los del tapón de datos de la pantalla. Se pueden quitar fácilmente. Todos los conectores son diferentes, por lo que es imposible mezclar Como se dijo antes, algunos de ellos podrían ser un poco difíciles de quitar, pero tómate tu tiempo, se relajarán.
-
-
-
On my iMac 24" (early 2008), this cable and the power supply one are covered by a plastic fin that you'll have to bend a little to extract the two cables underneath (left speaker and power supply).
Traducción al Español:
Tome nota aquí de cómo el cable para el altavoz de audio izquierdo (lo estoy pellizcando) se enruta de manera holgada por encima de las ranuras de RAM. Después de volver a instalar la placa lógica, debe volver a colocarlo en un estilo similar.
En mi iMac 24 "(principios de 2008), este cable y la fuente de alimentación están cubiertos por una aleta de plástico que deberá doblar un poco para extraer los dos cables que se encuentran debajo (altavoz izquierdo y fuente de alimentación).
-
-
Quasi finito! Saremo veramente senza fili, scollegando le tre antenne del WiFi e del Bluetooth. Questi sono dei connettori a pressione, da tirare delicatamente verso l'alto. Inoltre, sbucando dal retro, troverai il cavo della fotocamera iSight. Scollegalo. Questo è uno di quelli a cui stare attenti durante la reinstallazione della scheda madre
-
Alla fina scollega il cavo dell'alimentazione e il cavo SATA del disco rigido. Ho fotografato quello sopra già scollegato: assicurati di premere le alette laterali per rilasciare i ganci a morsetto. Il connettore SATA del disco rigido ha una comoda aletta per tirarlo.
ORANGE: On my iMac 24" (early 2008), the main power cord is marked «MLB» and is located in the wifi cables area. My iMac motherboard is a bit different than Jeff's one. But the differences are small. For instance, in my case, there is a small plastic fin above the memory slots that you'll have to bend a little to take out the power and left speaker cables. There is also a small cooler plate in the area above the memory slots.
Traducción al Español:
¡Ya esta casi! Es hora de ir realmente a la red inalámbrica desconectando las tres antenas WiFi y Bluetooth. Estas son pequeñas broches, así que tira suavemente hacia arriba. Además, entrando sigilosamente desde abajo, encontrarás el cable de la cámara iSight. Desenchúfelo. Este es un aspecto que debe tener en cuenta al reinstalar la placa lógica.
Por último, desconectará el cable de alimentación principal y el cable SATA del disco duro. Fotografié el superior ya desconectado; asegúrese de apretar las lengüetas del borde para liberar los ganchos de la abrazadera. El conector HDD SATA tiene una pestaña de extracción conveniente.
NARANJA: En mi iMac 24 "(principios de 2008), el cable de alimentación principal está marcado como« MLB »y está ubicado en el área de cables wifi. Mi placa base iMac es un poco diferente a la de Jeff. Pero las diferencias son pequeñas. También hay una pequeña placa de refrigeración en el área sobre las ranuras de memoria.
-
-
-
Finiti i cavi. Ora passiamo alle viti. Ci sono dieci viti Torx T10 che fissano la scheda madre alla copertura, di tre misure diverse:
-
Lunghe (da 2,5 mm x 24 mm)
-
Corte (da 2,5 mm x 7 mm)
-
Una corta con filettatura sottile (da 2,5 mm x 7 mm)
RED: On my iMac 24" (early 2008), the motherboard has just one more long screw located in the middle of the motherboard, below the top one indicated by Jeff in his picture. All the other screws are like those indicated by Jeff.
Traducción al Español:
Cables desconectados.. Ahora para desenroscarlo. Hay diez tornillos Torx T-10 que sujetan la placa lógica a la caja en tres tamaños diferentes:
Rojos: Los largos (2.5mm x 24mm)
Naranjas: Las cortas (2.5mm x 7mm)
Amarillos: uno corto con un hilo fino (2.5mm x 7mm)
ROJO: En mi iMac 24 "(principios de 2008), la placa base solo tiene un tornillo más largo ubicado en el centro de la placa base, debajo de la parte superior indicada por Jeff en su foto. Todos los otros tornillos son como los indicados por Jeff.
-
-
-
Se non lo hai già fatto, rimuovi il gruppo dello speaker a destra svitando la vite Torx T10 da 2,5 mm x 14 mm.
-
Svita le due viti Torx T9 da 2 mm x 7 mm sugli angoli in basso a destra e sinistra delle prese della RAM che fissano la copertura in plastica nera alla cornice.
-
Ora semplicemente solleva la scheda madre mentre stai attento a tutti i cavi che hai scollegato. Il dissipatore è attaccato alla scheda madre e si solleverà con lei.
-
Nota: C'è del nastro in alluminio all'estrema destra (vicino alle prese audio) che dovrà essere sollevato dalla copertura mentre sollevi la scheda madre.
Traducción al Español
Si aún no lo ha hecho, retire el ensamblaje del altavoz a la derecha aflojando un solo tornillo T-10 (2,5 mm x 14 mm).
Retire los dos tornillos T-9 (2 mm x 7 mm) de las esquinas inferior derecha e izquierda de las ranuras de RAM que fijan el soporte de plástico negro al marco.
Ahora simplemente levante la placa lógica mientras observa atentamente todos los cables que acaba de desconectar. Las aletas del disipador de calor están unidas a la placa lógica y se levantan con ella.
Nota: Hay un poco de cinta de aluminio en el extremo derecho (por los puertos de audio) que también tendrá que sacar del estuche mientras levanta la placa base.
-
-
-
Ho spostato la scheda madre sulla mia superficie di lavoro imbottita.
-
Girando la scheda a faccia in giù troverai tutti i connettori sul retro e alcuni tubi in rame del dissipatore della CPU e della scheda grafica.
-
Questi tubi vanno alle alette sopra la ventola principale. Questo è come diventano dopo 4 anni di polvere. Può essere il motivo per cui la mia memoria grafica si è rovinata?
Traducción a Español:
La placa lógica se mueve a mi superficie de trabajo acolchada.
Al voltear el tablero, encontrará todos los conectores del panel posterior y algunas tuberías de calor de cobre ingeniosas para la CPU y la GPU.
Esos tubos de calor fluyen a las aletas por encima del soplador principal. Así es como se ve 4 años de acumulación de polvo. ¿Es esta la razón por la que mi VRAM murió?
I’m thinking of replacing my iMac Graphics cards and RAM! My computer is getting extremely slow and I’m extremely surprised the computer has lasted this long; 10 years and going strong!
XD
-
-
-
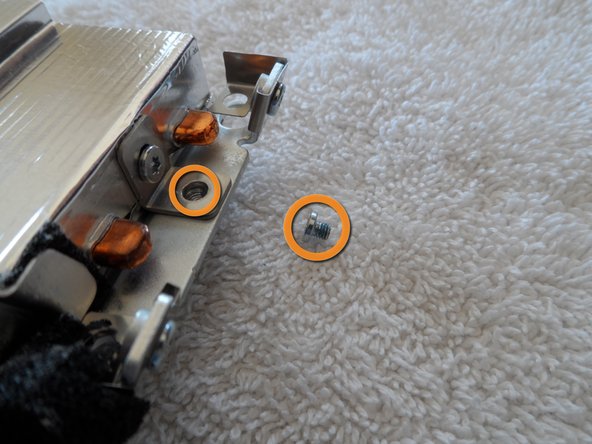
La scheda grafica fissata da due viti Torx T9 da 2 mm x 5 mmalla scheda grafica...
-
...una terza vite Torx T9 da 2 mm x 4 mm alla fine del dissipatore...
-
...e un sempre presente connettore del sensore della temperatura.
-
Rimuovi/scollega tutto.
On my iMac 24" (early 2008) equipped with a Nvidia 8800GS, there are 3 screws too, located at the exact same places than Jeff 's indications. Great job, Jeff ! Thanks again for your help !
La tarjeta gráfica está retenida por dos tornillos torx T-9 (2 mm x 5 mm) en la placa GPU ...
un tercer tornillo T-9 (2 mm x 4 mm) en el extremo del disipador de calor ...
y el conector del sensor térmico siempre presente.
Eliminar / desconectarlos todos.
-
-
-
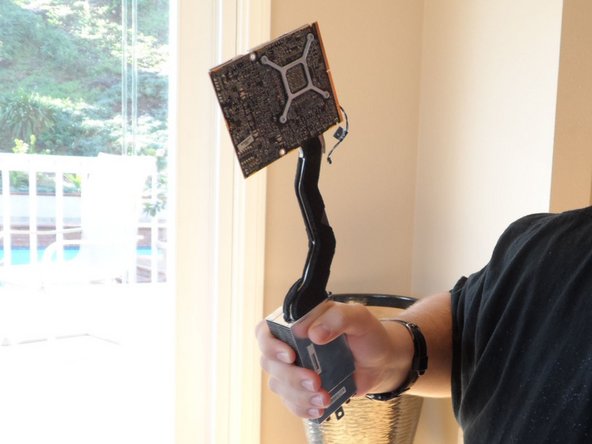
Ecco fatto! La scheda grafica si inclina semplicemente a 45° e si sfila verso l'alto dal connettore MXM, con il dissipatore e tutto il resto. Sono contento di poter vedere quanto sia progettato bene questa componente di Apple.
-
Nella seconda immagine puoi vedere le schede grafiche di ricambio (parte Apple #661-5135)che ho preso da Impact Computers in Florida. è una sostituzione semplice. Anche la schiuma adesiva e il sensore della temperatura sono già installati. Infatti, è meglio non girarsi, o potresti dimenticare quale sia quella nuova e quella originale.
-
I giocatori di World of Warcraft concorderanno con me e mio figlio: pensiamo che la scheda video originale sembri un'autentica ascia Gnomish 1H. Gloria all'Alleanza! :-)
On my iMac 24" (early 2008, Nvidia 8800GS), I had to unscrew 4 screws to release the graphic card from the cooler plate (don't be afraid, it's easy). Then I had to clean all the thermal paste from the upside of the graphic processor using small amount of 90º alcohol (holding the graphic card upside down so that alcohol doesn't pour inside the chips), unglue all the small stickers, then bake the graphic card during 7 min at 200ºC (graphic chip, up), then, after cooling down and reaching ambient temperature, apply small amount of thermal paste (a 2 mm nut) on the graphic chip, then reassemble everything. Voilà ! It's alive ! Infinite thanks to Jeff for his invaluable help !
¡Lo has hecho! La tarjeta gráfica simplemente se inclina 45 grados y se desliza hacia afuera del conector MXM, disipador de calor y todo. Me alegra poder ver cuán bien diseñada está esta pieza de hardware de Apple.
En la segunda foto, puede ver la tarjeta gráfica de reemplazo (parte de Apple # 661-5135) que obtuve de Impact Computers en Florida. Es un reemplazo directo. Incluso la espuma adhesiva y el sensor térmico ya están en su lugar. De hecho, es mejor que no le des la espalda o puede que olvides cuál es cuál.
Ustedes, jugadores de World of Warcraft, podrían estar de acuerdo con mi hijo y pensé que la vieja tarjeta de video es un hacha Gnomish 1H de aspecto bastante auténtico. ¡Gloria a la Alianza! :-)
On my EMC2267 (A1225), the layout is completely different. There is no heat upper heat sink for the MXM card and where that should be there is a blanking plate! There is none of the metal structure on the front of the motherboard supporting heatpipes. It is as if the MXM card and the subsystems supporting it are missing. I will remove motherboard tonight to see what is going on behind it!
It seem as if you have got the early 2009 base model with the 2.66 GHz CPU. This model has no dedicated GPU, but integrated graphics instead. If the iMac shows faulty graphics you’ve got to replace the entire logic board.
-


Per rimontare il tuo dispositivo, segui le istruzioni in ordine inverso. Questo è anche un buon momento per pulire tutta la polvere nel computer!
Per rimontare il tuo dispositivo, segui le istruzioni in ordine inverso. Questo è anche un buon momento per pulire tutta la polvere nel computer!
Annulla: non ho completato questa guida.
Altre 73 persone hanno completato questa guida.
Un ringraziamento speciale a questi traduttori:
100%
Daniele Carminati ci sta aiutando ad aggiustare il mondo! Vuoi partecipare?
Inizia a tradurre ›
36 Commenti
Aha! The "Apple part number" from step 11 is a great clue! Searching for these cards by this part number yields many online sellers.
There were three cards that could go in this model:
* NVIDIA GT120 (256Mb): part #661-4991
* NVIDIA GT130 (512Mb): part #661-4990
* ATI Radeon HD 4850 (512Mb): part #661-5135
The ATI card is generally marginally cheaper than the equivalent NVIDIA.
When I bought my iMac new, I remember the ATI card being the top-of-the-line option.
If you're going to try and substitute parts, I would start with the website I bought my video card from (http://www.impactcomputers.com/apple-ima...) and see if the video card(s) for that particular 2011 iMac match any of the part numbers aaaidan shows above.
I picked out one of the 2011 iMacs at random on the website and while the actual card looks the same (size and MXM connector) the heat sink is completely different. But you could try and dismantle the heat sink from the old and new cards and swap them. I would love to know if that works. An AMD Radeon HD6750M upgrade would be sweet :)
Hi. I did it, but separatet the cooler from the grafic-card. Removed als that "cooling-gum" on the RAM's and cleaned the CPU with tissue-paper. Heated my kitchen oven to 200°C, waited untill temp ist reached. Then put my grafic-card inside for exact 5 Minutes. After this, open the oven, DONT TOUCH THE CARD. Switch oven to off. Wait until the card has slowly reached room-temperature. Reassemble (using the cooling-goo on the rams, and some "Wärmeleitpaste (German-word; i am lazy)" on the CPU. Press the coolerplate firmly to the card (all the goo has to be flatened, to gain contact between the cooling plate and the cpu) - Reassembled, WORKS!
For a broken-card... at least worth a try. Dont blame me if it dosent work. There are thousand of threads out there about this topic - inform yourself.
BTW: Card is a NVIDIA GeForce 8800 GS 512 MB
Hello Heiko seems that this would only work on a 8800 (German: glaube nicht dass dies bei einer GT 130m funktioniert). But I shall give it a try
Rob -
Hi, for me the new graphic-card was to expensive. i take the card and put it in my oven for 20 min by 220 degrees. and... it works now. How long? i don't know...
IT WORKED! I baked my card at 200°C (about 400F) for 20 minutes yesterday. Mac is runnung smoothly so far...
Rob -
While it will work for a while, best bet is to find a repair place that replaces the NVIDIA chip when repairing the card.
I had the exact problem as described in the article. Bought a graphics board online. I could not locate any new ones, however, for a mid 2008 iMac. Followed this procedure and the referenced one for opening the iMac. Both very excellent guides. Thank you so much for posting them. I would only reiterate the part about being very careful when pulling up the outer glass. The alignment pins break off very easily. I broke 2 or 3. The good thing is that they don't seem to be essential to the screen as it is held in place very well with the magnets. Thanks again for the excellent guides!
Hey guys, i replace the card with a Dell G92-751-B1 M17X/M15X Nvidia GTX 260M 1GB MXM 3.0 and it works fine but gamma is too high (it is like take a look to the sun without sunglasses). I tried to low it with same programs but I cannot lower to to an acceptable level (fn f1 and fn f2 keys dont work). I install windows 7 on bootcamp and cannot install any nvidia drivers, always computer tell me that cannot install the specific driver. In mac the System Information card model correctly listed (gtx 260m). Any idea?
Hi. I have a imac 24 a1225 model. Nvidia Geforce 7600 GT is compatible ?, and geforce GT210 is compatible ?. I expect an answer. Thank you
Hi, in step 6 on the 3rd picture there is black rounded rectangle little black dot on center. Right of the little orange square. What is it? is this infrared or something else? I broke this part today. is this important or can I live with it?
Yes, this is the Apple Infrared receiver for the Apple Remote. If you don't have or never used the Apple Remote, you won't be missing anything. I personally use the Apple Remote with Kodi (media player) to stream media, so I would miss it dearly. If you don't have an Apple Remote, you should be able to pick one up for less than $20. Fixing the infrared receiver might be more expensive though...
Great instructions! I replaced my card today with a used one found on Amazon. I took pictures along the way but still maybe something is not hooked up proper. The fan(s) are running at high speed and are audible. Ideas anyone?
Maybe you forgot to plug back some temperature sensor plug. Or maybe you damaged one of its little cables.
Great instructions ! I completed your step by step with some instructions about the same process regarding an early 2008 24" iMac with a Nvidia 8800GS (iMac8,1 - A1225 - 2211). I baked the videocard and everything is working fine now ! I'd like to add that, as I took my time to avoid damaging anything, this operation took me more than 5 hours.
FYI - as the graphics card’s heat vents are above the CPU’s and there is only 1 fan to cool them, We recommend that the computer be “serviced” to clean out the fan, also clean out the vents. This is especially true in a household that is high dust levels and had pets that shed fur. Side note: having the “hot” power supply above the vents further impedes the airflow.
i used this guide to remove gpu card from A1225 (EMC2211) 2008 3.06 iMac . found 1 additional screw holding the logic board and positions of some of the connectors were slightly different. rest of it same. Lucky for me I got a used 2008 really cheap and replacing the working GPU card to my iMac which lost its Nvidia GeForce 8800 GS (661-4664). I hope it works. Thanks to the original author for the instructions.
Hello
Im currently digging into this guide as well as other ones on iFixit.
I have this iMac, stored and I am looking for a solution so I can give it to my daughter for school purposes.
(iMac 24”, 2.66, early 2009)
https://everymac.com/systems/apple/imac/...
Mine has, obviously, a damaged GPU. I sent it to a repair shop a few years ago and it worked for a while then it stopped.
Would like to give it a try with a friend of mine who knows his ways into an iMac.
I believe that, with the help of this guide and we will make it work somehow.
my question for you all…In case the GPU is badly damaged and out of repair, which GPU can I alternatively look for to put back on this iMac?
Thank you for your help.
Ricardo
- from Portugal
seems like this particular model has a onboard gpu
Matthias -
Hi everyone,
I have two iMacs 2008 :
• One is a 20 inch, works well
• The other is 24, but the GPU is dead.
I’d like to use the video card from the first, to put in the second.
ATI references are the same, but after opening the two iMacs, I saw that there are 3 connectors on the 24”, and only 2 on the 20 inch GPU.
It should work to just leave it without the third connector, right ?
Does anybody know what the connector on the right does (see photo) ?
Could it break the iMacs ?
Thanks a lot for your help. :)
Photo here : VIDEO CARD > From 20 inches to 24 / (Aussi en français))
so I actually have the broken GPU (the ATI one) I pulled from my iMac when I wrote this guide. I looked at the edge connector and curiously it doesn’t look like either one of your pictures. My card has a single notch in the center of the connector and both ends go all the way to the edge of the card. If you look closely at the first of the last 3 photos in the guide you can see it.
The wrong card shouldn’t damage the Mac. It just won’t work.
hello From France.
Many thanks for this tutorial.
I’ve used it to change successfully the ATI Radeon 2600 Pro of an iMac 24” earlier 2008 (A2111)
There’s a few differences, but the tutorial helped a lot.
Best regards, Joan.
I have tried to install a quadro k1000m into the iMac 9.1 24inch early 2009 with the plastic backside and the smallest processor and I found out it has no graphics card to switch, it must be an onboard model. It seems like only the model with the 2,6 ghz processor has an onboard gpu.
I have the same model and there is no MXM GPU (or even a slot) on the motherboard for an MXM. The GPU chip is soldered to the motherboard, so no replacing with a K1100M, etc.
I removed the large square aluminum heatsink on the GPU chip and heat-gunned it for 8 minutes at 200°C and I am about to reassemble (after 30 minutes to cool) and see it that has made a temporary fix. If not, it’s going to be parted-out for pennies.
I have pictures of the alternative motherboard layout without the MXM GPU if anybody wants them.