Introduzione
Rimuovi il display nell'iMac versione fine 2012 richiede di tagliare l'adesivo con uno strumento di apertura specifico per iMac. Una volta completata la riparazione, dovrai seguire la nostra Guida Strisce Adesive per togliere il vecchio adesivo e sostituirlo con nuove strisce di biadesivo.
Cosa ti serve
-
Attrezzo utilizzato in questo passaggio:iMac Intel 21.5" Cardboard Service Wedge$4.99
-
-
Attrezzo utilizzato in questo passaggio:Plastic Cards$2.99
-
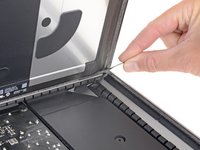
A partire dall'angolo superiore destro dell'iMac, inserire una scheda di plastica fra il display e il telaio.
-


Per riassemblare il tuo computer, segui queste istruzioni in ordine inverso e utilizza la nostra Guida Strisce Adesive per riattaccare il vetro del display
Per riassemblare il tuo computer, segui queste istruzioni in ordine inverso e utilizza la nostra Guida Strisce Adesive per riattaccare il vetro del display
Annulla: non ho completato questa guida.
Altre 72 persone hanno completato questa guida.
Un ringraziamento speciale a questi traduttori:
100%


Questi traduttori ci stanno aiutando ad aggiustare il mondo! Vuoi partecipare?
Inizia a tradurre ›


22 Commenti
It was really easy but the display did not power on for me. Any suggestions?
I got to the point where I fit in the display back on before I pulled the covers off of the adhesive strips. I turned the computer on and the display worked perfectly. Everything worked! The camera was aligned and everything! It must’ve been beginners luck.
I turn the computer off, unplugged the display, pulled the covers off the adhesive strips, plugged the display back in and sealed the display down. When I turn the computer on again I had a blank screen. It wasn’t just blank, it never came back on. The iMac did, but the display didn’t. I tried the old display. Same thing. After some research I found that I had burned up a device on my logic board.
So, I am left with only my iPhone and don’t know how to upload a picture in comments or I would show you exactly which one it is.