Questa versione può contenere modifiche errate. Passa all'ultima istantanea verificata.
Cosa ti serve
-
Questo passaggio è privo di traduzione. Aiuta a tradurlo
-
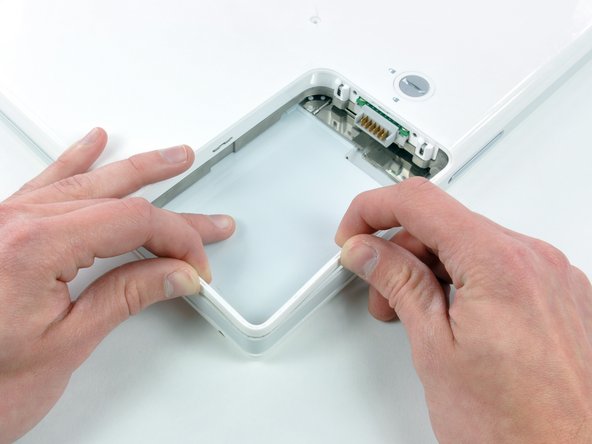
Lay your iBook upside down on a flat surface.
-
Use a coin to rotate the battery locking screw 90 degrees clockwise.
-
Lift the battery out of the computer.
-
-
Questo passaggio è privo di traduzione. Aiuta a tradurlo
-
Pull the keyboard release tabs toward you and lift up on the keyboard until it pops free.
-
Flip the keyboard over, away from the screen, and rest it face-down on the trackpad area.
-
-
Questo passaggio è privo di traduzione. Aiuta a tradurlo
-
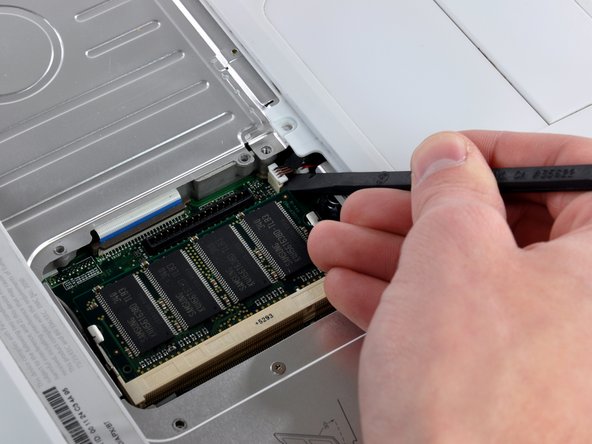
Remove the four silver Phillips screws that secure the RAM shield.
-
-
Questo passaggio è privo di traduzione. Aiuta a tradurlo
-
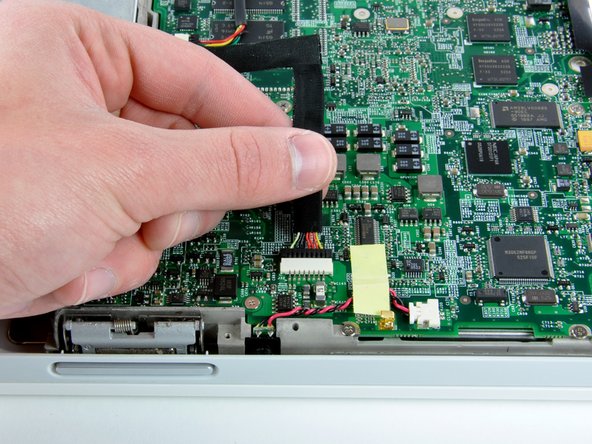
Pull the keyboard cable up from the logic board, holding the cable as close to the connector as possible.
-
-
Questo passaggio è privo di traduzione. Aiuta a tradurlo
-
Use a spudger or small flathead screwdriver to remove the three rubber feet from the lower case.
-
-
Questo passaggio è privo di traduzione. Aiuta a tradurlo
-
Remove the three newly-revealed Phillips screws.
-
-
Questo passaggio è privo di traduzione. Aiuta a tradurlo
-
Use a spudger or small flathead screwdriver to pry up the three metal rings that housed the rubber bumpers.
-
-
Questo passaggio è privo di traduzione. Aiuta a tradurlo
-
Remove the three Torx screws using a T8 Torx screwdriver.
-
-
Questo passaggio è privo di traduzione. Aiuta a tradurlo
-
Remove the two 4.5 mm Phillips screws on either sides of the battery contacts.
-
-
Questo passaggio è privo di traduzione. Aiuta a tradurlo
-
Push the thin rims of the lower case surrounding the battery compartment in, bending them past the tabs, and then lift up to free that corner of the lower case.
-
-
Questo passaggio è privo di traduzione. Aiuta a tradurlo
-
There is a slot on the wall of the battery compartment that locks the lower case in place. Use a small flathead screwdriver to pry out the slot's lower rim and pull up on the lower case to free the slot from the tabs holding it.
-
-
Questo passaggio è privo di traduzione. Aiuta a tradurlo
-
Run a spudger along the seam between the lower case and upper case on the front of the computer to free the tabs locking the lower case. Pull up on the lower case and continue to use the spudger as necessary until you hear three distinct clicks.
-
-
-
Questo passaggio è privo di traduzione. Aiuta a tradurlo
-
Continue to run the spudger around the front right corner. There are two tabs on the port side of the computer, one near the front corner and one near the sound-out port.
-
-
Questo passaggio è privo di traduzione. Aiuta a tradurlo
-
There are three tabs over the optical drive that must be released before the lower case can come off. Slide the spudger into the lower case above the optical drive and run it toward the back of the computer until you hear three distinct clicks.
-
-
Questo passaggio è privo di traduzione. Aiuta a tradurlo
-
Turn the computer so that the back is facing you and pull the lower case up and toward you until the back tabs pop free.
-
-
Questo passaggio è privo di traduzione. Aiuta a tradurlo
-
Remove the small greasy springs with white plastic caps from either side of the battery contacts.
-
-
Questo passaggio è privo di traduzione. Aiuta a tradurlo
-
Have patience and follow the directions, the end result is up to you.
-
-
Questo passaggio è privo di traduzione. Aiuta a tradurlo
-
Remove the following 4 screws from the bottom shield:
-
Two 3 mm Phillips.
-
Two 7.5 mm Phillips.
-
-
Questo passaggio è privo di traduzione. Aiuta a tradurlo
-
Remove the two Phillips screws securing the DC-In board, removing tape as necessary.
-
-
Questo passaggio è privo di traduzione. Aiuta a tradurlo
-
Deroute the cable from around the optical drive, removing tape as necessary.
-
Disconnect the DC-In cable from the logic board and angle the DC-In board out of its compartment.
-
-
Questo passaggio è privo di traduzione. Aiuta a tradurlo
-
Remove the two 3 mm Phillips screws inside the left edge of the battery tray.
-
Three 3 mm Phillips around the battery compartment.
-
Three 4.5 mm Phillips along the optical drive bezel. (a magnetic screwdriver may help to lift these screws out)
-
One 12 mm Phillips in the lower right corner.
-
Four 14.5 mm Phillips.
-
-
Questo passaggio è privo di traduzione. Aiuta a tradurlo
-
Turn over the computer and open it.
-
Use the flat side of a flathead screwdriver to remove the small magnet covering a screw near the middle of the computer.
-
-
Questo passaggio è privo di traduzione. Aiuta a tradurlo
-
Remove the following 7 screws from the edges of the keyboard area.
-
Three 2 mm Phillips along the right edge.
-
One 4.5 mm Phillips underneath where the magnet was.
-
One 6 mm Phillips with a small head in the lower left corner.
-
Two 6 mm Phillips with large heads, one in the upper left corner and one in the middle.
-
-
Questo passaggio è privo di traduzione. Aiuta a tradurlo
-
Carefully lift the upper case slightly and move it toward the front of the computer to reveal the trackpad connector. Use a spudger or your finger to disconnect the trackpad connector hidden beneath the white plastic tab.
-
After disconnecting the track pad connector, carefully rotate the upper case away from you and rest it against the display.
-
-
Questo passaggio è privo di traduzione. Aiuta a tradurlo
-
Use the sharp end of a spudger to disconnect the speaker cable connector.
-
-
Questo passaggio è privo di traduzione. Aiuta a tradurlo
-
Using the sharp end of a spudger, disconnect the connector for the blue and white power cables. Again, be careful to pry up only on the connector.
-
The upper case is now free and can be removed from the computer.
-
-
Questo passaggio è privo di traduzione. Aiuta a tradurlo
-
Remove the fifteen 3 mm Phillips screws securing the top shield to the computer.
-
Remove the following 16 screws:
-
Thirteen 3 mm Phillips.
-
One 3 mm Phillips. (actual screw not present in image)
-
Two 4 mm Phillips.
-
-
Questo passaggio è privo di traduzione. Aiuta a tradurlo
-
Lift the top shield up from the right side, minding the upper left corner, which may catch on the metal framework.
-
-
Questo passaggio è privo di traduzione. Aiuta a tradurlo
-
Remove the metal hard drive retaining bracket from the computer.
-
-
Questo passaggio è privo di traduzione. Aiuta a tradurlo
-
Remove the four Phillips screws securing the hard drive to the metal framework.
-
-
Questo passaggio è privo di traduzione. Aiuta a tradurlo
-
Slightly lift the hard drive from the free end and pull the hard drive straight away from the connector.
-
-
Questo passaggio è privo di traduzione. Aiuta a tradurlo
-
Remove the hard drive brackets from the left and right sides of the hard drive.
-
-
Questo passaggio è privo di traduzione. Aiuta a tradurlo
-
Remove the two black T8 Torx screws from either side of the hard drive (four screws total).
-
-
Questo passaggio è privo di traduzione. Aiuta a tradurlo
-
Pull the plastic hard drive connector straight away from the hard drive.
-
Hard drive remains.
-


Annulla: non ho completato questa guida.
Altre 141 persone hanno completato questa guida.
Documenti Allegati

11 Commenti
I did this not just for upgrade but because G4 had been out of service for over 12mths due to what I believed was a faulty logic board. Attempted re-installs of OS (when I found the disc) suggested HDD failure so I ordered a 160Gb replacement from ebay for £40 and have just replaced original 30Gb HDD with a 160Gb following these instructions - I have no previous experience in this type of work but now have a working lap top with fully installed OS up and running and all at a total saving of at least £827 based on new MacBook prices!!!
Be SURE to read the comments on the more difficult parts (removing connectors, etc). The comments expound on the care needed in these areas to avoid damaging your iBook. Good luck!
Next time I think I'll just use a crowbar or a drop saw to get the hard disk out for data recovery.
Hard disk is located in the front left hand side of the unit.
65+ screws of all shapes and sizes.
What a poorly designed notebook - that's putting it really, really, mildly.
It sucks.
I completely agree with joshAU. This design is the worst hardware I’ve ever had the displeasure of having to deal with.
36 %#*@ steps to CHANGE A HARD DRIVE?
WildBill -