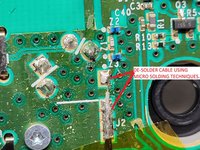
Salta al contenuto principale

Xbox One Wireless Controller Model 1708 Top Motherboard Replacement

Cosa ti serve

  1. Xbox One Wireless Controller Model 1708 Top Motherboard Replacement, Cover Plate: passo 1, immagine 1 di 2 Xbox One Wireless Controller Model 1708 Top Motherboard Replacement, Cover Plate: passo 1, immagine 2 di 2
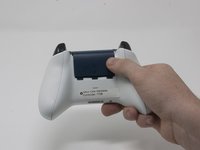
    • Slide the battery cover toward the top of the controller to remove it.

    • Lift up the batteries or the battery pack from the battery compartment.

  2. Xbox One Wireless Controller Model 1708 Top Motherboard Replacement: passo 2, immagine 1 di 2 Xbox One Wireless Controller Model 1708 Top Motherboard Replacement: passo 2, immagine 2 di 2
    • Insert a plastic opening tool into the top seam, and gently work the opening tool to the bottom of the controller.

    • Continue using the opening tool to gently pry the side plate off of the controller.

    • Repeat this process for the second side plate.

  3. Xbox One Wireless Controller Model 1708 Top Motherboard Replacement: passo 3, immagine 1 di 1
    • Gently peel the battery label or punch a hole in the center of the sticker in the battery compartment to reveal the hidden screw.

    • Remove the five 9mm torx-9 security screws from the back of the controller.

  4. Xbox One Wireless Controller Model 1708 Top Motherboard Replacement: passo 4, immagine 1 di 2 Xbox One Wireless Controller Model 1708 Top Motherboard Replacement: passo 4, immagine 2 di 2
    • Orient the controller so the front plate is facing up.

    • Lift the front cover off of the controller.

  5. Xbox One Wireless Controller Model 1708 Top Motherboard Replacement: passo 5, immagine 1 di 1
    • Turn the controller face down and gently lift the rear plate.

    • Be careful with the rumble motors, as they tend to fall out, risking damage to the motherboard.

  6. Xbox One Wireless Controller Model 1708 Top Motherboard Replacement, Tape Shock Motors in place: passo 6, immagine 1 di 3 Xbox One Wireless Controller Model 1708 Top Motherboard Replacement, Tape Shock Motors in place: passo 6, immagine 2 di 3 Xbox One Wireless Controller Model 1708 Top Motherboard Replacement, Tape Shock Motors in place: passo 6, immagine 3 di 3
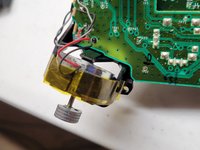
    • Tape the Rumbler/shock motors in place.

    • This will prevent the motors from falling out.

  7. Xbox One Wireless Controller Model 1708 Top Motherboard Replacement, Directional Pad: passo 7, immagine 1 di 1
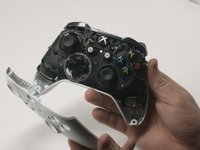
    • Turn the device over and remove the directional pad by gently pulling it away from the controller.

  8. Xbox One Wireless Controller Model 1708 Top Motherboard Replacement, Joystick Caps: passo 8, immagine 1 di 1
    • Pull the joysticks off of the controller.

  9. Xbox One Wireless Controller Model 1708 Top Motherboard Replacement, Top Motherboard: passo 9, immagine 1 di 1
    • If the rumble motors fall out of frame, the wires may disconnect from the motherboard . The wires will have to be soldered to reattach the motor.

    • Turn the device over and remove the two 7mm torx-6 screws in the bottom left and right corners.

  10. Xbox One Wireless Controller Model 1708 Top Motherboard Replacement, De-soldering required: passo 10, immagine 1 di 3 Xbox One Wireless Controller Model 1708 Top Motherboard Replacement, De-soldering required: passo 10, immagine 2 di 3 Xbox One Wireless Controller Model 1708 Top Motherboard Replacement, De-soldering required: passo 10, immagine 3 di 3
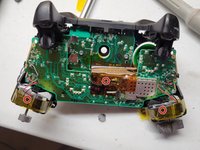
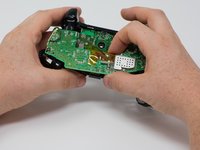
    • Firmly grasp the top and bottom motherboards in opposite hands, then gently pull them apart.

    • The top motherboard is still connected to the bottom motherboard. To fully separate the top motherboard, you will need to use a soldering iron.

    • Warning: Do not attempt to disconnect the shielded (gold colored) connector as it is extremely fragile you will break it. It runs between the two boards.

    • De-solder the shielded cable from the lower board instead of attempting to disconnect the connector. De-solder using micro soldering techniquest.

Conclusione

To reassemble your device, follow these instructions in reverse order.

Altre 24 persone hanno completato questa guida.

Team

Cal Poly, Team S18-G3, Forte Fall 2017 Membro di Cal Poly, Team S18-G3, Forte Fall 2017

CPSU-FORTE-F17S18G3

4 Membri

34 Guide realizzate

0 Commenti

Aggiungi Commento

Visualizza Statistiche:

Ultime 24 Ore: 20

Ultimi 7 Giorni: 119

Ultimi 30 Giorni: 425

Tutti i Tempi: 28,731