Salta al contenuto principale

Toshiba Satellite L855-S5210 LCD Screen Replacement

Cosa ti serve

  1. Toshiba Satellite L855-S5210 LCD Screen Replacement, LCD Screen: passo 1, immagine 1 di 1
    • So, your spouse fell on your computer while taking a nap... let's replace the LCD. I got mine from http://www.LaptopScreen.com

    • First, here's some tools you might consider using while working. You may also want an old credit card of your choosing to help get inside. More on that later.

  2. Toshiba Satellite L855-S5210 LCD Screen Replacement: passo 2, immagine 1 di 1
    • Remove the battery by pressing the two slider buttons in the appropriate direction.

  3. Toshiba Satellite L855-S5210 LCD Screen Replacement: passo 3, immagine 1 di 1
    • Next, remove the 10 screws located in the image. They are all on the bottom of the machine.

  4. Toshiba Satellite L855-S5210 LCD Screen Replacement: passo 4, immagine 1 di 1
    • You might consider using some sort of screw-organizer to make life easier. Be it paper, tape or whatever.

    • Use a dry erase marker (or other writing utensil) to mark where each set of screws came from.

  5. Toshiba Satellite L855-S5210 LCD Screen Replacement: passo 5, immagine 1 di 1
    • Remove the plastic covering that encloses the Hard Drive and RAM. This is done by loosening (not removing) a single screw on the large plastic piece.

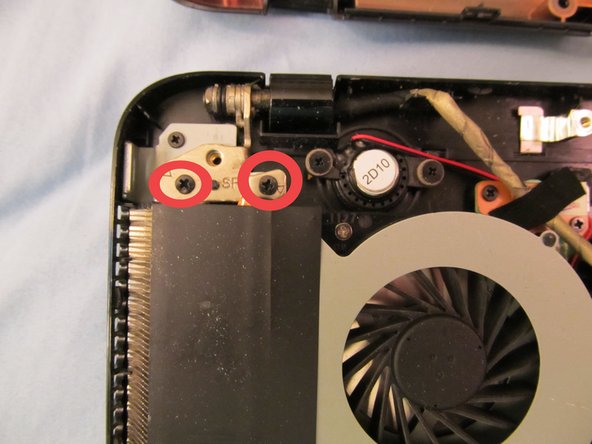
    • After removal, there are 4 screws under the plastic we need to remove. See the image to locate them all. Place them in your screw organizer.

  6. Toshiba Satellite L855-S5210 LCD Screen Replacement: passo 6, immagine 1 di 1
    • Next, remove the single screw holding in your DVD drive. After this screw is removed, your DVD drive will slide right out. Remove it.

  7. Toshiba Satellite L855-S5210 LCD Screen Replacement: passo 7, immagine 1 di 1
    • Next, remove the single screw holding the hard drive in place (it's located on the right).

    • After removal of that screw, slide the Hard Drive casing to the right -->, remove.

  8. Toshiba Satellite L855-S5210 LCD Screen Replacement: passo 8, immagine 1 di 1
    • Slide a credit card all the way around the outer edge of the laptop to help pry the plastic clips open.

    • if anything snags, or wont come apart, try twisting the card gently, so as to wedge it open.

  9. Toshiba Satellite L855-S5210 LCD Screen Replacement: passo 9, immagine 1 di 1
    • Behold!

    • At this point, the LCD is under the motherboard. Interestingly, this is one of the rare builds that has the hinges screwed in upside down.

  10. Toshiba Satellite L855-S5210 LCD Screen Replacement: passo 10, immagine 1 di 3 Toshiba Satellite L855-S5210 LCD Screen Replacement: passo 10, immagine 2 di 3 Toshiba Satellite L855-S5210 LCD Screen Replacement: passo 10, immagine 3 di 3
    • Two screws on each hinge await for your removal.

    • Note the screw organizer. This is how many screws we've removed. (The one with an arrow pointing to it we did NOT remove in this tutorial. It is located under the DVD drive after the drive is removed. It is not necessary to remove it)

  11. Toshiba Satellite L855-S5210 LCD Screen Replacement: passo 11, immagine 1 di 1
    • Open the laptop so that the hinges can move into a vertical position instead of being flush with the screws you just removed.

    • Put the laptop back into closed position.

  12. Toshiba Satellite L855-S5210 LCD Screen Replacement: passo 12, immagine 1 di 1
    • Remove the tape that keeps the LCD cable in place.

  13. Toshiba Satellite L855-S5210 LCD Screen Replacement, Caution!: passo 13, immagine 1 di 1
    • Carefully tug the LCD cable out from under the motherboard.

    • When putting back together, this will be difficult to put back. We had to use a crochet hook to get the leverage needed to put it back in place. DO NOT REMOVE THE MOTHERBOARD TO GET BACK THERE. The Keyboard Cable is 1/2" long underneath, rendering it near impossible to put back. We cussed out Toshiba a few times for the unfriendly structuring.

    • Make sure that the LCD cable is fully seated before you finish up. Use a light to double check it. I had to take the PC apart 4 times till I found out the cable wasn't in the socket but underneath it.

  14. Toshiba Satellite L855-S5210 LCD Screen Replacement: passo 14, immagine 1 di 1
    • Behold, the LCD cable removed.

  15. Toshiba Satellite L855-S5210 LCD Screen Replacement: passo 15, immagine 1 di 2 Toshiba Satellite L855-S5210 LCD Screen Replacement: passo 15, immagine 2 di 2
    • Remove the wifi cable by unfastening it from the wifi card first, then following the wire. Remove any tape necessary.

  16. Toshiba Satellite L855-S5210 LCD Screen Replacement: passo 16, immagine 1 di 1
    • Open the laptop again, bottom facing you, and slide the motherboard piece away from you. This will disconnect it from the LCD unit we're after.

  17. Toshiba Satellite L855-S5210 LCD Screen Replacement: passo 17, immagine 1 di 2 Toshiba Satellite L855-S5210 LCD Screen Replacement: passo 17, immagine 2 di 2
    • Carefully use a very small flat-head precision screwdriver to remove the plastic circles guarding the LCD screws we need to get to. Found in corners.

    • Remove the screws underneath.

  18. Toshiba Satellite L855-S5210 LCD Screen Replacement: passo 18, immagine 1 di 2 Toshiba Satellite L855-S5210 LCD Screen Replacement: passo 18, immagine 2 di 2
    • After the screws are removed from all 4 corners, grab your credit card and pry around all the edges to get the plastic bezel piece off.

  19. Toshiba Satellite L855-S5210 LCD Screen Replacement: passo 19, immagine 1 di 1
    • After the bezel is removed, unfasten two revealed screws: One on the right hinge, one on the left.

  20. Toshiba Satellite L855-S5210 LCD Screen Replacement: passo 20, immagine 1 di 2 Toshiba Satellite L855-S5210 LCD Screen Replacement: passo 20, immagine 2 di 2
    • Now you can remove the LCD panel, along with the hinges.

    • Note: Lift from the top or left side first. As seen in the second image here, your wifi wire runs up the side of the back panel. Unless you want to put it back into those little grooves, I suggest removing the LCD, and laying it on its face WHILE the wifi line is still intact with the back plastic.

  21. Toshiba Satellite L855-S5210 LCD Screen Replacement: passo 21, immagine 1 di 1
    • Once the LCD is on it's face (and the cables are still intact) remove the 6 screws holding the metal LCD holders in place. There are 3 screws on each side.

  22. Toshiba Satellite L855-S5210 LCD Screen Replacement: passo 22, immagine 1 di 2 Toshiba Satellite L855-S5210 LCD Screen Replacement: passo 22, immagine 2 di 2
    • Gently pry the small piece of tape away from the back of the LCD. This tape helps keep the LCD cable intact.

    • Pic 2: Using the tape you just pried up, pull back gently, unplugging the LCD cable from the old LCD screen.

  23. Toshiba Satellite L855-S5210 LCD Screen Replacement: passo 23, immagine 1 di 3 Toshiba Satellite L855-S5210 LCD Screen Replacement: passo 23, immagine 2 di 3 Toshiba Satellite L855-S5210 LCD Screen Replacement: passo 23, immagine 3 di 3
    • Check out your screw collection. This is roughly what yours should look like if you're keeping track of them.

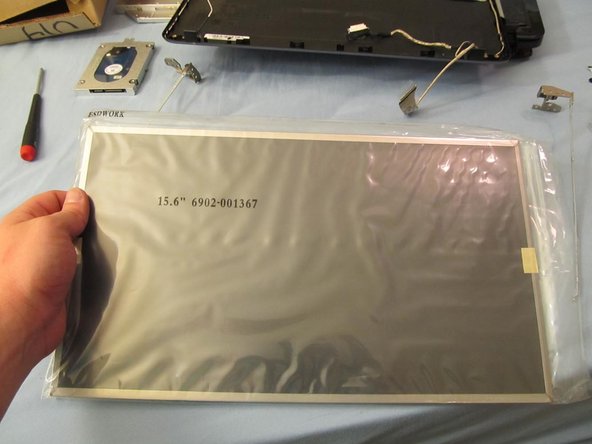
    • Finally, bust out your new LCD screen that you should have purchased from www.laptopscreen.com, and reverse the entire procedure for installation.

    • -- Final Notes and Credits: Difficulty Level: Medium. | Screen purchased from: www.laptopscreen.com (their email support will land you a compatible screen within hours!) | We are The PC Penguin, www.thepcpenguin.com

Conclusione

To reassemble your device, follow these instructions in reverse order.

Altre 2 persone hanno completato questa guida.

4 Commenti

Steps 3 - 16 are not needed to remove the screen. Should take about 10 minutes. Reverse to install.

Player Onesix - Replica

Hey there, thanks for this guide. I own a Satellite L855-17z. The architecture seems very similar to me. Do you think I can follow this guide for my model ?

I made a huge bump in the middle of the screen's hood. Luckily, it's barely affected the screen, minus for a tiny little spot of white pixels where the hood is pressing on the screen. I just want to remove my screen to flaten the bump.

English isn't my native language, so sorry for any odd sentence or badly used vocabulary.

bastien - Replica

Yeah, she "feel on it". What she actually was doing was using it as a desk to STAPLE PAPERS on top of. After you told her three times to sit up and do her work, because setting up camp in the recliner was how she stupidly ruined the USB socket, and the two more times you dug out that shorted socket so the sad thing would start. So while you know ultimately your're just whizzing in the wind; you still gotta thank that ifixit guy (THNX!) for that brief moment when you're a dang "IT professional"! Or something, you don't really know what that means.

John Whitley - Replica

I used this guide to replace the LCD (and clean the fan) on an old L855-S5405, and it worked like a charm! Except the reverse of Step 13 was a pain in the neck as expected, lol. Thanks so much for this guide!

Evalyn Roberts - Replica

Aggiungi Commento

Visualizza Statistiche:

Ultime 24 Ore: 0

Ultimi 7 Giorni: 7

Ultimi 30 Giorni: 24

Tutti i Tempi: 20,583