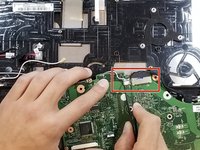
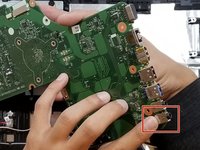
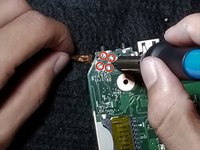
Salta al contenuto principale

Toshiba Satellite C55-A5140 Headphone jack Replacement

Cosa ti serve

  1. Toshiba Satellite C55-A5140 Headphone jack Replacement, Battery: passo 1, immagine 1 di 1
    • Make sure the device is unplugged, completely off, and not warm to the touch.

    • Check for any visible battery defects such as bulges, bends or cracking as they could be signs of a leaking or deformed battery.

    • Do not handle a deformed battery. Deformed batteries can cause burns and exposure to harmful chemicals.

    • Flip device over and locate two switches on the back of the device.

  2. Toshiba Satellite C55-A5140 Headphone jack Replacement: passo 2, immagine 1 di 2 Toshiba Satellite C55-A5140 Headphone jack Replacement: passo 2, immagine 2 di 2
    • Slide switch 1 towards the unlock symbol on the device (switch should click into place).

    • Slide switch 2 towards the unlocked symbol on the device.

    • While holding switch 2 in the unlocked position, use the notch located at the top of the battery to pull battery out and away from the device.

    • Switch 2 does not lock into place and will need to be held in unlocked position.

  3. Toshiba Satellite C55-A5140 Headphone jack Replacement: passo 3, immagine 1 di 1
    • Pull battery free from device and release switch 2.

  4. Toshiba Satellite C55-A5140 Headphone jack Replacement, CD Drive: passo 4, immagine 1 di 1
    • Make sure that the device is unplugged, completely off, and that the device is not warm to the touch.

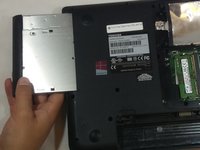
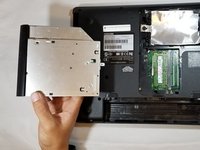
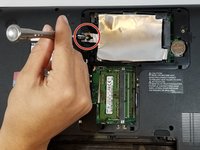
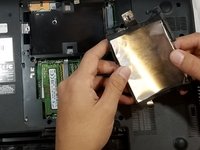
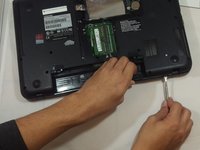
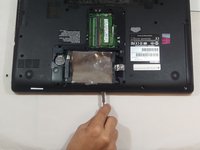
    • Flip the device over so you see the bottom, and loosen the 5mm PH#1 screw on the L shaped access panel.

    • The screw will not come out of access panel, simply unscrew until loose.

  5. Toshiba Satellite C55-A5140 Headphone jack Replacement: passo 5, immagine 1 di 1
    • Use the plastic opening tool to open access panel by sliding it into notch near screw and prying access panel(L-shaped) away from device.

    • Pull panel completely free from device and set aside.

  6. Toshiba Satellite C55-A5140 Headphone jack Replacement: passo 6, immagine 1 di 1
    • Unscrew the 2mm PH#1 screw next to the Toshiba Device information tag.

  7. Toshiba Satellite C55-A5140 Headphone jack Replacement: passo 7, immagine 1 di 3 Toshiba Satellite C55-A5140 Headphone jack Replacement: passo 7, immagine 2 di 3 Toshiba Satellite C55-A5140 Headphone jack Replacement: passo 7, immagine 3 di 3
    • Using the plastic opening tool, pry the CD drive up.

    • Once the CD drive is partially separated from the device, grasp with your hand and slide it out of the slot.

  8. Toshiba Satellite C55-A5140 Headphone jack Replacement, Headphone jack: passo 8, immagine 1 di 1
    • Unscrew the twelve 5mm PH#1 screws on the bottom of the device.

  9. Toshiba Satellite C55-A5140 Headphone jack Replacement: passo 9, immagine 1 di 2 Toshiba Satellite C55-A5140 Headphone jack Replacement: passo 9, immagine 2 di 2
    • Remove the 4mm PH#1 screw on aluminum tray cover inside of access panel.

    • Pull aluminum cover away from device and put aside.

  10. Toshiba Satellite C55-A5140 Headphone jack Replacement: passo 10, immagine 1 di 1
    • Remove the remaining five 10mm PH#1 screws within access panel.

  11. Toshiba Satellite C55-A5140 Headphone jack Replacement: passo 11, immagine 1 di 3 Toshiba Satellite C55-A5140 Headphone jack Replacement: passo 11, immagine 2 di 3 Toshiba Satellite C55-A5140 Headphone jack Replacement: passo 11, immagine 3 di 3
    • Using a metal spudger, remove the back cover by working metal spudger around edges of the laptop. Pry base away from rest of device until separated.

    • Separate back cover completely from device and set aside.

    • Plastic joints will make a snapping sound as they are released.

  12. Toshiba Satellite C55-A5140 Headphone jack Replacement: passo 12, immagine 1 di 2 Toshiba Satellite C55-A5140 Headphone jack Replacement: passo 12, immagine 2 di 2
    • Loosen the four 5mm PH#1 screws on heat sink.

    • Pull heat sink out and away from motherboard and set aside.

    • Screws on heat sink will not come out completely. Simply unscrew until lose.

  13. Toshiba Satellite C55-A5140 Headphone jack Replacement: passo 13, immagine 1 di 2 Toshiba Satellite C55-A5140 Headphone jack Replacement: passo 13, immagine 2 di 2
    • Gently unplug 5 connections on top of motherboard with your hand by applying pressure away from port while making sure not to bend any of the contacts.

    • Remove the 10mm PH#1 screw securing motherboard to device.

  14. Toshiba Satellite C55-A5140 Headphone jack Replacement: passo 14, immagine 1 di 2 Toshiba Satellite C55-A5140 Headphone jack Replacement: passo 14, immagine 2 di 2
    • Flip motherboard over, and using the precision tweezers, disconnect the two ribbon cables.

    • Pull motherboard free from device.

  15. Toshiba Satellite C55-A5140 Headphone jack Replacement: passo 15, immagine 1 di 2 Toshiba Satellite C55-A5140 Headphone jack Replacement: passo 15, immagine 2 di 2
    • Locate headphone jack on bottom right corner of the motherboard.

    • Turn motherboard over and use soldering iron and wick to melt and remove solder from 4 points holding headphone jack to the motherboard

    • Pull headphone jack from motherboard using tweezers.

    • A soldering iron can reach temperatures up to 650° F. Only perform this step if you are comfortable operating a soldering iron. Use proper protection equipment to avoid serious injury such as burns. If you are unsure how to solder, use this guide for help Come saldare e dissaldare componenti elettrici.

Conclusione

To reassemble your device, follow these instructions in reverse order.

Un'altra persona ha completato questa guida.

Un commento

Whats the jack model n please? I want to buy it in advance.

Michal Sovcik - Replica

Aggiungi Commento

Visualizza Statistiche:

Ultime 24 Ore: 2

Ultimi 7 Giorni: 4

Ultimi 30 Giorni: 14

Tutti i Tempi: 3,416