Introduzione
After many years of use, the solar panels in your Texas Instruments TI-30X IIS will slowly decay, and their capacity to charge will diminish. Thankfully, this can be easily fixed with a bit of time, patience, and some basic tools.
This guide demonstrates how to remove and replace the solar panels.
Caution: Desoldering and soldering presents the potential for device damage and burns. Always solder in well-ventilated environments.
Cosa ti serve
-
-
Use a Phillips #000 screwdriver to remove the four 5 mm screws securing the back panel.
-
-
-
-
Gently lift up the front of the motherboard, at the top of the calculator.
-
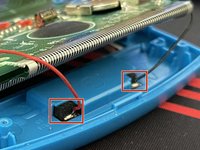
Desolder the positive and negative terminals on the solar panel
-
Use the tip of a spudger to "walk" the solar panel out of its housing, by pushing it down through the two cutouts until it slides out of the bottom.
-
Remove the solar panel.
-


To reassemble your device, follow these instructions in reverse order.
To reassemble your device, follow these instructions in reverse order.
Annulla: non ho completato questa guida.
Un'altra persona ha completato questa guida.
Team

University of Memphis, Team 51-5, Willis Spring 2022 Membro di University of Memphis, Team 51-5, Willis Spring 2022
UM-WILLIS-S22S51G5
1 Membro
1 Guida realizzata