Salta al contenuto principale
Unisciti alla Community delle riparazioni - Crea un account

TECHUP Bluetooth Speaker Motherboard Replacement

Visualizzazioni: 4440

Visualizza statistiche:

Ultime 24 ore:
3
Ultimi 7 giorni:
32
Ultimi 30 giorni:
171
Tutti i Tempi:
4.440
Commenti: 3

3 commenti sui passaggi.

Completato: 5

5 persone hanno contrassegnato questa guida come "completata". Sarai il prossimo?

Preferiti: 0

Nessuno ha preferito (e si è iscritto) questa guida. Sarai il primo?

Tempo necessario: 5 - 10 minuti
Difficoltà: Moderato
TECHUP Bluetooth Speaker Motherboard Replacement

Introduzione

Vai al passo 1 ↓

This guide will cover the replacement of the motherboard in a TECHUP Bluetooth speaker; model No. AR456.

If your TECHUP Bluetooth speaker has recently lost functionality, it is likely the motherboard is at fault. This guide will take you through how to replace the motherboard step-by-step. This process will involve disconnecting the internal battery, and although this device runs on low-power, there is a shock hazard anytime you are working with open wires from a battery. Take care when soldering/desoldering the battery wires.

If you do not know how to solder, you may use this guide.

Cosa ti serve

Strumenti

    1. TECHUP Bluetooth Speaker Motherboard Replacement, Motherboard: passo 1, immagine 1 di 1
      • Pry the foam buffer from the speaker using a nylon spudger or flathead screwdriver (pictured).

      • You will need to re-apply adhesive if you want to reattach this foam after removing it.

      Chiedi a FixBot

      Aggiungi Commento

    2. TECHUP Bluetooth Speaker Motherboard Replacement: passo 2, immagine 1 di 3 TECHUP Bluetooth Speaker Motherboard Replacement: passo 2, immagine 2 di 3 TECHUP Bluetooth Speaker Motherboard Replacement: passo 2, immagine 3 di 3
      • Remove the two bottom screws using a Phillips #0 screwdriver.

      Chiedi a FixBot

      Aggiungi Commento

    3. TECHUP Bluetooth Speaker Motherboard Replacement: passo 3, immagine 1 di 2 TECHUP Bluetooth Speaker Motherboard Replacement: passo 3, immagine 2 di 2
      • Pull the plastic casing away from the speaker.

      • You may have to twist-and-pull to remove it.

      Chiedi a FixBot

      Aggiungi Commento

    4. TECHUP Bluetooth Speaker Motherboard Replacement: passo 4, immagine 1 di 2 TECHUP Bluetooth Speaker Motherboard Replacement: passo 4, immagine 2 di 2
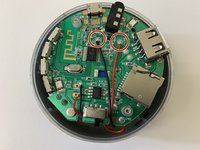
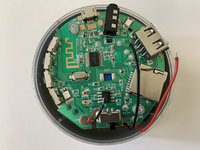
      • Desolder the two battery wires from the motherboard.

      • Because you are dealing with battery connections, be aware of the shock hazard.

      Chiedi a FixBot

      Aggiungi Commento

    5. TECHUP Bluetooth Speaker Motherboard Replacement: passo 5, immagine 1 di 2 TECHUP Bluetooth Speaker Motherboard Replacement: passo 5, immagine 2 di 2
      • Desolder the two speaker wires from the motherboard.

      Chiedi a FixBot

      Aggiungi Commento

    6. TECHUP Bluetooth Speaker Motherboard Replacement: passo 6, immagine 1 di 1
      • Grasp the motherboard and pull it from the encasement.

      • Take care to not rip the wires as you pull the motherboard out, as they may catch in the grooves on the motherboard.

      Chiedi a FixBot

      Aggiungi Commento

    7. TECHUP Bluetooth Speaker Motherboard Replacement: passo 7, immagine 1 di 1
      • Pry the battery from the motherboard using a nylon spudger.

      • You may have to apply significant force to the motherboard to remove the battery.

      • Always use an ESD-safe tool, such as a nylon spudger, when working with batteries. Metal tools can puncture an unprotected battery, potentially causing a fire.

      Chiedi a FixBot

      Aggiungi Commento

Conclusione

To reassemble your device, follow these instructions in reverse order.

Annulla: non ho completato questa guida.

Altre 5 persone hanno completato questa guida.

0Commenti sulla guida

Aggiungi Commento

Visualizza statistiche:

Ultime 24 ore: 3

Ultimi 7 giorni: 32

Ultimi 30 giorni: 171

Tutti i Tempi: 4,440