Salta al contenuto principale

System x3650 CPU and Memory Replacement

Cosa ti serve

  1. System x3650 CPU and Memory Replacement, CPU and Memory: passo 1, immagine 1 di 2 System x3650 CPU and Memory Replacement, CPU and Memory: passo 1, immagine 2 di 2
    • Make sure that you have unplugged the power cable before servicing.

    • Pull the latch on the top cover up.

    • Slide the cover out.

  2. System x3650 CPU and Memory Replacement: passo 2, immagine 1 di 3 System x3650 CPU and Memory Replacement: passo 2, immagine 2 di 3 System x3650 CPU and Memory Replacement: passo 2, immagine 3 di 3
    • Press the two latches on the riser card assembly, indicated by blue arrows and outlines.

    • Slowly take the the riser card assembly out.

    • Doing so will allow you to remove the white plastic airflow guides.

    • This will provide access to the computer parts that you want to replace.

  3. System x3650 CPU and Memory Replacement: passo 3, immagine 1 di 1
    • Move the heat sink bracket lever to the open position and remove the heat sink.

    • This will provide access to the processor.

  4. System x3650 CPU and Memory Replacement: passo 4, immagine 1 di 2 System x3650 CPU and Memory Replacement: passo 4, immagine 2 di 2
    • Open the CPU retention bracket lever.

    • Remove the old processor from the socket.

  5. System x3650 CPU and Memory Replacement: passo 5, immagine 1 di 2 System x3650 CPU and Memory Replacement: passo 5, immagine 2 di 2
    • Remove the old RAM if it is being replaced.

    • Unfasten the clamps on both ends of the slot.

    • Take out the memory module.

  6. System x3650 CPU and Memory Replacement: passo 6, immagine 1 di 2 System x3650 CPU and Memory Replacement: passo 6, immagine 2 di 2
    • Insert the new memory modules into the empty RAM slots securely.

    • The clamps on both ends of the slot should click into place.

    • See this link for the DIMM installation sequence.

  7. System x3650 CPU and Memory Replacement: passo 7, immagine 1 di 3 System x3650 CPU and Memory Replacement: passo 7, immagine 2 di 3 System x3650 CPU and Memory Replacement: passo 7, immagine 3 di 3
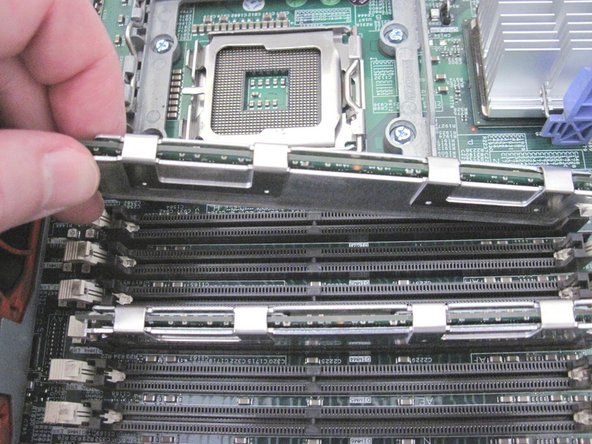
    • Insert new CPU into socket.

    • Ensure that the CPU chip is positioned correctly (i.e. its marked corner is facing bottom left).

    • Apply thermal paste to the top of the processor if necessary.

    • Close the CPU retention bracket lever.

    • An insecure or improper placement can damage a CPU or the socket pinout.

  8. System x3650 CPU and Memory Replacement: passo 8, immagine 1 di 1
    • Place the heat sink on top of the CPU.

    • Move the heat sink bracket lever to closed position.

  9. System x3650 CPU and Memory Replacement: passo 9, immagine 1 di 3 System x3650 CPU and Memory Replacement: passo 9, immagine 2 di 3 System x3650 CPU and Memory Replacement: passo 9, immagine 3 di 3
    • If you need to add a second processor, move the heat sink bracket lever to open position.

    • Take out the white plastic cover on the second socket.

    • Repeat steps 7 and 8 for the second CPU/socket (insert a CPU and a heat sink).

  10. System x3650 CPU and Memory Replacement: passo 10, immagine 1 di 3 System x3650 CPU and Memory Replacement: passo 10, immagine 2 di 3 System x3650 CPU and Memory Replacement: passo 10, immagine 3 di 3
    • Insert the plastic airflow guides back in their places.

    • Insert the riser card assembly, pushing it into its slot.

  11. System x3650 CPU and Memory Replacement: passo 11, immagine 1 di 2 System x3650 CPU and Memory Replacement: passo 11, immagine 2 di 2
    • Slide the top cover in place firmly.

    • Ensure that the latch is in the down position.

Conclusione

Follow this guide to replace or upgrade CPU and memory on IBM System x3650. Up to 2 processors can be installed. Up to 48 GB of RAM can be installed.

Serguei Potechnykh

Membro da: 09/16/20

193 Reputazione

1 Guida realizzata

0 Commenti

Aggiungi Commento

Visualizza Statistiche:

Ultime 24 Ore: 1

Ultimi 7 Giorni: 12

Ultimi 30 Giorni: 39

Tutti i Tempi: 2,331