Salta al contenuto principale
Unisciti alla Community delle riparazioni - Crea un account
Surface Studio M.2 SSD Replacement

Surface Studio M.2 SSD Replacement

The Raptor

The Raptor e 2 altri collaboratori

Ultimo aggiornamento il 27 lug 2023

10 - 20 minuti
Moderato
Guida fornita dalla comunità

Introduzione

Vai al passo 1

Do you want a bigger SSD or perhaps a faster PCIe NVMe SSD? Follow this guide to replace your SSD.

(Note: Surface Studio with Intel Core i5 comes with SATA III SSD while Surface Studio with Intel Core i7 comes with PCIe NVMe SSD.)

Cosa ti serve

Ricambi

Strumenti

Mostra di più…

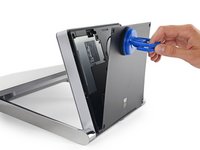
  1. Surface Studio M.2 SSD Replacement, M.2 SSD: passo 1, immagine 1 di 3 Surface Studio M.2 SSD Replacement, M.2 SSD: passo 1, immagine 2 di 3 Surface Studio M.2 SSD Replacement, M.2 SSD: passo 1, immagine 3 di 3
    • Lay the Surface face down on a padded surface

    • Be careful not to scratch the screen when laying it face down

    • Remove the four rubber feet at each corner concealing the Torx screws

    • Remove the four Torx screws under the rubber feet.

    • Two screws on the upper corners are longer than two screws on the lower corners.

    • Attach suction cups to the bottom cover and then pull on the suction cups to free the bottom cover.

  2. Surface Studio M.2 SSD Replacement: passo 2, immagine 1 di 2 Surface Studio M.2 SSD Replacement: passo 2, immagine 2 di 2
    • Remove five torx screws holding the two fans to the midframe

    • Remove the two fans

    • The fan connectors are behind the midframe and not yet accessible. Let the fans hang loosely until you can access the connectors.

    • Four large torx screws and four small torx screws hold the midframe to the upper frame.

    • Remove four large torx screws holding the midframe

    • Remove four small torx screws holding the midframe

  3. Surface Studio M.2 SSD Replacement: passo 3, immagine 1 di 1
    • Slowly remove the midframe

    • Be careful, the speaker on the midframe is still attached to the motherboard

    • Detach the connectors for the two fans and the speaker

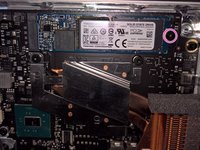
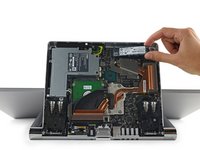
  4. Surface Studio M.2 SSD Replacement: passo 4, immagine 1 di 2 Surface Studio M.2 SSD Replacement: passo 4, immagine 2 di 2
    • With the midframe removed, the M.2 SSD is now accessible

    • Remove a torx screw holding the M.2 holding the SSD to the motherboard

    • Pull the SSD straight back

    • Do not pull the SSD upward or risk damaging the M.2 socket

    • The M.2 socket is compatible with most SATA III, PCIe ACHI, and PCIe NVMe in the M.2 2280 form factor

Conclusione

To reassemble your device, follow these instructions in reverse order.

Altre 6 persone hanno completato questa guida.

The Raptor

Membro da: 11/27/16

6.276 Reputazione

6 Guide realizzate

21Commenti sulla guida

I know that one of the very first questions would be: Does the M.2 slot supports PCIe NVMe ?

The answer is: Yes it does.

The Raptor - Replica

But it does not mean that you can get the drive to run in NVMe model.

There does not appear to be a setting to enable NVMe model for the drive.

John -

Does it support bootable NVMe?

Mark Smith - Replica

@msmith4099 @theofficemaven

Sure. When installing Windows, choose to install Windows to "Drive 1" instead of "Drive 0"

The Raptor -

Is there any raid options that need to be configured?

Mark Smith - Replica

Aggiungi Commento

Visualizza Statistiche:

Ultime 24 Ore: 3

Ultimi 7 Giorni: 22

Ultimi 30 Giorni: 115

Tutti i Tempi: 12,354