Salta al contenuto principale

SteelSeries Arctis Pro Plus GameDAC Headset Mute Button Replacement

Cosa ti serve

  1. SteelSeries Arctis Pro Plus GameDAC Headset Mute Button Replacement, Headset Ear Cushions: passo 1, immagine 1 di 2 SteelSeries Arctis Pro Plus GameDAC Headset Mute Button Replacement, Headset Ear Cushions: passo 1, immagine 2 di 2
    • Lift the edge of the cushion and pull out slightly.

    • Work your way around the cushion until it comes off completely.

    • Repeat for the other cushion.

  2. SteelSeries Arctis Pro Plus GameDAC Headset Mute Button Replacement, Headset Circuit Board: passo 2, immagine 1 di 1
    • Remove the three 5mm screws with a Phillips #0 driver head on the headphone with the microphone.

  3. SteelSeries Arctis Pro Plus GameDAC Headset Mute Button Replacement: passo 3, immagine 1 di 1
    • Lift the speaker off the headset to expose the circuit board.

    • Be careful not to lift the speaker too quickly or too forcefully to prevent the wires from being pulled out of their connections.

  4. SteelSeries Arctis Pro Plus GameDAC Headset Mute Button Replacement: passo 4, immagine 1 di 1
    • Remove the three 5mm screws using a Phillips #0 driver head.

  5. SteelSeries Arctis Pro Plus GameDAC Headset Mute Button Replacement: passo 5, immagine 1 di 1
    • Lift the circuit board out of the plastic housing.

    • Press in on the volume wheel while pulling on the circuit board to help maneuver the circuit board out of the housing.

  6. SteelSeries Arctis Pro Plus GameDAC Headset Mute Button Replacement, Headset Mute Button Cap: passo 6, immagine 1 di 2 SteelSeries Arctis Pro Plus GameDAC Headset Mute Button Replacement, Headset Mute Button Cap: passo 6, immagine 2 di 2
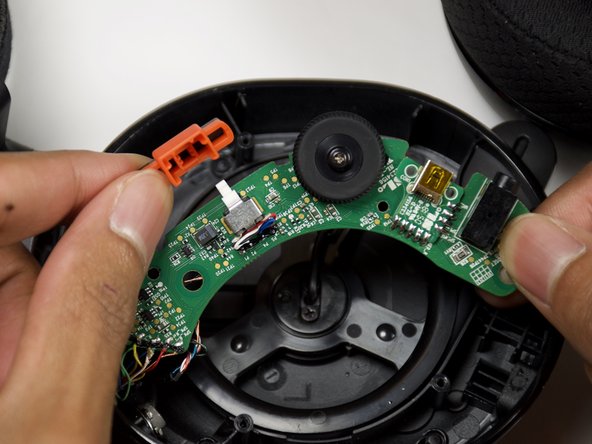
    • Flip the circuit board over and remove the keycap by pulling on it.

  7. SteelSeries Arctis Pro Plus GameDAC Headset Mute Button Replacement, Headset Mute Button: passo 7, immagine 1 di 1
    • Desolder the wires connecting the button to the circuit board.

    • For help desoldering connections, follow this useful guide on Come saldare e dissaldare componenti elettrici.

    • Use caution when soldering. The heated tip may cause damage to the board or burn you.

  8. SteelSeries Arctis Pro Plus GameDAC Headset Mute Button Replacement: passo 8, immagine 1 di 2 SteelSeries Arctis Pro Plus GameDAC Headset Mute Button Replacement: passo 8, immagine 2 di 2
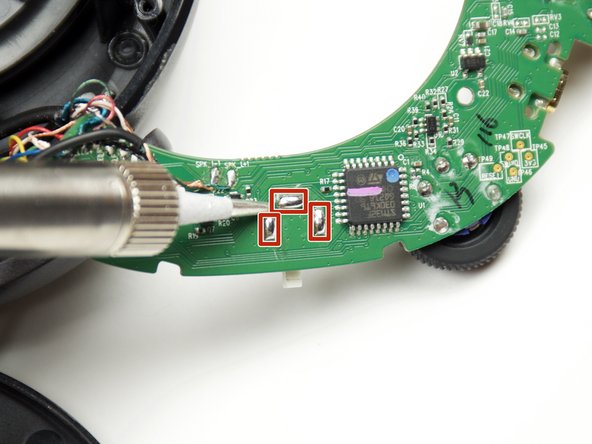
    • Desolder the three pins to remove the button from the circuit board.

    • For help desoldering connections, follow this useful guide on Come saldare e dissaldare componenti elettrici.

    • Use caution when soldering. The heated tip may cause damage to the board or burn you.

Conclusione

To reassemble your device, follow these instructions in reverse order.

Un'altra persona ha completato questa guida.

Kyle Chang

Membro da: 01/24/19

1.152 Reputazione

7 Guide realizzate

Team

Cal Poly, Team S18-G1, White Winter 2019 Membro di Cal Poly, Team S18-G1, White Winter 2019

CPSU-WHITE-W19S18G1

4 Membri

21 Guide realizzate

7 Commenti

Where can you get the replacement switch?

Jason Rosa - Replica

Can you provide any specs for this switch? I’d like to buy the replacement switch before disassembling the headset.

DAA - Replica

I also need to know where to get the replacement switch from !

Trevor Peters - Replica

If anyone wants to try it (I have not), I think the G type switch will work. BUT you will have to find a way to mount it, as it does not have the Metal case for soldering to the PCB.

Searchebay.co.uk for 11 Types, DPDT Self Latching Locking Momentary Push Button PCB SMD Switch 6 Pin

Select Type G

Try at your own risk and good luck

Trevor Peters - Replica

BTW, the size of the switch is 5.8 x 5.8 mm

DAA - Replica

Aggiungi Commento

Visualizza Statistiche:

Ultime 24 Ore: 7

Ultimi 7 Giorni: 44

Ultimi 30 Giorni: 178

Tutti i Tempi: 9,381