Salta al contenuto principale

Sostituzione pannello superiore copertura interna Xbox One S

Cosa ti serve

  1. Sostituzione pannello superiore copertura interna Xbox One S, Copertura: passo 1, immagine 1 di 1
    • Gira l'Xbox One S in modo che la parte inferiore sia rivolta verso l'alto.

  2. Sostituzione pannello superiore copertura interna Xbox One S: passo 2, immagine 1 di 1
    • Comincia lavorando sul case posteriore dove c'è l'adesivo della garanzia. Infila uno strumento di apertura nella fessura tra la parte inferiore della copertura e la parte superiore forata. Quindi trova i ganci nella fessura che tengono insieme la copertura.

    • Usa lo strumento di apertura per rilasciare i ganci. Il modo migliore è fare leva per allontanare la copertura posteriore da quella inferiore.

    • Sentirai dei suoni di scatti mentre fai leva per aprire la copertura. Potrebbe essere abbastanza difficile rimuoverne la parte inferiore.

    • Potresti rompere i ganci mentre rimuovi la copertura inferiore.

    • Consigliamo di iniziare dal retro con l'adesivo della garanzia. Fai leva con lo strumento di apertura lungo il bordo posteriore finché tutti i ganci sono liberi, poi prosegui con gli altri lati. Quando tre lati sono liberi, comincia alla fine del lato opposto al pulsante sync. Fai attenzione e prenditi il tuo tempo, si separerà tutto senza danni.

    Be careful not to damage the pairing button on this part

    David - Replica

    Important!!

    You've to start from the back corner where is the information label, because there is a main clip behind a warranty sticker

    Cristian Ramirez - Replica

    They should add this to the guide! I didnt know that, and did some minor damage to the bottom piece where that main clip is.

    I dont mind because it's my own Xbox, but what if it belonged to a customer?

    Charles Jackson -

    They should add this to the guide! I didnt know that, and did some minor damage to the bottom piece where that main clip is.

    I dont mind because it's my own Xbox, but what if it belonged to a customer?

    💯% same opinion!

    profnussecke42o -

    This was hard! I tried using plastic pry tools, but they did not work. A metal tool did, but make sure to watch a video or two, to see what you actually are dealing with. After the videos it went quite smoothly.

    Peterdk - Replica

    I legitimately cannot open the case where the warranty sticker is, ive tried everything, im resorting to a fork to try and open this

    Sohail ツShah - Replica

    nothing is moving... not sure what I am doing wrong but I can't feel any clips anywhere. I'm genuinely scared to break something.

    bumpsy - Replica

    undid all the clips on the back and nothing moves more than a few millimeters... is there actually a good guide out there that doesn't promote breaking plastic?

    bumpsy - Replica

  3. Sostituzione pannello superiore copertura interna Xbox One S: passo 3, immagine 1 di 1
    • Una volta rilasciati tutti i ganci, rimuovi la parte inferiore della copertura.

  4. Sostituzione pannello superiore copertura interna Xbox One S: passo 4, immagine 1 di 2 Sostituzione pannello superiore copertura interna Xbox One S: passo 4, immagine 2 di 2
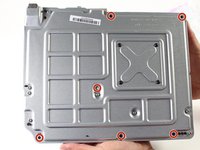
    • Usa un cacciavite Torx T10 per svitare le sei viti verdi da 50 mm segnate da F1 a F6 dalla copertura in metallo.

    My F3 isn't coming out. The screwdriver isn't sitting tight like it is for the other ones. Any idea on how to fix that?

    ben mccord - Replica

  5. Sostituzione pannello superiore copertura interna Xbox One S: passo 5, immagine 1 di 2 Sostituzione pannello superiore copertura interna Xbox One S: passo 5, immagine 2 di 2
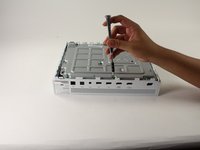
    • Separa delicatamente la copertura interna da quella bianca esterna usando il metodo appropriato.

    Essential tip: be sure to slide the metal housing backward, away from the from of the case as pictured above, rather than upward. If not, you can easily break off the teeny momentary switches on the IR blaster board!

    Mark Ross - Replica

    “appropriate method is not descriptive like Mr. Ross’s comment. The original poster should edit the description to ensure people do in fact remove the box from the case appropriately. I would also add arrows to the picture.

    Ryan A - Replica

    ____________⬆️

    ↖️Yes! I see it the same way!↗️

    ⬅️Arrows are always a good thing!➡️

    ↙️Can't do anything wrong with them! ↘️

    ____________⬇️

    😅😅

    profnussecke42o -

    I didn't realize that metal ribbon was connecting the case to the console and I yanked it w out realizing it was there. How o I get a replacement?

    Jerianna Mike - Replica

  6. Sostituzione pannello superiore copertura interna Xbox One S, Pannello superiore copertura interna: passo 6, immagine 1 di 1
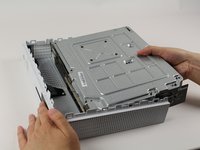
    • Gira la copertura interna in modo che la ventola sia verso l'alto.

  7. Sostituzione pannello superiore copertura interna Xbox One S: passo 7, immagine 1 di 1
    • Per accedere alle componenti dentro alla copertura, puoi sganciare e sollevare il pannello superiore della copertura. Dovrebbe venire visa senza problemi.

Conclusione

Per rimontare il tuo dispositivo, segui le istruzioni in ordine inverso.

Altre 12 persone hanno completato questa guida.

Un ringraziamento speciale a questi traduttori:

en it

100%

Daniele Carminati ci sta aiutando ad aggiustare il mondo! Vuoi partecipare?
Inizia a tradurre ›

Andrew

Membro da: 04/26/17

5.461 Reputazione

3 Guide realizzate

Team

Cal Poly, Team S22-G3, Livingston Spring 2017 Membro di Cal Poly, Team S22-G3, Livingston Spring 2017

CPSU-LIVINGSTON-S17S22G3

4 Membri

59 Guide realizzate

2Commenti sulla guida

Pourquoi ma X boxe One s'allume plus

Karim hamadi - Replica

Very sloppy manual. Skips removing a couple screws (such as those marked Bx like B1), says to remove certain screw, then on the next step it's back in the image. Skips removal of some elements. Overall, this guide is usable, but only just. 3 stars out of 5.

Ilya - Replica

Aggiungi Commento

Visualizza Statistiche:

Ultime 24 Ore: 0

Ultimi 7 Giorni: 25

Ultimi 30 Giorni: 158

Tutti i Tempi: 7,303