Introduzione
I dorsali su un controller wireless Xbox One 1697 possono diventare poco responsivi nel tempo a causa dell'usura. Se i dorsali del tuo controller perdono la responsività o si rompono, segui questa guida per sostituirli.
Cosa ti serve
-
-
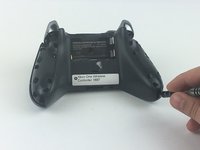
Rimuovi la copertura del vano batterie.
-
Rimuovi le due batterie AA.
-
Rimuovi attentamente l'etichetta o forala per accedere alla vite.
-
-
-
Rimuovi le coperture dei manici facendo leva con uno spudger attorno alla loro fessura.
-
Fai leva sulle coperture dei manici muovendo lo spudger avanti e indietro. Devi farlo lungo tutta la fessura di ogni manico per rimuoverli.
-
Ci sono sette ganci che devono essere aperti per rimuovere ogni copertura dei manici.
Absolutely use the spudger to do this. DO NOT just lift up a bit at the bottom and then try to forcefully pull off this panel (as is shown and suggested on *multiple* YouTube videos). You WILL snap the clips. Maybe not all of them and *maybe* none of them, but as the instructions here detail, what you want to do is UNCLIP the clips where they are located, using the PLASTIC spudger. NOT a screwdriver. I watched three separate videos on YouTube where the person said “just stick a screwdriver in there and once you’re able to lift up enough to fit your finger inside, do so, and then just carefully pull the panel off.” That’s not how it works.
-
-
-
-
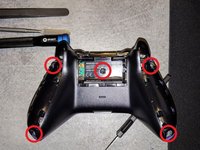
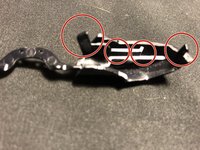
Usa un cacciavite Torx TR8 per svitare le cinque viti Torx TR9.
you must also remove the T8 screw hidden under the label in the battery compartment to free the faceplate.
Precised by Dennis Kim, but to remove the screws you need a TORX TR8 screwdriver (I guess it’s a Torx size 8)
-
-
-
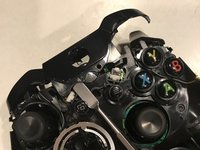
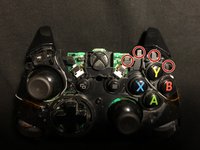
I dorsali sono collegai da una copertura in plastica centrale attorno al tasto home della Xbox. Rimuovi questo pezzo in plastica sollevandolo da sopra le due sporgenze, premendo il tasto home e spingendo la copertura verso la parte superiore del controller.
-
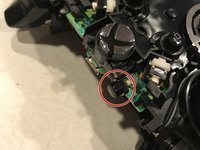
Stai attento al tasto di sincronizzazione appoggiato sotto la copertura in plastica. Assicurati di riposizionarlo prima di rimontare il gruppo dei dorsali/copertura in plastica.
-
Rimuovi il gruppo dei dorsali tirandoli via dalla copertura in plastica.
you forgot to include directions for removing the central cover.
And when you do, the connect button pops out, and now I have no clue how to put it back -_-
The replacement part I bought fit OK but was too snug, with the result that the bumpers wouldn’t spring back so they wouldn’t click and unclick the tiny control switches they connect to.
After a bit of examination I determined that if I cut out the middle arch section that joins the bumpers, but leaving enough plastic to go under the central plastic cover so that they would be held in place securely, that it was possible to reassemble the controller so the bumpers click and unclick freely.
I had the same issue, But i just shaved the little lugs that connect the button to the switch with a scalpel and used the original plastic black cover. Works a treat and i’ve no fear the button will fall out.. :)
-
-
-
Allinea i nuovi dorsali sopra il controller tenendo premuti i grilletti e allineando le quattro sporgenze su entrambi i lati.
-
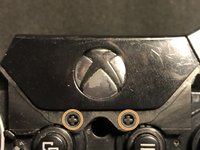
Posiziona la nuova copertura del tasto home sopra la porta micro USB, spingi il tasto home in posizione e tira la copertura oltre le due sporgenze come mostrato.
-


Il tuo dispositivo è ora pronto all'uso.
Il tuo dispositivo è ora pronto all'uso.
Annulla: non ho completato questa guida.
Altre 61 persone hanno completato questa guida.
Un ringraziamento speciale a questi traduttori:
100%
Daniele Carminati ci sta aiutando ad aggiustare il mondo! Vuoi partecipare?
Inizia a tradurre ›
Team

USF Tampa, Team S9-G1, Remmell Fall 2017 Membro di USF Tampa, Team S9-G1, Remmell Fall 2017
USFT-REMMELL-F17S9G1
4 Membri
14 Guide realizzate
14 Commenti
You should add a security hex screwdriver to your tools list, along with the gauge that is required.
There is a fifth screw in the battery compartment that holds the faceplate on. Take an exacto knife and cut out sticker where the hole is.
Could you elaborate on the “remove the bumpers” part (last step) please, thank you.
Great guide. Helped me easily fix a sticky bumper and save 60$
Thank you soooo much. Had a broken bumper for over a year and finally fixed it thanks to this great guide.
How do you put them back on. The right button assembly seems to be different than the left for me
Bad design or planned obsolescence on Microsoft's part, but thanks for the guide. I had a problem that others had on the replacement bumper where it had the switch depressed all the time, their solution was to file down the plastic (just barely) that presses the switch and it worked for me as well.
Excellent guide! Just revived a controller that had been chilling unused for 2 years. The replacement bumper I purchased off of Ebay had a little hitch. They would not move or click at all when placed. I just had to break off the little plastic nub that holds the end of the bumper to the controller (I found that little trick on accident by breaking one of them, lol). Now the controller functions fine, the bumpers can just be pulled up at the outside ends. Not a problem, as their purpose is to be clicked. Thanks!
It is worth noting that you should definitely be paying attention to alignment when inserting in the new bumpers. Make sure all 8 protruding black plastic "fins" (2 on the bumpers per side, 2 on the controller itself per side) go into the correct places, otherwise this whole thing won't snap into place and obviously won't work.
All 4 plastic fins on the controller need to go into the middle channel on the underside of the bumpers. The 2 inner fins on the bumper constellation need to go underneath a black bar so that they are able to activate the buttons. The 2 outer fins need to hook underneath a black bar on the controller, this keep them in place.
I hope this is able to help those of you that might be struggling with this :)
Note: Screw removal is in Step 3
jkgarrett17 - Replica