Introduzione
Anche se il dissipatore e la ventola sono due componenti diverse, la procedura per sostituirne una o l'altra è esattamente la stessa, in quanto sono attaccate l'una all'altra sulla scheda madre.
Cosa ti serve
-
-
Gira l'Xbox One S in modo che la parte inferiore sia rivolta verso l'alto.
-
-
-
Comincia lavorando sul case posteriore dove c'è l'adesivo della garanzia. Infila uno strumento di apertura nella fessura tra la parte inferiore della copertura e la parte superiore forata. Quindi trova i ganci nella fessura che tengono insieme la copertura.
-
Usa lo strumento di apertura per rilasciare i ganci. Il modo migliore è fare leva per allontanare la copertura posteriore da quella inferiore.
Important!!
You've to start from the back corner where is the information label, because there is a main clip behind a warranty sticker
They should add this to the guide! I didnt know that, and did some minor damage to the bottom piece where that main clip is.
I dont mind because it's my own Xbox, but what if it belonged to a customer?
They should add this to the guide! I didnt know that, and did some minor damage to the bottom piece where that main clip is.
I dont mind because it's my own Xbox, but what if it belonged to a customer?
💯% same opinion!
I legitimately cannot open the case where the warranty sticker is, ive tried everything, im resorting to a fork to try and open this
-
-
-
Usa un cacciavite Torx T10 per svitare le sei viti verdi da 50 mm segnate da F1 a F6 dalla copertura in metallo.
My F3 isn't coming out. The screwdriver isn't sitting tight like it is for the other ones. Any idea on how to fix that?
-
-
-
Separa delicatamente la copertura interna da quella bianca esterna usando il metodo appropriato.
“appropriate method is not descriptive like Mr. Ross’s comment. The original poster should edit the description to ensure people do in fact remove the box from the case appropriately. I would also add arrows to the picture.
____________⬆️
↖️Yes! I see it the same way!↗️
⬅️Arrows are always a good thing!➡️
↙️Can't do anything wrong with them! ↘️
____________⬇️
😅😅
I didn't realize that metal ribbon was connecting the case to the console and I yanked it w out realizing it was there. How o I get a replacement?
-
-
-
Per sostituire il disco rigido, gira la console a testa in giù e svita le due viti Torx T10 da 10 mm, la C3 e la C4, dal retro della Xbox One S.
Some of my silver were gold screws, so just letting people know to look out for that!
The Torx screw circled on the left is actually C5
I found the same. On my Xbox One S, it's C3 and C5 that hold in the hard drive caddy. C4 holds in the optical disk caddy.
jamesr -
Funny thing on my console rev t t3 built feb 2018 it’s C4 and C5
-
-
-
-
Scollega delicatamente il disco rigido dalla scheda madre (dai due connettori in plastica).
Do not remove the cable!!!! You can change while the cables are plugged. It took 2 hours trying to put mm precisely all the little pins because of the removal of the cables.
Please update the post, I could easily end up as the Aaron, breaking the XBOX completly.
Yes, this has also happened to me the connectors had broken and the pins bent and snapped off.
-
-
-
Per rimuovere il lettore CD, svita la vite Torx T10 argento da 10 mm chiamata "C5".
-
-
-
Per sostituire la scheda madre devi svitare le tre viti Torx T10 argento da 10 mm chiamate "C1", "C2" e "C6".
-
Svita le quattro viti Torx T9 nere da 8 mm chiamate "A1", "A2", "A3" e "A4".
The Black screws are T-8 Torx, not T-9!
I didnt see this before, so thankfully I was able to use T9 without stripping the screws!
IMPORTANT! You also need to remove the two T10 screws labeled B1 and B2 in order to remove the motherboard! I had to figure this out on my own.
-
-
-
Trova il morsetto rettangolare nell'angolo opposto all'alimentatore.
-
-
-
Devi svitare la piccola scheda logica vicino alla ventola prima di rimuovere la scheda madre. Penso sia dell'antenna WiFi.
-
-
-
Rimuovi la piccola scheda Mediatek etichettata D1, D2, e D3.
-
-
-
Ora che il morsetto è stato rimosso, solleva delicatamente la scheda madre dai suoi bordi dalla copertura in metalli. La scheda madre dovrebbe uscire senza problemi.
How do you open it?
They forget, I think, to tell that first you need to take off screw B1 and B2
-
-
-
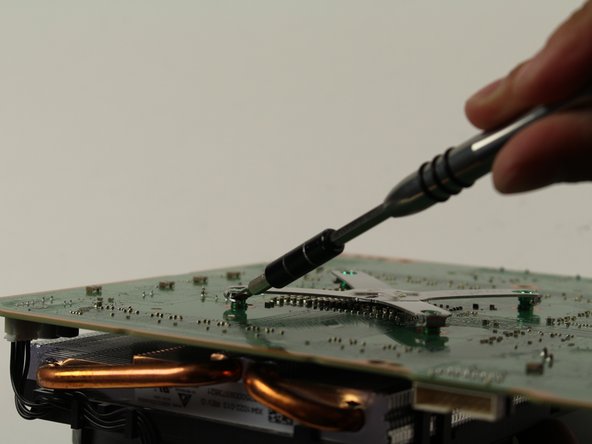
Gira la scheda madre a faccia un giù e trova la staffa in metallo a forma di x.
-
Usa uno spudger o uno strumento di apertura in plastica peer fare leva sugli angoli della staffa e sollevarli dai quattro piccoli supporti verdi.
-
-
-
Scollega la ventola/dissipatore dalla scheda tirando delicatamente verso l'alto il connettore in plastica bianca.
You don’t have to take the heatsink off the motherboard to take the fan off if that’s what you’re after, just take a flathead and lift the clips and that should let the fan go.
-
-
-
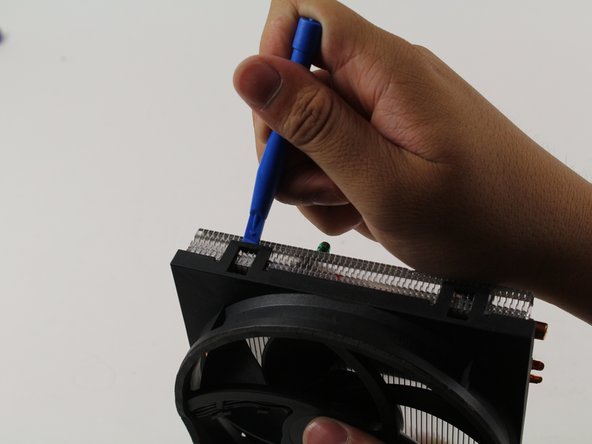
Una volta rimosso il dissipatore/ventola dalla scheda, usa lo strumento di apertura in plastica per rimuovere la ventola in plastica dal dissipatore in metallo, facendo leva sui ganci rettangolari della ventola.
This guide and the visual diagrams provided are great but shouldn’t you at least mention destatic process, work matt grounding and the need to replace thermal compound for the sake of novices doing at home repairs?
I agree with the comments, though I am not the author; I repair stuff like this for a living. Making manuals on IFIXIT.com is a dilemma. The manuals are great if you are the repair guy and need some basic help on a new device. But if then again, if you are the repair guy, and you have much experience, do I really want to give away all my hard-earned experience to the average home DIY guy who thinks they can do everything without paying anybody for it? My .02 on the comment by Mikey is that indeed, a cursory mention of "additional precautions/procedures" should be included, but not with much detail. In fact, I think ALL of the IFIXIT manuals abruptly end and should have a disclaimer to the effect of, "THIS GUIDE MAY BE INCOMPLETE. INEXPERIENCED DIYers MAY PERMANENTLY DAMAGE OR "BRICK" THE DEVICE. WE HIGHLY RECOMMEND CONTACTING AN EXPERIENCED TECHNICIAN."
"Cannot edit comment after 5 minutes past" is very stupid. What if I wanted to correct a typo or logic error? 5 minutes is way too short. After 24 hours maybe... So now the community knows why we do not post much on this forum. And BTW, the laws in California are very different than the laws in other states, so some of the issues that are pushed do not apply at all in other states.
-


Per rimontare il tuo dispositivo, segui le istruzioni in ordine inverso.
Per rimontare il tuo dispositivo, segui le istruzioni in ordine inverso.
Annulla: non ho completato questa guida.
Altre 42 persone hanno completato questa guida.
Un ringraziamento speciale a questi traduttori:
100%
Daniele Carminati ci sta aiutando ad aggiustare il mondo! Vuoi partecipare?
Inizia a tradurre ›
Team

Cal Poly, Team S22-G3, Livingston Spring 2017 Membro di Cal Poly, Team S22-G3, Livingston Spring 2017
CPSU-LIVINGSTON-S17S22G3
4 Membri
56 Guide realizzate
9 Commenti
After researching replacement costs through local "fixit" places and Microsoft and cost ranging from $140 to $175 for fan replacement. Decided to take chance on this fan for Xbox one S. https://www.amazon.com/gp/product/B07HD3... Take time taking the bottom black plastic cover off once it gets started its easy. The corner by MS logo has tab that seems a bit thicker and took some doing to get off. Followed this guide did not have to do port removal. Once I got main white case off I just took hard drive and optical drive screws out. Just lifted enough to get to tab holding fan onto heat sink. popped them off and then replaced with this unit. Be aware when putting optical drive and hard drive back in place there are plastic tabs that match to holes on motherboard and let the two units sit down all the way. Also If I recall the hard drive goes in first and then optical drive. 15 minutes from start to finish. Worked like a champ right off! thanks for the awesome guide!
ACHTUNG!!! Schritt 15 ist UNNÖTIG bzw. hat so wie hier beschrieben womöglich FATALE Folgen für Eure Xbox! (Es sei denn Ihr wollt aus irgendeinem mir nicht ersichtlichen Grund den Kühler austauschen und nicht den Lüfter.) Denn was hier unterschlagen wird: Löst man den Kühler wie in den Bildern gezeigt von der Platine wird die Verbindung zwischen Kühleinheit und Prozessor unterbrochen und die Kühlpaste zerbröselt und verliert jegliche Wirkung!
Der Lüfter lässt sich auch OHNE Ablösen des Kühlkörpers relativ einfach von diesem abhebeln. Falls dennoch der Kühlkörper von der Platine abgelöst werden soll/muss (oder so wie in meinem Fall im blinden Vertrauen auf die Richtigkeit obiger Anleitung unnötigerweise entfernt wurde) UNBEDINGT Prozessor und Kühlkörper von der alten Paste befreien und neue Paste auftragen (Anleitungen hierfür finden sich im Netz).
Es rät sich auf jeden Fall an, die Wärmeleitpaste zwischen Kühlkörper und Prozessor zu wechseln (besonders, wenn sie bereits trocken ist und beim Ausbau zerbröselt), wenn man sich schon die Mühe macht und die Xbox komplett demontiert.
Die Anleitung zum Austausch der Wärmeleitpaste gibt es hier:
Ach ja: außerdem fehlt in der Beschreibung das Lösen der beiden seitlich angebrachten Funkmodule (in neuren Modellen?) und zwei zusätzliche Schrauben (B1 und B2) müssen auch noch entfernt werden, um die Hauptplatine lösen zu können. ;-)
Regulär alles da. Nur separat aufgelistet
completely misses steps of the process. screws B1 and B2 are required to be removed to seperate the motherboard, and you didnt mention removing the power supply at all, its just in one step and gone the next. with the help of another barely helpful guide, i managed to figure out enough of it to get the job done. would recommend you use gifs for certain steps.
noticed this too i might make a guide with improved steps to help future fixers
Hayden -
what size fan doser it use as i have some leftover 120mm fans but idk if they will fit