Introduzione
Per sostituire la batteria, devi prima rimuovere la copertura, l’adesivo sotto alla batteria, e infine rimuovere la batteria per sostituirla.
Cosa ti serve
-
-
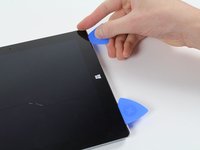
Riscalda un iOpener seguendo le istruzioni riportate nella guida dell'iOpener.
-
Posiziona l'iOpener caldo sui bordi dello schermo. Questo calore indebolirà la resistenza dell'adesivo tra il display e il corpo.
-
-
-
Prova a muoverti con cautela attorno al dispositivo usando i plettri, riapplicando l'iOpener riscaldato e un po' di fortuna.
-
-
-
-
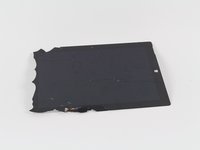
Capovolgi il display in modo che le parti sottostanti siano facilmente accessibili.
Please note that the WIFI antenna can become stuck to the display. It is located on the black plastic to the right of the camera and can be easily disconnected accidentally. Excellent guide otherwise.
I second this comment. Didn’t know it was there. The surface 3 pro guide clearly warns of this in the takeapart.
-
-
-
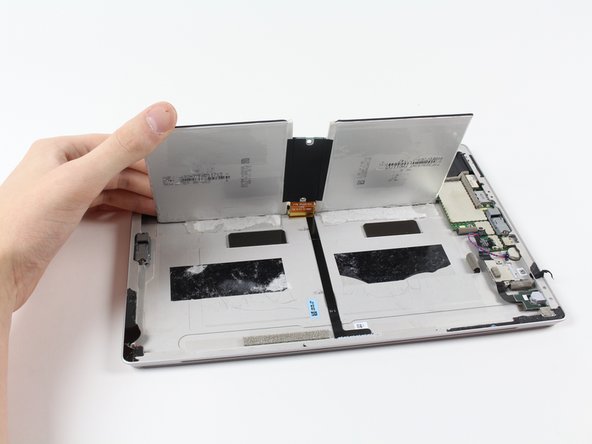
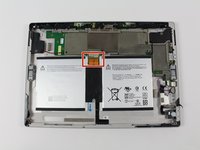
Ora che avete rimosso la copertura del Surface 3, potete iniziare a rimuovere il pacco batteria.
-
-
-
Fai scorrere con attenzione fuori dalla sua sede il connettore dell'alimentazione e dei dati dal suo inserto.
-
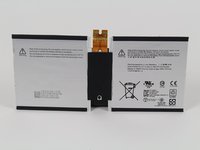
Ora puoi togliere la batteria per sostituirla con una nuova.
When replacing the battery, the connector will not slide back in where it came from easily. There are small “fingers” that press down on the top of the connector from the bottom of the logic board, they are pressed down against the back of the casing so firmly that the connector will not slide under them, instead the cable will ride up them and jam into the back of the logic board. I’ve found the best solution is to remove the screws from the logic board and use a spudger to gently lift the logic board to make a space under the fingers to allow the connector to slip back in.
Be aware of the fragility of the battery connector and ensure that the replacement has got the cut out on the leading edge. I’ve managed to break / snap the connecting cable on the replacement battery :-( so will have to order another and try again (at £25 its worth trying again IMHO).
I installed the battery but it was shorting. Examine a picture of the backside of the motherboard (ebay). There are THREE rows of connector pins to the battery, not just the row you see, and you’ve got to get under all the rows it’s supposed to connect to or it shorts. Only way to do this is to get some screws out and lift the motherboard enough to get it under.
It’s a very important point mentioned a couple of times above concerning the contact fingers. As the top edge of the circuit board seems to be stuck into the back case you have to prise up the bottom of the circuit board enough to slide the connector under and over a plastic stud. The problem is that there are three rows of fingers on the circuit board which connect to the battery connector and it’s very easy to lift the connector over the plastic stud and then not get it down again to get under the third row of fingers.
So i installed the battery, it charges but the system does not recognize it. The battery status is 100% but the battery in the sys tray has a x on it.
Any ideas how to fix this?
Thank you.
-


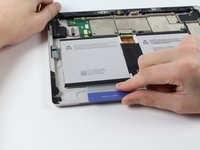


Per riassemblare il dispositivo, segui queste istruzioni in ordine inverso.
Per riassemblare il dispositivo, segui queste istruzioni in ordine inverso.
Annulla: non ho completato questa guida.
Altre 22 persone hanno completato questa guida.
Un ringraziamento speciale a questi traduttori:
100%

Questi traduttori ci stanno aiutando ad aggiustare il mondo! Vuoi partecipare?
Inizia a tradurre ›
Team

Cal Poly, Team 5-12, Maness Fall 2015 Membro di Cal Poly, Team 5-12, Maness Fall 2015
CPSU-MANESS-F15S5G12
4 Membri
22 Guide realizzate
13 Commenti
I followed these instructions without a hitch but now that I'm trying to put the new battery in I can't slide the connector for the new battery back in. It seems like the teeth that are supposed to grab the connector for the battery are too tight so I can't side the director for the battery in. Do you have any advise for this issue that I'm having?
Recently had to complete this repair for a customer. Was in the same boat, couldn’t figure out how to plug the battery back in. And wasn’t paying attention to how the connection was originally, when i pulled the battery. The connector has to slide UNDER the teeth, not above. Meaning loosen the board screws and lift the board slightly, then slide the battery connector in. hopefully this helps others that a stuck with this issue, and iFixit will update this guide.
Hab’s versucht und es hat leider nicht mal in Ansätzen geklappt. Genau wie beschrieben hab ich den iOpener 30 Sekunden lang in der Mikrowelle erhitzt und dann auf die rechte Seite des Geräts gelegt. Nach ein paar Minuten war ich der Meinung es kann losgehen und hab wie beschrieben an der Einbuchtung des Lautsprechers das Glas leicht angehoben und mit dem Plektrum in flachem Winkel angesetzt. Bevor ich noch groß Kraft anwenden konnte hatte ich schon den Sprung und ein ordentliches Stück Glas ist mir weggesprungen. Zunächst dachte ich dass es halb so schlimm sei, denn es hat “nur” den schwarzen Rand erwischt, nicht jedoch das Tochscreen selbst. Naja nach kurzer Zeit ist der Riss gewandert und nachdem die Tochfunktion nicht mehr ging, kamen danach die bunten Streifen…. 300€ kostet der Displaytausch und noch mal 90€ der Akku tausch. Hätte ich gewusst wie unfassbar leicht das Glas springt, hätte ich sofort den Akkutausch machen lassen und nicht selbst Hand angelegt -.-
Hi Guys. Any idea whether we can replace the SSD in Surface 3. My Surface 3 goes to BSOD loop and i tried resetting and it dint work. Tried memtest86. it passed too. Then used the surface drive eraser tool to wipe the drive clean. but still it goes to bsod while installation reaches some percentage. Tried all possible things with in my resourses. Dint try opening the surface yet. if the ssd is replaceable please let me know whats the ssd model to be bought
Hi Guys. Any idea whether we can replace the SSD in Surface 3 (1645) . My Surface 3 goes to BSOD loop and i tried resetting and it dint work. Tried memtest86. it passed too. Then used the surface drive eraser tool to wipe the drive clean. but still it goes to bsod while installation reaches some percentage. Tried all possible things with in my resources. Dint try opening the surface yet. if the ssd is replaceable ? please let me know whats the ssd model to be bought. Thanks a lot in advance Stay Safe
Got it all back together with no issues except…. it won’t power up. How long do I need to wait for it to charge the batteries before I can use it. Should I not be able to use it while it’s plugged in and charging?
What’s the battery part and where do I order it?
OK here are few more things to know. First unless you’re incredibly lucky, or have done this before you ARE going to crack your screen. This is especially true if its under pressure from battery swelling. Do yourself a favor and buy a new screen and tape as well.
Second, you don’t slide the battery connector into place. Take a close look at it, that hole in the top center goes over a peg, you need to take out enough screws from the motherboard to lift it out of the way enough to be able to lay the ribbon in place. I would suggest to go as far as to fully remove the motherboard so that the battery can be laid in place correctly and the board replaced over it.
The speaker connectors are also not just pull straight connectors to remove, they require an slight up and out movement to keep them intact.
The primary screws are T3 torx however there are two T2 torx screws, T2 isnt included in as many hardware packages.
I figured out, using a heat gun or a blowdryer all the way around the display for about 5 minutes, to where it's hot to the touch, use the plastic picks and slowly insert one into each side, or just two of the sides. Then work your way slowly while still blowdrying ahead of the pick, and eventually you will work your way around without any damage to the screen if you are patient enough :) hope it helped!
A little forewarning when replacing an expanded battery from one of these, the battery could be expanded enough to apply pressure to the screen and crack it before the glue becomes undone completely. The heated glass also becomes much more fragile.
no, I didn't break the screen upon removing batteries.
Robert Hale - Replica