Introduzione
La rimozione della batteria è un procedimento relativamente semplice, ma cruciale al funzionamento del rasoio. Molte persone usano il rasoio elettrico fino a quando la batteria esaurisce la sua carica, ed invece di cambiare la batteria, ne comprano uno di nuovo. Questa è un'abitudine molto costosa, al posto di sostituire la batteria esausta e poter cosi continuare ad usare il rasoio per un periodo più esteso. Seguendo la Guida per la Sostituzione chiunque può cambiare con facilità la batteria del rasoio più volte.
Cosa ti serve
-
-
Usa uno spudger per rimuovere la parte in gomma presente sul retro del rasoio.
-
-
-
-
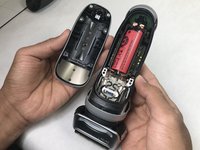
Rimuovi la batteria dal suo alloggiamento all'interno del dispositivo.
-
-
-
Sostituisci la vecchia batteria con una nuova da 1'300 mAh Sanyo (UR18500Y) .
-
Assicurati di inserire la batteria nel verso giusto.
hey namesake thanks for the effort! Is the same true for the 7899cc?
The shaver was working on electricity before I disassemble it. As I couldn't find a new battery I re-assembled is with the old battery but it does not work anymore on electricity.
Is there any trick here?
An excellent step by step instructions…??????????
Very detailed repair instructions.
I will give this a try.
Thanks
-


Per riassemblare il dispositivo, segui le istruzioni nell'ordine inverso.
Per riassemblare il dispositivo, segui le istruzioni nell'ordine inverso.
Annulla: non ho completato questa guida.
Altre 37 persone hanno completato questa guida.
Un ringraziamento speciale a questi traduttori:
100%

Acn0w ci sta aiutando ad aggiustare il mondo! Vuoi partecipare?
Inizia a tradurre ›
Team

IUPUI, Team S3-G6, Harley Fall 2017 Membro di IUPUI, Team S3-G6, Harley Fall 2017
IUPUI-HARLEY-F17S3G6
3 Membri
9 Guide realizzate
28Commenti sulla guida
Where do you buy the Battery?
For example, on Amazon: https://www.amazon.com/Braun-81377206-RE...
Thank you for the awesome tutorial Alex!
I just wanted to comment that a small flat-head screw driver can be used to remove the 4 screws (under the rubber handle piece) if you don’t have a Torx tool. The screws each have 1 small slot across the head and if you’re careful you can remove and re-install them without too much trouble.
Thanks again for helping to save me a lot of trouble with this Alex… and avoid having to buy a new electric razor!
-jb-
Under Braun there is a reset button, hold in for 4 seconds
What are symptoms of dying battery, other than failure to hold a charge? My Series 7 9595 will run perfectly, until I use the pop-up side trimmer. Then it shuts OFF, with the full battery and Hygiene meter dropping to absolute zero. I open it up and pull the battery…. and suddenly battery charge is “restored.” I’m stumped…
Same question as jclemis
Thanks for the great information, the reset information is also very helpful. I am going to reset it on a full charge. Very easy to change, much better than the ones that had them soldered in.
Have followed all above instructions and shaver works well until the back is replaced then stops working. Blue light comes on but shaver does not start? Can anyone explain why?
Brian H
I have the same problem as Brian H does. I replaced the battery and replaced the back cover, the blue light comes on but it doesn’t turn on. If I take the cover off and hold the motor in with 2 screws, the motor turns on so I’m sure all of the components work. Has anyone else have the same problem? Does anyone have a fix for this problem?
Walt L
I have he same problem as Brian H and Walt L. Came to this site to find the answer. If I find the solution, I’ll come back and post it.
Thanks for the tutorial.
Idiot as I am - I inserted the battery the wrong way.
And now the shaver is dead.
What can I do?
Best regards
Hans, Denmark
My unit would light up after battery replacement, but motor would not operate. I determined that motor assembly contacts were not touching opposing contacts; cover screws were going through square holes in brackets rather than the round holes. To allow motor assembly to push far enough into main body, I removed shaver cartridge to allow better manipulation. Then I opened trimmer unit. This allowed me to push the motor assembly to its correct location and allowed the upper screws to slip thru the round holes in mounting ears to hold motor assembly at correct depth.
Thanks! Unfortunately, the screws on mine are completely corroded… :(
I replaced battery in my Series 7. Would not work. Put the original battery which was still working some back in. Now it won’t charge. The new battery I bought didn’t have the little tips that stick out in the middle of each end. Help!
Great, easy to follow tutorial. It feel so much better to start opening stuff when you realize someone else has already done it, and done it successfully without ruin the gadget (which is the whole point in the first place).
Same question as Mike O from a year ago: is this battery a standard 18650 rechargeable Li-ion?
Maybe someone could kindly post what the correct battery position is rather than just telling us to make sure we put it in the right way.
According to the video, the positive end should be inserted toward the bottom of the shaver.
Installed fully charged battery correctly, 4 sec. reset. Nothing. No charge level or blue light. Disassembled, reassembled several times. Still dead!
Danke. Sehr gute Anleitung. Ich habe sie bei einem BRAUN 750cc-4 erfolgreich angewendet.
I completed exchanging the battery and my shaver now works great - thank you Alex! I did read the manual and applied a little oil to the shaver foil to help maintain it. I also saw that the reset button is for after you change the foil and cutter cassette not after changing the battery.