Introduzione
This guide will show you the steps to take to reach the motherboard and remove it for replacement. If you are having trouble with the speaker turning on, or issues with the speaker charging, this is the guide you'll want to follow. Before you do this, make sure to refer to the troubleshooting guide for this device.
The majority of repair time will be spent attempting to open the device, as it is sealed shut by adhesive. Once open, the repair is straightforward.
Keep in mind that opening the speaker will nullify the IP67 (waterproof and dustproof) rating, and may cause slight external damage when attempting to open.
Cosa ti serve
-
-
To get the bottom part of the speaker off, take a long and sturdy screwdriver and put it through the holes at the bottom of the speaker.
-
When you have the screwdriver through the holes, you'll want to push down very firmly. Rotate between the holes and repeat this process until the bottom piece pops off.
-
-
-
-
To unplug the microphone from the motherboard, use the nylon tipped tweezers to clamp the white block that is attached to the red and white wires.
-
Pull up and away from the motherboard until the block is fully disconnected from the slot.
-
-
-
Using the precision tweezers set, pinch the tabs on the electric plugins and gently pull outwards to disconnect the wires from the motherboard.
-
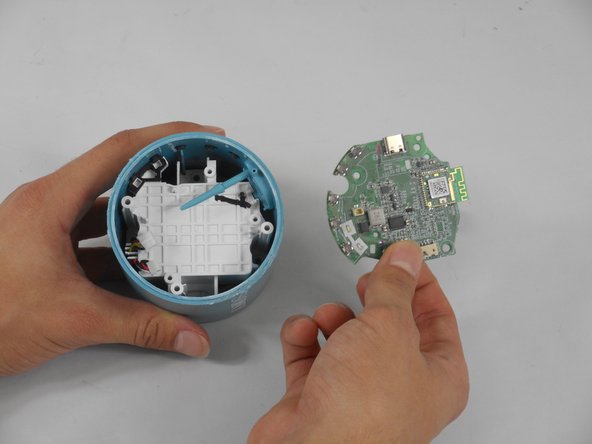
Insert a finger under the motherboard and gently lift it out of the casing.
-


To reassemble your device, follow these instructions in reverse order.
To reassemble your device, follow these instructions in reverse order.

Team

University of New Orleans, Team 5-4, McDonald Fall 2023 Membro di University of New Orleans, Team 5-4, McDonald Fall 2023
UNO-MCDONALD-F23S5G4
3 Membri
4 Guide realizzate