Salta al contenuto principale

Sony Cyber-Shot DSC-W170 LCD Replacement

Cosa ti serve

  1. Sony Cyber-Shot DSC-W170 LCD Replacement, LCD Panel Assembly: passo 1, immagine 1 di 3 Sony Cyber-Shot DSC-W170 LCD Replacement, LCD Panel Assembly: passo 1, immagine 2 di 3 Sony Cyber-Shot DSC-W170 LCD Replacement, LCD Panel Assembly: passo 1, immagine 3 di 3
    • Be sure to remove the battery before performing this task.

    • Remove the five 4 mm screws with a Phillips #000 screwdriver.

  2. Sony Cyber-Shot DSC-W170 LCD Replacement: passo 2, immagine 1 di 1
    • Use an opening pick to pry the LCD panel open.

  3. Sony Cyber-Shot DSC-W170 LCD Replacement: passo 3, immagine 1 di 1
    • Gently remove the LCD panel from the rest of the camera.

  4. Sony Cyber-Shot DSC-W170 LCD Replacement, Front Panel: passo 4, immagine 1 di 3 Sony Cyber-Shot DSC-W170 LCD Replacement, Front Panel: passo 4, immagine 2 di 3 Sony Cyber-Shot DSC-W170 LCD Replacement, Front Panel: passo 4, immagine 3 di 3
    • Remove the three 4 mm screws with a Phillips #000 screwdriver.

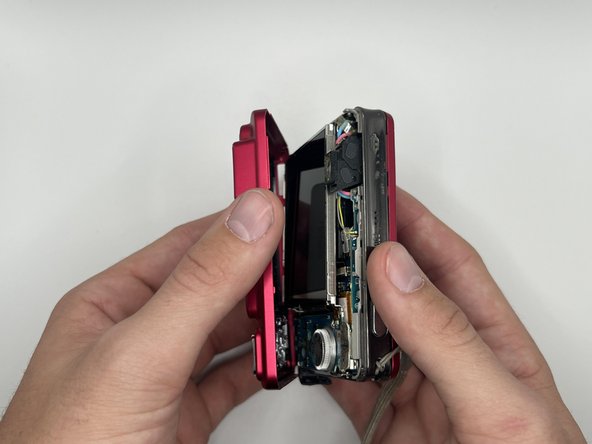
  5. Sony Cyber-Shot DSC-W170 LCD Replacement: passo 5, immagine 1 di 1
    • Gently open the front panel and remove it from the rest of the camera.

  6. Sony Cyber-Shot DSC-W170 LCD Replacement, LCD: passo 6, immagine 1 di 2 Sony Cyber-Shot DSC-W170 LCD Replacement, LCD: passo 6, immagine 2 di 2
    • Remove the first side panel to the left of the LCD.

    • Remove the 4 mm screw from the other side panel to the right of the LCD with a Phillips #000 screwdriver.

  7. Sony Cyber-Shot DSC-W170 LCD Replacement: passo 7, immagine 1 di 3 Sony Cyber-Shot DSC-W170 LCD Replacement: passo 7, immagine 2 di 3 Sony Cyber-Shot DSC-W170 LCD Replacement: passo 7, immagine 3 di 3
    • Gently, lift the LCD and carefully open the camera to disconnect the LCD ribbon cable from the motherboard.

  8. Sony Cyber-Shot DSC-W170 LCD Replacement: passo 8, immagine 1 di 2 Sony Cyber-Shot DSC-W170 LCD Replacement: passo 8, immagine 2 di 2
    • Gently push the connector through the hole to separate the LCD from the metal casing.

Conclusione

To reassemble your device, follow these instructions in reverse order.

0 Commenti

Aggiungi Commento

Visualizza Statistiche:

Ultime 24 Ore: 0

Ultimi 7 Giorni: 0

Ultimi 30 Giorni: 7

Tutti i Tempi: 77