Salta al contenuto principale

Scuf Reflex Faceplate Trim Replacement

Cosa ti serve

  1. Scuf Reflex Faceplate Trim Replacement, Pry up the right faceplate trim edge: passo 1, immagine 1 di 3 Scuf Reflex Faceplate Trim Replacement, Pry up the right faceplate trim edge: passo 1, immagine 2 di 3 Scuf Reflex Faceplate Trim Replacement, Pry up the right faceplate trim edge: passo 1, immagine 3 di 3
    • The faceplate trim is secured by plastic clips.

    • At the bottom tip of the right grip, insert the flat end of a spudger or a clean fingernail between the faceplate trim and the back cover.

    • Pry up to release the faceplate trim’s bottom right clip.

  2. Scuf Reflex Faceplate Trim Replacement, Pry up the left faceplate trim edge: passo 2, immagine 1 di 3 Scuf Reflex Faceplate Trim Replacement, Pry up the left faceplate trim edge: passo 2, immagine 2 di 3 Scuf Reflex Faceplate Trim Replacement, Pry up the left faceplate trim edge: passo 2, immagine 3 di 3
    • At the bottom tip of the left grip, insert the flat end of a spudger or a clean fingernail between the faceplate trim and the back cover.

    • Pry up to release the faceplate trim’s bottom left clip.

  3. Scuf Reflex Faceplate Trim Replacement, Pry up the center of the faceplate trim: passo 3, immagine 1 di 2 Scuf Reflex Faceplate Trim Replacement, Pry up the center of the faceplate trim: passo 3, immagine 2 di 2
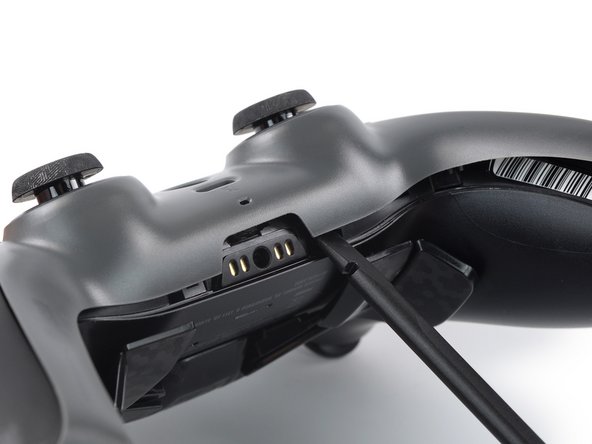
    • Insert the flat end of a spudger between the faceplate trim and the back cover, next to the headphone jack.

    • Pry up to release the plastic clips securing the center of the faceplate trim.

  4. Scuf Reflex Faceplate Trim Replacement, Remove the faceplate trim: passo 4, immagine 1 di 3 Scuf Reflex Faceplate Trim Replacement, Remove the faceplate trim: passo 4, immagine 2 di 3 Scuf Reflex Faceplate Trim Replacement, Remove the faceplate trim: passo 4, immagine 3 di 3
    • The top corners of the faceplate trim are slotted up underneath the faceplate.

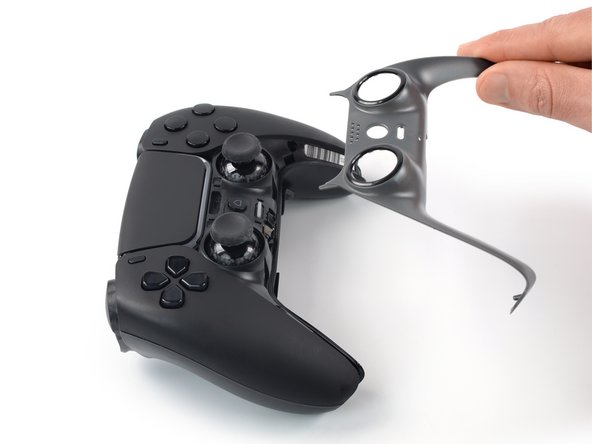
    • Lift the bottom edge of the faceplate trim and thread it up and over the thumbsticks.

    • Pull the top corners of the faceplate trim out from underneath the faceplate and remove the faceplate trim.

    • To reinstall the faceplate trim, slide its top corners under the faceplate and over the thumbsticks, then push down along the edges of the trim to engage the clips securing it.

Conclusione

To reassemble your device, follow the instructions in reverse order.

Repair didn’t go as planned? Try some basic troubleshooting, or ask our Answers community for help.

Dominik Schnabelrauch

Membro da: 11/23/16

204.358 Reputazione

682 Guide realizzate

Team

iFixit Membro di iFixit

Staff

136 Membri

17.299 Guide realizzate

0 Commenti

Aggiungi Commento

Visualizza Statistiche:

Ultime 24 Ore: 0

Ultimi 7 Giorni: 13

Ultimi 30 Giorni: 34

Tutti i Tempi: 258