Salta al contenuto principale

Samsung Galaxy Z Flip Top Glass Replacement

Cosa ti serve

  1. Samsung Galaxy Z Flip Top Glass Replacement, Preparation: passo 1, immagine 1 di 1
    • Completely power off your phone before you begin disassembly.

    • Open up the phone and set it face down on your surface.

    • Make sure your surface is clean and free of debris, as it may damage your screen.

  2. Samsung Galaxy Z Flip Top Glass Replacement, Heating the back glass.: passo 2, immagine 1 di 1
    • Prepare an iOpener and apply it to the left edge of the phone for one minute.

    • Alternatively, you could use a hairdryer, heat gun or heating mat to melt the adhesive.

    • Be careful while using a heat gun or hairdryer, as you may damage the battery or screen.

  3. Samsung Galaxy Z Flip Top Glass Replacement, Insert an opening pick: passo 3, immagine 1 di 3 Samsung Galaxy Z Flip Top Glass Replacement, Insert an opening pick: passo 3, immagine 2 di 3 Samsung Galaxy Z Flip Top Glass Replacement, Insert an opening pick: passo 3, immagine 3 di 3
    • Apply a suction cup to the glass.

    • If your glass is badly cracked, you may use clear packaging tape to cover the cracked glass. This will allow the suction cup to adhere to the glass.

    • Push down on the metal part on the hinge while pulling up on the glass until the glass begins to separate from the frame.

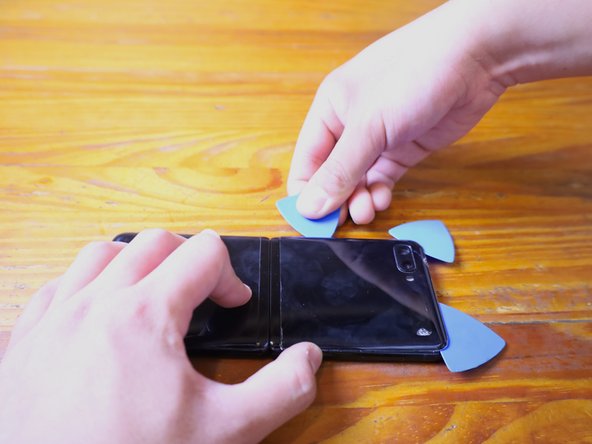
    • Insert an opening pick into the gap between the glass and the frame.

  4. Samsung Galaxy Z Flip Top Glass Replacement, Begin to slice the adhesive: passo 4, immagine 1 di 1
    • Begin sliding the pick down to the corner of the phone to slice the adhesive

    • Do not insert your pick more than a quarter of the way through, as you may damage internal components in the phone.

  5. Samsung Galaxy Z Flip Top Glass Replacement, Slice around the perimeter of the phone: passo 5, immagine 1 di 3 Samsung Galaxy Z Flip Top Glass Replacement, Slice around the perimeter of the phone: passo 5, immagine 2 di 3 Samsung Galaxy Z Flip Top Glass Replacement, Slice around the perimeter of the phone: passo 5, immagine 3 di 3
    • Repeat previous heating instructions for each side of the phone.

    • Leave an opening pick in each corner as you cut the adhesive around the phone.

  6. Samsung Galaxy Z Flip Top Glass Replacement, Lift off the glass: passo 6, immagine 1 di 1
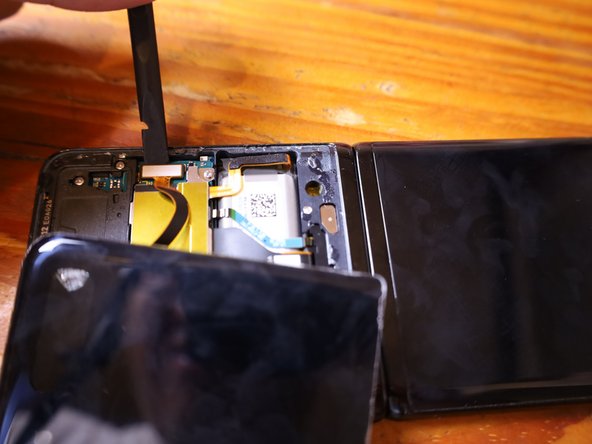
    • Lift up the rear glass of the phone to from the far left side of the phone to risk damaging the ribbon cable.

  7. Samsung Galaxy Z Flip Top Glass Replacement, Disconnecting the ribbon cable: passo 7, immagine 1 di 2 Samsung Galaxy Z Flip Top Glass Replacement, Disconnecting the ribbon cable: passo 7, immagine 2 di 2
    • Use a Uspudger to remove the plastic bracket covering the connector.

    • Use a spudger to disconnect the ribbon cable from the board.

    • Follow this guide to reinstall the rear cover and replace the adhesive.

    • Be sure to turn on your device and test your repair before installing new adhesive and resealing the device.

Conclusione

To reassemble your device, follow the above steps in reverse order.

Luke Mcalel

Membro da: 07/19/20

17 Reputazione

1 Guida realizzata

0 Commenti

Aggiungi Commento

Visualizza Statistiche:

Ultime 24 Ore: 3

Ultimi 7 Giorni: 26

Ultimi 30 Giorni: 132

Tutti i Tempi: 461