Salta al contenuto principale

Samsung Galaxy Tab 4 8.0 Verizon Display Replacement

Cosa ti serve

  1. Samsung Galaxy Tab 4 8.0 Verizon Display Replacement, Motherboard: passo 1, immagine 1 di 3 Samsung Galaxy Tab 4 8.0 Verizon Display Replacement, Motherboard: passo 1, immagine 2 di 3 Samsung Galaxy Tab 4 8.0 Verizon Display Replacement, Motherboard: passo 1, immagine 3 di 3
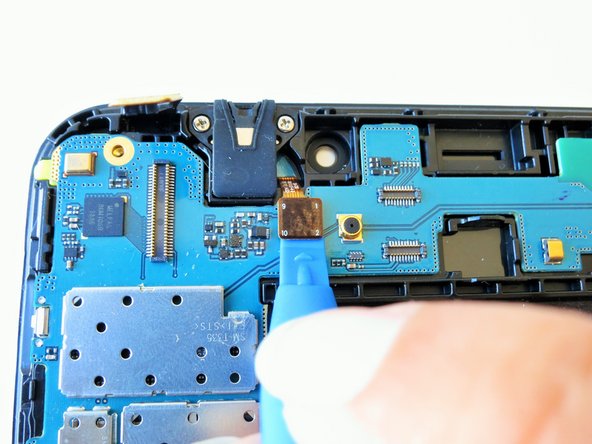
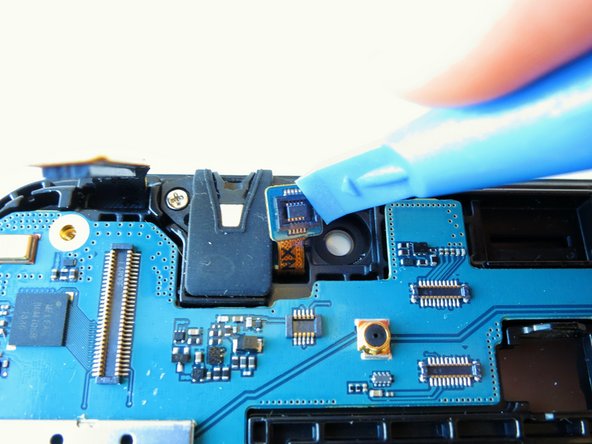
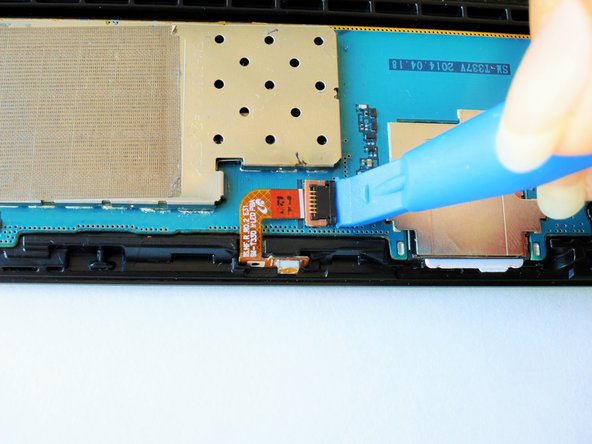
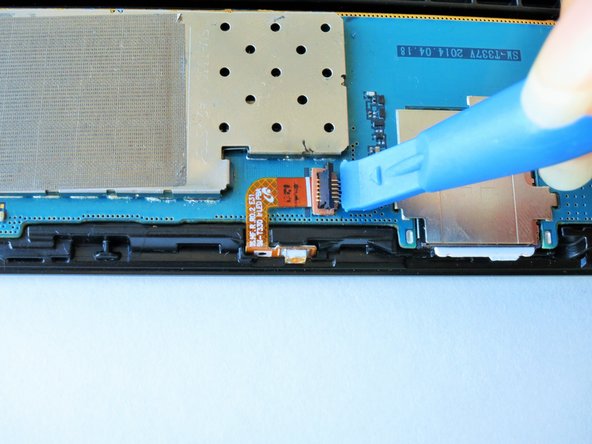
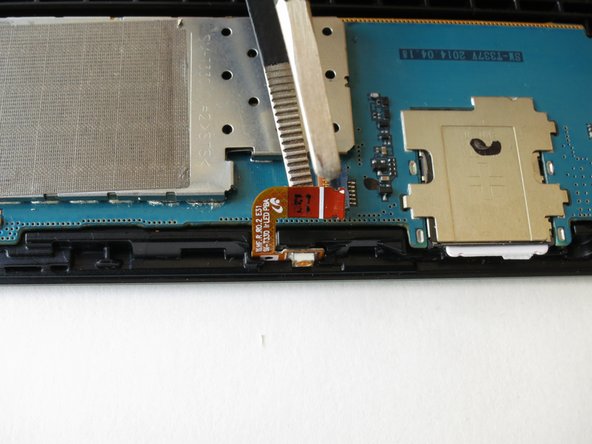
    • Slightly apply pressure and move the blue plastic opening tool downwards to pop the metallic rectangular connector from its socket on the mother board.

  2. Samsung Galaxy Tab 4 8.0 Verizon Display Replacement: passo 2, immagine 1 di 3 Samsung Galaxy Tab 4 8.0 Verizon Display Replacement: passo 2, immagine 2 di 3 Samsung Galaxy Tab 4 8.0 Verizon Display Replacement: passo 2, immagine 3 di 3
    • Slightly apply pressure and move the blue plastic opening tool downwards to pop the gold rectangular connector from its socket on the mother board.

  3. Samsung Galaxy Tab 4 8.0 Verizon Display Replacement: passo 3, immagine 1 di 3 Samsung Galaxy Tab 4 8.0 Verizon Display Replacement: passo 3, immagine 2 di 3 Samsung Galaxy Tab 4 8.0 Verizon Display Replacement: passo 3, immagine 3 di 3
    • Slightly apply pressure and move the blue plastic opening tool downwards to pop the gold square connector from its socket on the mother board.

  4. Samsung Galaxy Tab 4 8.0 Verizon Display Replacement: passo 4, immagine 1 di 3 Samsung Galaxy Tab 4 8.0 Verizon Display Replacement: passo 4, immagine 2 di 3 Samsung Galaxy Tab 4 8.0 Verizon Display Replacement: passo 4, immagine 3 di 3
    • Using the spudger gently wedge the blue wire out of its compartment.

  5. Samsung Galaxy Tab 4 8.0 Verizon Display Replacement: passo 5, immagine 1 di 1
    • Remove two 2 mm #000 Phillips screws securing the metallic charger port cover to both the logic board and the front panel.

  6. Samsung Galaxy Tab 4 8.0 Verizon Display Replacement: passo 6, immagine 1 di 3 Samsung Galaxy Tab 4 8.0 Verizon Display Replacement: passo 6, immagine 2 di 3 Samsung Galaxy Tab 4 8.0 Verizon Display Replacement: passo 6, immagine 3 di 3
    • Squeeze the metal charger port cover piece with the tweezers to gently lift it from it's place.

  7. Samsung Galaxy Tab 4 8.0 Verizon Display Replacement: passo 7, immagine 1 di 3 Samsung Galaxy Tab 4 8.0 Verizon Display Replacement: passo 7, immagine 2 di 3 Samsung Galaxy Tab 4 8.0 Verizon Display Replacement: passo 7, immagine 3 di 3
    • Carefully insert the flat end of the blue plastic opening tool under the black plastic fastener and lift.

    • Rotate your tablet counter clockwise to facilitate the process.

  8. Samsung Galaxy Tab 4 8.0 Verizon Display Replacement: passo 8, immagine 1 di 2 Samsung Galaxy Tab 4 8.0 Verizon Display Replacement: passo 8, immagine 2 di 2
    • Squeeze the golden cable with the tweezers and gently pull the cable to the left to free the end of the golden cable.

    • The golden cable is delicate so use gentle force.

  9. Samsung Galaxy Tab 4 8.0 Verizon Display Replacement: passo 9, immagine 1 di 1
    • Remove three 2 mm #000 Phillips screws securing the mother board to the front panel.

  10. Samsung Galaxy Tab 4 8.0 Verizon Display Replacement: passo 10, immagine 1 di 2 Samsung Galaxy Tab 4 8.0 Verizon Display Replacement: passo 10, immagine 2 di 2
    • Using your hands, hold the opposite ends of the mother board corners, and lift.

  11. Samsung Galaxy Tab 4 8.0 Verizon Display Replacement, Display: passo 11, immagine 1 di 1
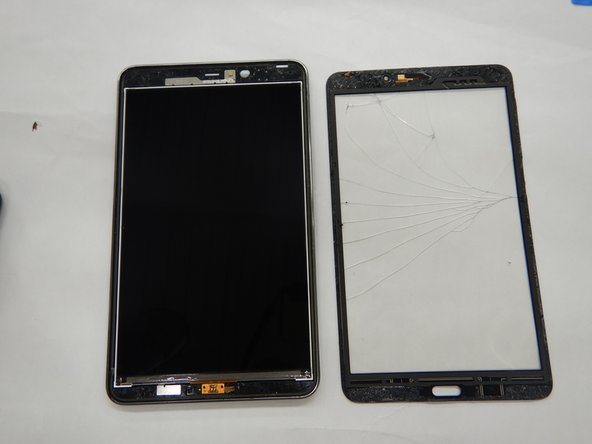
    • Insert an opening pick in between the display screen and the display frame.

  12. Samsung Galaxy Tab 4 8.0 Verizon Display Replacement: passo 12, immagine 1 di 1
    • Wedge four of the opening picks in between the display screen and the device backing on all four corners.

  13. Samsung Galaxy Tab 4 8.0 Verizon Display Replacement: passo 13, immagine 1 di 2 Samsung Galaxy Tab 4 8.0 Verizon Display Replacement: passo 13, immagine 2 di 2
    • Wedge the Jimmy between the display and the device backing at a corner.

    • Cut through the adhesive that is securing the screen to the device on all four sides.

  14. Samsung Galaxy Tab 4 8.0 Verizon Display Replacement: passo 14, immagine 1 di 2 Samsung Galaxy Tab 4 8.0 Verizon Display Replacement: passo 14, immagine 2 di 2
    • Once the display is completely disconnected from the device gently remove it without touching the screen which lies underneath.

Conclusione

To reassemble your device, follow these instructions in reverse order.

Altre 2 persone hanno completato questa guida.

Un commento

Umm….how do you remove the rear cover?

Gregg Stanley - Replica

Aggiungi Commento

Visualizza Statistiche:

Ultime 24 Ore: 0

Ultimi 7 Giorni: 0

Ultimi 30 Giorni: 0

Tutti i Tempi: 465