Introduzione
Usa questa guida per sostituire il gruppo telaio centrale sul tuo Samsung Galaxy S6. Il midframe include la bobina ad induzione, i tasti accensione e volume, l'obiettivo della fotocamera e l'altoparlante.
Questa guida richiede la rimozione del vetro posteriore. Rimuovere il vetro posteriore distrugge l'adesivo che lo tiene in posizione. Segui questa guida per reinstallare il vetro posteriore.
Cosa ti serve
-
-
Inserisci una graffetta o lo strumento di estrazione SIM nel foro del vassoio della scheda SIM presente sul lato del pulsante di accensione.
-
Premi per sbloccare il vassoio SIM ed estrarlo parzialmente.
-
-
-
-
Riempi una pentola o una padella con abbastanza acqua per immergerci un iOpener.
-
Scalda l'acqua finché non bolle. Spegni il fuoco.
-
Posiziona l'iOpener nell'acqua calda per 2-3 minuti. Assicurati che l'iOpener sia completamente immerso nell'acqua.
-
Usa delle pinze per estrarre l'iOpener scaldato dall'acqua calda.
-
Asciuga accuratamente l'iOpener con un asciugamano.
-
Il tuo iOpener è pronto all'uso! Se devi scaldare di nuovo l'iOpener, scalda l'acqua fino all'ebollizione, spegni il fuoco e immergi l'iOpener in acqua per 2-3 minuti.
-
-
-
Metti l'iOpener sopra il pannello per circa due minuti per ammorbidire l'adesivo lungo i bordi del vetro.
-
Sposta l'iOpener per scaldare la sezione rimanente del pannello per altri due minuti.
-
-
-
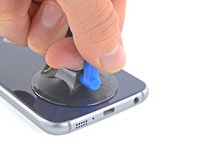
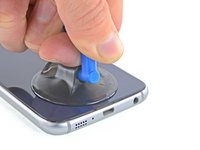
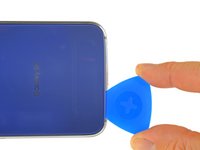
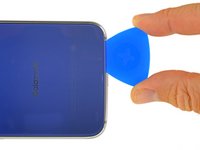
Una volta che il vetro posteriore è molto caldo al tatto, applica una ventosa vicino al bordo inferiore del vetro.
-
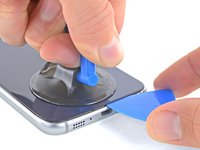
Solleva la ventosa per creare una piccola fessura al di sotto del vetro posteriore e inserisci un plettro di apertura nella fessura stessa.
-
Opzionalmente, una volta che il plettro di apertura è inserito, puoi aggiungere qualche goccia di alcol isopropilico nella fessura per favorire il distacco dell'adesivo nei passi successivi.
-
-
Attrezzo utilizzato in questo passaggio:Tweezers$4.99
-
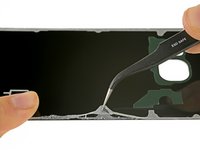
Usa delle pinzette per staccare tutto l'adesivo rimasto sulla scocca del telefono.
-
Ripulisci le aree di incollaggio con alcol isopropilico ad elevata concentrazione (almeno 90%) e un panno privo di lanugine. Passa il panno in un'unica direzione, non avanti e indietro. In questo modo prepari la superficie per accogliere il nuovo adesivo.
-
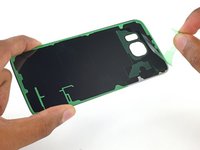
Stacca la pellicola adesiva dal nuovo vetro posteriore, allinea con cura un bordo del vetro contro la scocca dell'S6 e premi con decisione il vetro sul telefono.
-
-
-
Rimuovi le 13 viti Phillips #00 da 3,5 mm che fissano il telaio centrale al telefono.
-
-
-
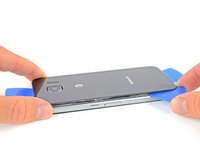
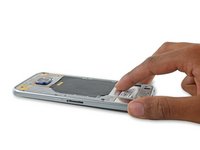
Afferra saldamente i bordi del gruppo telaio centrale.
-
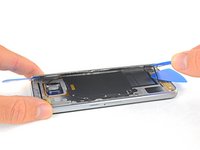
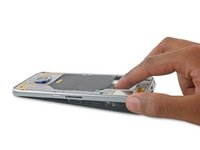
Solleva il gruppo telaio centrale mentre tieni premuta verso il basso la batteria per separare il telaio dal resto del telefono.
-
Mentre sollevi il telaio centrale, stai attento a non impigliarlo sul jack cuffie o sulla porta di ricarica.
-
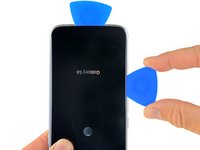
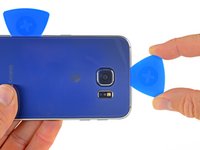
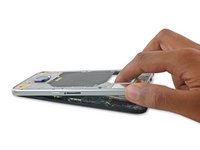
Una volta che il telaio centrale è parzialmente separato, fai scorrere con attenzione un plettro attorno ai bordi restanti del telefono per separare la parte superiore del telaio centrale.
-
Per evitare di danneggiare la porta jack, rimuovi prima la parte superiore del telaio centrale, quindi spingi verso il basso il telaio per sganciarlo dalla porta jack.
-
Se non riesci a separare il telaio, devi forse riscaldare e applicare un iOpener sui bordi del display per ammorbidire l'adesivo dello schermo.
-


Per rimontare il tuo dispositivo, segui queste istruzioni in ordine inverso. Segui questa guida per reinstallare il vetro posteriore.
Per rimontare il tuo dispositivo, segui queste istruzioni in ordine inverso. Segui questa guida per reinstallare il vetro posteriore.
Annulla: non ho completato questa guida.
Altre 18 persone hanno completato questa guida.
Un ringraziamento speciale a questi traduttori:
100%


Questi traduttori ci stanno aiutando ad aggiustare il mondo! Vuoi partecipare?
Inizia a tradurre ›

6 Commenti
Step 18
Is it really that "simple" to separate the midframe from the front of the phone? In most videos (even the one on ifixit) a suction cup is used (after warming the front) with some prying tools.
So, does Step 18 really work?
It appears that the front is hold together by only 4 adhesives in the corners. Are this damaged during the front removal process? (is there a replacement kit?)
Just another question, I damaged the heart sensor plastic cover, is it possible to buy just that part or do I need to buy a complete midframe?
Can this step be exactly with a simple push as stated? Other sources required focusing heat on the 4 corners and run through with a pick....?
Secondly, how can one avoid damaging the lamination under the glass while removing it or trying to get the first foothold with the pick. Most guides I have seen appear to skip this step.
I have seen one phone parts site (EtradeSupply) list all different variants of the mid housing (G920F, G920V, G920R etc). But another site (WitRigs) has just one, as if they aren't specific.
Does anyone know? Because i'm in Australia and can't find G920i variant.
Also, has anyone simply swapped over the antennas, and crimped them onto the new housing?
Ok Guys I am definitely !#^&@@ off right now.... but to the point.
Please Edit to this guide --> @Step 18:
First of all: Heat the for corners with your iOpener to lose the adhesive which sits in the corners.
Be very very gentle when you push down on the battery and try to put a little pressure onto or maybe into the headphone jack when you first encounter that the display gets lose, because the headphone-jack fits very well in the frame and holds on a little corner.
Only go around the whole display with a spudger when the adhesive is really warm to lose it when it doesn't come out as easy as you thought. Because otherwise you may face that the display to display-glass laminate gets damaged. That just happened to me at the upper display side... so to get a perfect new looking phone I have to replace that as well....EXPENSIVE :(
Hope this may help you guys.
but ... nevertheless ... thank you guys from IFixit for your continous effort to help people repairing there stuff - heads up :-)
Hi Jakob, thanks for your input! When writing this guide we used a device that had been previously disassembled, so our experience may have been different from yours. Just to be clear: you have an issue with step 18 because the adhesive between the midframe and front assembly is very strong and simply pushing the battery is not adequate? Are there other steps that need to be adjusted?
And, as a general note, you can edit this guide yourself! When you hover your cursor over any particular step, an "Edit" button will appear. Alternatively, you can scroll to the top of the page and click the "Edit" tab up there.