Introduzione
Saitek X52 Pro is a great Flight System Controller, however it is not without flaws.
For me as well as for some other users, the shooting trigger sometimes stops working. This doesn't mean you have to throw it away, instead with a little bit of patience, you can fix it yourself.
Cosa ti serve
-
-
Patience :)
-
You need 2 small screw drives with a Phillips (cross) PH1 head and Torx (star) T10 head.
-
A list of screw drive heads can be hound here http://en.wikipedia.org/wiki/List_of_scr...
-
-
-
With the Phillips screwdrive unscrew the #1 to #4 screws in Fig. 1.
-
Using the Torx T10 head, unscrew the #5 (Fig. 1), #6, #7 and #8 screws (Fig. 2)
-
Using your hand, unscrew #9 (Fig. 2). Please note that you cannot completely remove this screw, but you don't need to do this anyway.
-
-
-
-
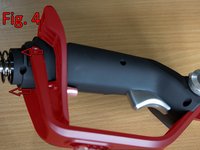
Carefully remove the plastic bracket and the support holding the "Pinkie trigger" by pushing it towards the trigger (Fig. 4).
-
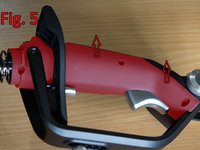
Remove the stick cover that will expose the contacts and wiring (Fig. 5)
Under a small plastic cap, on the adjustment knob for the handrest. Is a REVERSE threaded phillips head screw. Removing this, allows you to remove the adjustment knob. this permits the handle being removed from the hand rest. Which then allows you to remove the 3 phillips head screws holding the pinkie switch to the handrest. Reducing the risk of damaging the wires.
-
-
-
Note the small metal plate.
-
Bend it just a little from the middle so that pushing the trigger actually pushes the small blue switch inside the stick.
-
Test the trigger before putting back the plastic cover
Dont bend the metal plate, adjust the plastic pushing out from inside the triggers by tightening down the two small screws, or loosen them as needed
-


To reassemble your device, follow these instructions in reverse order.
To reassemble your device, follow these instructions in reverse order.
Annulla: non ho completato questa guida.
Altre 22 persone hanno completato questa guida.

25 Commenti
Amazing this is what I was exactly looking for!! My trigger stopped work but only heard a single click. Once i opened it up one of the contacts was stuck down. A little adjustment and once again it was working. Getting the hand guard off was very tricky. I did damage the cable guide thing for the pinky switch but it still works. Thank you soo much!!!
Fixed it!! Thank you so much for this guide! I ended up over bending it and then tried to straighten it out again and then it shot off somewhere, but luckily the piece fits back in and then i tweaked it until it worked! -Nate
This helped a great deal! The Thumb POV had a screw that dropped out and prevented it from going left. By using this I found out why it wasn't working by disassembling it and solved my problem. Thanks!
I was kind of hoping this would be a full Disassembly, as i have much more intricate problem with mine.
Sorry to hear this Paul, however if you are feeling brave enough, perhaps go further and create another guide for this device.
Cri Cri -
Agreed. I am having an issue with the Yaw Axis sensor, and had hoped this would at least help me to find out which sensor needs cleaned/repaired and how to get to it.
Derek W -
I agree with the above statement. if there is on can you point us to it?
My problem is that *!&$!&$^ 3-position dial!!! It has no detents so I get absolutely no tactile feedback on what *!&$!&$^ position it is in. I have to look at both the %#*@ led on the stick and then double check on the throttle display as it can easily be in between positions in which case the throttle display goes blank and you lose all control of your ship. This has cost me Millions of credits due to lost ships in Elite Dangerous and has had me on the verge of having a stroke from getting so upset!!! Is there a way to fix or replace that &&^&^$^ dial with one that actually has solid clicks for each position??????
Not to be that guy, but I would say to just not use the dial? Unfortunately it's a pretty crummy design, but on my X52 Pro it has detents of some sort on that dial. They're poor and not very tactile, but they're there. Are they not present on the standard X52 or maybe you got a bad one? I'm an avid Elite player, and haven't found the need for more than one layout at any time as long as I wisely use the pinky trigger as a sort of control/command button to effectively double the number of inputs on the hotas, but if you really want multiple layouts you could always set up a keyboard macro to change it on the fly.
Derek W -
Thanks this help, but I think I actually damaged the pinky cable, but nothing visual. the pinky swich isn’t responding.. Any suggestions on how to fix it?
You might need to solder the thin wire back… for this you would need a soldering iron (or “pen”) or ask someone to do it for you.
Cri Cri -
Great guide but is it possible to disassemble the rest of the joystick that part where the hats are and the mode switch? I’m struggling with the removal of the hats.
Did not go further, sorry and I am not risking further damage for mine, since it works perfectly now :)
Cri Cri -
My problem lies with the metal stick being loose so that there is play between the joystick handle and metal post to the base. Also the P2 switch does not work so I have to open the base to tweak or replace the switch. All of the LEDs work fine. I only have these two issues. Have you any exploded photos of these?
Nope, those are the only photos I took, sorry
Cri Cri -
I was able to dissemble the stick, but could not figure out how to tighten the ring around the stick. At least your article showed how to take it apart, thank you.
Thanks for this guide. I had a slightly different problem, my main trigger worked, but it somehow got stuck, so I couldn’t physically push it all the way in to reach the second position.
Turns out the screws for the small piston thingy inside the trigger button had come loose, causing it to block instead of being compressed as it slid along the metal plate. While your guide didn’t cover my exact problem, it had all the steps I needed to disassemble the thing and find the issue without breaking anything.
Thanks for the tutorial. The trigger issue I had was that the casing of the main trigger micro switch was coming apart at the seams because the black tabs on the side of it that hold it together were broken. Really, the micro switch should be replaced but I put some super glue on the black tab area and on the seams of the micro switch to hold it together and that seems to fix it well enough to work again.
See linked picture showing the main and secondary trigger switches and the repair on the main switch. Also see the main switch broken black tab and the intact secondary switch black tab.
https://drive.google.com/file/d/1itVSpVt...
NOTE: If the main trigger switch is not working, the secondary trigger switch will not function either.
I used this guide for fixing the Z-axis pot. I agree with Paul that a full disassembly would be greatly appreciated, but with how intricate this stick is I can see why no one wants to cover a full disassembly.
One thing I would recommend is that I had much better results by removing the three screws holding the pinky trigger to the palm rest. I could not get it to pop out. However, by removing the pinky trigger housing allowed more space to work, and I could service the sled for the trigger too.
i posted a guide with more pics.Saitek/logitech X52 Pro/not pro Wiring Replacement
My X52 Pro joystick LED Lights up but none of the buttons are working, any idea?
Is there a similar instruction for the Logitech X52 Pro Throttle, I have no illumination on the X52's Screen.
there's 4 screws on the bottom. and a few on the board itself once inside. No illumination would suggest a couple things. 1 did you check the software? the software controls the illumination, and it be turned off.(control panel>devices and printer> right click on your hotas, and select either properties or there's something else i think you want on that right click menu> then the tabs at the top.
Or maybe the wire has broken off? unlikely, but if it got caught up in the throttle assembly, maybe?