Salta al contenuto principale

Photive Rain Battery Replacement

Cosa ti serve

  1. Photive Rain Battery Replacement, Back Panel: passo 1, immagine 1 di 1
    • Turn the speaker off before disassembling.

    • Remove the suction cup from its groove by twisting and turning it.

  2. Photive Rain Battery Replacement: passo 2, immagine 1 di 1
    • Remove the four 8.5 mm screws from the back panel of the speaker by using the Phillips #1 Screwdriver.

    • Remove back panel

  3. Photive Rain Battery Replacement, Battery: passo 3, immagine 1 di 2 Photive Rain Battery Replacement, Battery: passo 3, immagine 2 di 2
    • Remove the plastic cover in front of the battery slot.

    • Unscrew all the 8.5mm screws that hold the cover to the slot.

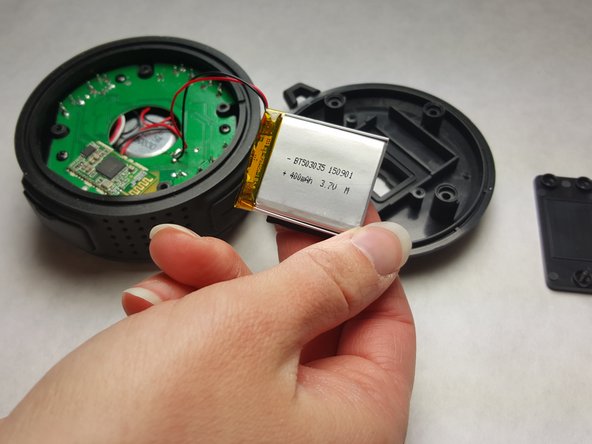
    • Separate the battery from the back panel as shown in photograph 3.

    • Caution: manipulation of the device while the battery is still connected to the motherboard may result in electric shock.

  4. Photive Rain Battery Replacement: passo 4, immagine 1 di 1
    • Remove the battery from the motherboard.

    • Use a soldering pen to remove the solder connecting the battery wires to the motherboard.

    • Click here to access the iFixit Soldering Guide. This will provide a safe and instructive manual on the usage of soldering pens.

Conclusione

To reassemble your device, follow these instructions in reverse order.

Altre 2 persone hanno completato questa guida.

Team

IUPUI, Team 1-4, Harley Spring 2016 Membro di IUPUI, Team 1-4, Harley Spring 2016

IUPUI-HARLEY-S16S1G4

3 Membri

4 Guide realizzate

0 Commenti

Aggiungi Commento

Visualizza Statistiche:

Ultime 24 Ore: 0

Ultimi 7 Giorni: 0

Ultimi 30 Giorni: 5

Tutti i Tempi: 492