Salta al contenuto principale

Photive Hydra Bluetooth Connector Replacement

Cosa ti serve

  1. Photive Hydra Bluetooth Connector Replacement, Face Plate and Back Plate: passo 1, immagine 1 di 1
    • Unscrew all twelve Hex Head 1.5 (Length-3/8", Head- 1/8") screws using a 1.5mm hex screwdriver.

  2. Photive Hydra Bluetooth Connector Replacement: passo 2, immagine 1 di 2 Photive Hydra Bluetooth Connector Replacement: passo 2, immagine 2 di 2
    • Use a plastic opening tool to pry off the face plate.

  3. Photive Hydra Bluetooth Connector Replacement: passo 3, immagine 1 di 1
    • Remove the rubber casing by using your fingers to pull off. Be sure not tear or rip rubber casing.

  4. Photive Hydra Bluetooth Connector Replacement: passo 4, immagine 1 di 1
    • Flip the device upside down and remove all eight Phillips (Length-3/8", Head-1/8") Screws using a standard #1 Phillips screwdriver.

  5. Photive Hydra Bluetooth Connector Replacement: passo 5, immagine 1 di 2 Photive Hydra Bluetooth Connector Replacement: passo 5, immagine 2 di 2
    • Use plastic opening tool to pry off back plate.

    • Move the plastic opening tool along the the device to further pry open the device.

    • Be careful when taking this plate off. You may accidentally damage the water proof seal.

  6. Photive Hydra Bluetooth Connector Replacement, Battery (Prerequisite): passo 6, immagine 1 di 2 Photive Hydra Bluetooth Connector Replacement, Battery (Prerequisite): passo 6, immagine 2 di 2
    • Identify the two Phillips (Length-5/16", Head-1/8") screws holding the battery in place and remove them using a #1 screwdriver.

  7. Photive Hydra Bluetooth Connector Replacement: passo 7, immagine 1 di 1
    • Remove the ICR18650-26M battery from its position by pulling upwards and out of the casing.

  8. Photive Hydra Bluetooth Connector Replacement, Bluetooth Connector: passo 8, immagine 1 di 2 Photive Hydra Bluetooth Connector Replacement, Bluetooth Connector: passo 8, immagine 2 di 2
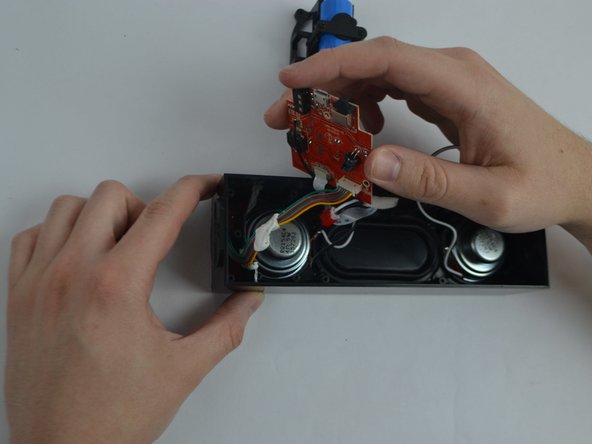
    • Identify the motherboard and the three Philips (Length-1/8,Head-1/8) screws and remove them using a #1 Phillips screwdriver.

  9. Photive Hydra Bluetooth Connector Replacement: passo 9, immagine 1 di 2 Photive Hydra Bluetooth Connector Replacement: passo 9, immagine 2 di 2
    • Pull the motherboard up and out to dislodge it.

    • Do not fully remove your motherboard to prevent any unwanted severing of connections.

  10. Photive Hydra Bluetooth Connector Replacement: passo 10, immagine 1 di 1
    • Identify the Bluetooth connector device.

  11. Photive Hydra Bluetooth Connector Replacement: passo 11, immagine 1 di 1
    • The two solder points shown are to be removed by use of a soldering gun. Remove and replace the component with a functioning connector device. Refer to the link below for soldering techniques. Come saldare e dissaldare componenti elettrici

Conclusione

To reassemble your device, follow these instructions in reverse order.

Team

USF Tampa, Team 11-3, Cheng Spring 2016 Membro di USF Tampa, Team 11-3, Cheng Spring 2016

USFT-CHENG-S16S11G3

5 Membri

6 Guide realizzate

Un commento

So any leads on where to get the module?

Charles - Replica

Aggiungi Commento

Visualizza Statistiche:

Ultime 24 Ore: 0

Ultimi 7 Giorni: 0

Ultimi 30 Giorni: 1

Tutti i Tempi: 301