Salta al contenuto principale

Philips Sonicare 2 Series Circuit Board Replacement

Cosa ti serve

  1. Philips Sonicare 2 Series Circuit Board Replacement, Philips Sonicare 2 Series Disassembly: passo 1, immagine 1 di 1
    • Pull upwards to remove the brush head from the top of the device.

  2. Philips Sonicare 2 Series Circuit Board Replacement: passo 2, immagine 1 di 1
    • Remove the 12 mm T8 Torx screw from the bottom of the toothbrush. After removing the screw, pry off the base with a plastic opening tool.

  3. Philips Sonicare 2 Series Circuit Board Replacement: passo 3, immagine 1 di 2 Philips Sonicare 2 Series Circuit Board Replacement: passo 3, immagine 2 di 2
    • Remove the internal electronic mechanism from the housing by prying the red clips shown in the figure. This removes the charging port.

    • Be very careful not to damage the charging port during this step. Otherwise you will have to solder this part back to the device as shown in the second figure.

  4. Philips Sonicare 2 Series Circuit Board Replacement: passo 4, immagine 1 di 1
    • Next you will be able to remove the internal electronic mechanism as shown in the figure.

  5. Philips Sonicare 2 Series Circuit Board Replacement: passo 5, immagine 1 di 1
    • Remove the white battery cover as shown in the figure.

  6. Philips Sonicare 2 Series Circuit Board Replacement: passo 6, immagine 1 di 1
    • Remove the white circuit board cover as shown. This cover will require you to pry off the piece from the groves .

  7. Philips Sonicare 2 Series Circuit Board Replacement, Circuit Board: passo 7, immagine 1 di 1
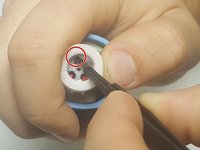
    • Pry away the battery using an opening tool from the battery housing. This will break the circuit and avoid electric shock.

  8. Philips Sonicare 2 Series Circuit Board Replacement: passo 8, immagine 1 di 1
    • Desolder the circuit board from the motor as shown.

  9. Philips Sonicare 2 Series Circuit Board Replacement: passo 9, immagine 1 di 1
    • Desolder the circuit board from the housing as shown to remove the board

Conclusione

To reassemble your device, follow these instructions in reverse order.

Un'altra persona ha completato questa guida.

Team

IUPUI, Team S6-G2, Baechle Fall 2017 Membro di IUPUI, Team S6-G2, Baechle Fall 2017

IUPUI-BAECHLE-F17S6G2

3 Membri

8 Guide realizzate

0 Commenti

Aggiungi Commento

Visualizza Statistiche:

Ultime 24 Ore: 0

Ultimi 7 Giorni: 9

Ultimi 30 Giorni: 27

Tutti i Tempi: 1,613