Salta al contenuto principale

Nobis NB07 Cameras Replacement

Cosa ti serve

  1. Nobis NB07 Cameras Replacement, Opening the case: passo 1, immagine 1 di 1
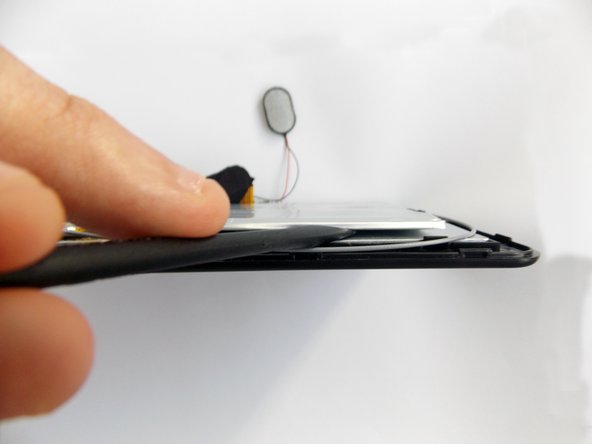
    • Look towards the topside of the tablet, where the power button is located.

    • Insert a plastic opening tool in the crack between the two parts of the case.

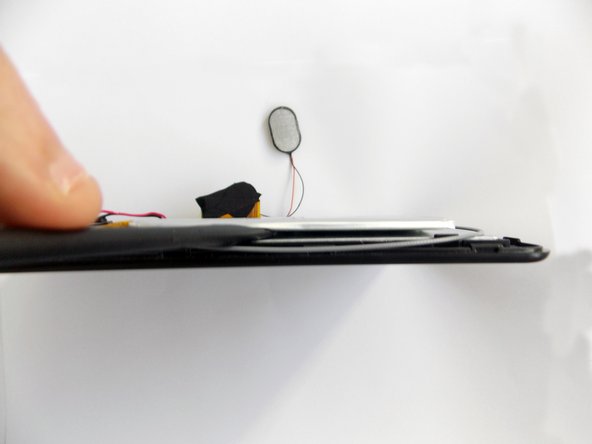
    • Move it gently back and forth to open the case.

  2. Nobis NB07 Cameras Replacement: passo 2, immagine 1 di 3 Nobis NB07 Cameras Replacement: passo 2, immagine 2 di 3 Nobis NB07 Cameras Replacement: passo 2, immagine 3 di 3
    • With the plastic opening tool in the opening between the two sides of the case, slide the tool along the tablet's border to separate the two sides completely.

    • Be careful when you separate the two halves. Open the case from the opposite side of the camera, there is a cable connecting both halves of the case.

  3. Nobis NB07 Cameras Replacement, Replacing the battery: passo 3, immagine 1 di 3 Nobis NB07 Cameras Replacement, Replacing the battery: passo 3, immagine 2 di 3 Nobis NB07 Cameras Replacement, Replacing the battery: passo 3, immagine 3 di 3
    • Remove the tape holding the battery in place.

  4. Nobis NB07 Cameras Replacement: passo 4, immagine 1 di 3 Nobis NB07 Cameras Replacement: passo 4, immagine 2 di 3 Nobis NB07 Cameras Replacement: passo 4, immagine 3 di 3
    • Insert the flat end of the spudger tool in the crack beneath the battery.

    • Move the spudger tool carefully side to side to remove the glue that is holding the battery in place.

    • This is a soft battery, so a little bending is expected.

  5. Nobis NB07 Cameras Replacement: passo 5, immagine 1 di 1
    • After the battery is unglued, locate the cables that connect it to the motherboard.

    • Annotate where each color goes to make the reassembly easier.

  6. Nobis NB07 Cameras Replacement: passo 6, immagine 1 di 2 Nobis NB07 Cameras Replacement: passo 6, immagine 2 di 2
    • Desolder the cables with a soldering iron and use a desoldering braid to remove the solder.

    • Review the Ifixit soldering guide if you need help soldering.

    • You can now remove the battery.

  7. Nobis NB07 Cameras Replacement, Removing the cameras: passo 7, immagine 1 di 3 Nobis NB07 Cameras Replacement, Removing the cameras: passo 7, immagine 2 di 3 Nobis NB07 Cameras Replacement, Removing the cameras: passo 7, immagine 3 di 3
    • Remove the black tape covering the cameras power cable.

  8. Nobis NB07 Cameras Replacement: passo 8, immagine 1 di 2 Nobis NB07 Cameras Replacement: passo 8, immagine 2 di 2
    • Use the spudger tool to pry upwards the ZIF connector and release the power cable.

  9. Nobis NB07 Cameras Replacement: passo 9, immagine 1 di 3 Nobis NB07 Cameras Replacement: passo 9, immagine 2 di 3 Nobis NB07 Cameras Replacement: passo 9, immagine 3 di 3
    • With the power cable disconnected, the backside camera is free. However, both cameras are sequentially connected through the power cable; the front side camera is glued to the motherboard.

    • Using tweezers, carefully grab the front camera and twist slowly.

    • The camera should release easily, do not twist too hard.

    • You can now remove the cameras.

Conclusione

To reassemble your device, follow these instructions in reverse order.

Team

USF Tampa, Team 5-5, Brown Winter 2015 Membro di USF Tampa, Team 5-5, Brown Winter 2015

USFT-BROWN-W15S5G5

3 Membri

10 Guide realizzate

0 Commenti

Aggiungi Commento

Visualizza Statistiche:

Ultime 24 Ore: 0

Ultimi 7 Giorni: 0

Ultimi 30 Giorni: 1

Tutti i Tempi: 121