Introduzione
If the Nintendo 3DS XL 2015 directional pad is malfunctioning or not working at all, this replacement guide will help you fix the problem.
Cosa ti serve
-
-
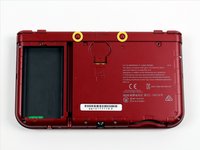
Place the 3DS upside down. Remove the game card, headphones, charging cable, stylus, or anything else that may be connected to the device.
-
-
-
Using a JIS #00 screwdriver, remove the six 6mm screws around the edges of the secondary cover.
-
-
-
-
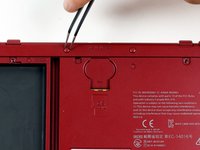
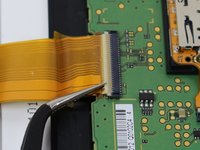
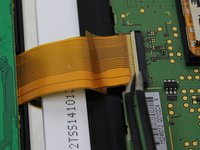
Use tweezers to flip up the small, hinged locking flap in order to unlock the ZIF connector securing the Circle Pad ribbon.
-
Slide the ribbon out of the ZIF connector.
-
-
-
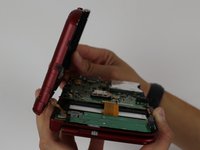
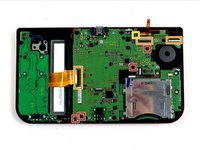
Using tweezers, gently pull the four marked ribbons out of the ZIF connectors along the sides of the motherboard.
-
Three of the ribbon connectors have plastic clamping flaps that cover the ribbon to prevent slippage. Use the tweezers to flip them up before ribbon removal.
-
This one ribbon connector may also have a plastic clamping flap, but it's not like the others, rather it's similar to the one used for the Circle Pad. Gently flip up the flap on the side opposite the ribbon cable to remove the cable.
-
-
-
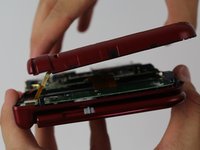
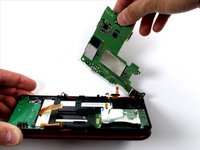
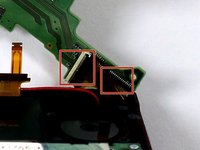
Carefully pivot the motherboard 90 degrees toward the hinges to reveal two more ZIF connectors on the underside of the motherboard.
-
Both have latches that must be flipped up. The left, longer latch is black; the right, shorter one is white. Flip up the flaps, slide the ribbons out and remove the motherboard.
-
-
-
Remove five 5mm screws from the game card reader panel using a JIS #000 screwdriver.
-
The game card reader can now be removed and replaced.
-
-
-
Using the JIS #000, remove four 3mm screws from the square panel.
-
Remove the panel by lifting it upward.
-


To reassemble your device, follow these instructions in reverse order.
To reassemble your device, follow these instructions in reverse order.
Annulla: non ho completato questa guida.
Altre 5 persone hanno completato questa guida.
Team

Cal Poly, Team 24-4, Lancaster Spring 2015 Membro di Cal Poly, Team 24-4, Lancaster Spring 2015
CPSU-LANCASTER-S15S24G4
4 Membri
30 Guide realizzate
11 Commenti
FYI: Under Tools you state a Philips #000 is needed but in the instructions you have JIS #000.
Submitted an edit! I corrected some of the bit sizes in the instructions as well (in our repair, a #00 was never used).
FYI: Under Step 13, you missed 1 ribbon cable that also needs to be detached in order for the motherboard to be separated. It is the tiny IC housed in a small PCB near the bottom left of the C-Stick. In fact, this little ribbon gets separated and reattached throughout your guide pictures starting with step 8. Here is a link to the ribbon in question (Note: Pic borrwed from Step 12 which highlights the red cable. Look for my lighter arrow which shows the missing ribbon): http://i.imgur.com/0V7QI4i.jpg
Thanks for the tip! The ribbon cable has been added to Step 12. Feel free to edit it to add anything specific about the procedure.
Total lack of information in these fix instructions about the new black zif connectors. The ones we have all be used to for years are mention in detail (eg. the one for the toddle stick). But nothing about the new ones that supply the home button, mic etc. I have today totally wrecked a customer’s new 3DS XL as a direct result of following this guide. As these new zifs were not mentioned I thought (stupidly) they should just be flipped up but obviously this destroys them. Whoever makes these guides would know these clips to be a problem but neglected to warn would be fixers about them (was it deliberate as I cannot think why you would neglect such a crucial fact). I am still not sure how they operate -. Yours felling stupid for trusting ifix and also very let down.