Introduzione
The Nikon Coolpix P90 is a high-quality compact digicam with a magic zoom. It was originally released in 2009 and is now archived by Nikon. Unfortunately, the camera’s flash may wear out or break due to mini-cracks in the flash tubes, exploding bulbs, or other wear and tear. If your Nikon Coolpix P90 flash does not fire correctly, it is most likely time to replace the flash bulb.
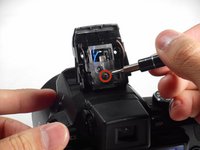
This repair requires you to remove the solder connecting the wires to the light bulb. Desoldering the wires is the most involved task of this repair, but iFixit believes in you. For additional support, follow the IFixit soldering instructions to avoid burning yourself or damaging the camera.
Cosa ti serve
-
-
Use your finger to push the latch of the compartment door to the center of the camera body, per image 1.
-
Push the door open, and remove the existing battery with your fingers, per images 2-3.
-
-


To reassemble your device, follow these instructions in reverse order.
To reassemble your device, follow these instructions in reverse order.
Team

Cal Poly, Team 20-14, Maness Winter 2015 Membro di Cal Poly, Team 20-14, Maness Winter 2015
CPSU-MANESS-W15S20G14
4 Membri
7 Guide realizzate